
Installation Guide
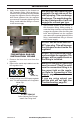
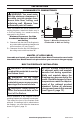
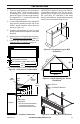
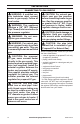
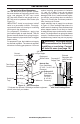
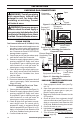
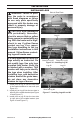
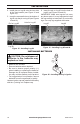
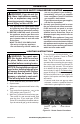
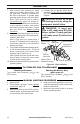
Table Of Contents
- Safety
- Specifications
- Qualified Installing Agency
- Product Features
- Product Identification
- Unpacking
- Local Codes
- Water Vapor: A By-Product Of Unvented Room Heaters
- Air For Combustion and Ventilation
- Installation
- Operation
- Inspecting Burners
- Care And Maintenance
- Troubleshooting
- Parts
- Replacement Parts
- Accessories
- Service Hints
- Technical Service
- Warranty

www.factorybuysdirect.com
11200373-01A
INSTALLATION
Use only the cap supplied on the
regulator. Do not use an off the
shelf pipe plug. This can damage
the plunger. The supplied regula-
tor cap is designed so it will not
engage the unused gas type.
4. Apply thread sealant to the threads on
the connection tting. While pushing in,
rotate the tting clockwise until the threads
engage the regulator. After the tting has
been hand tightened into the regulator
use a wrench to complete tightening of the
tting. Install additional tting to connect
to the house supply.
DO NOT use an off the shelf 3/8"
NPT pipe plug. This will damage
the plungers located inside the
regulator.
DO NOT try to remove the plung-
ers from inside the regulator. The
plunger will be pushed back as
the tting is installed.
Make sure the type of gas being
used is correct. Check to make
sure the connection tting is in
the correct inlet on the regula-
tor. Refer to Connecting to Gas
Supply, page 14.
If you are using natural gas
and the pilot will not light, see
Troubleshooting, page 24.
Metal Cap
Metal Cap
DO NOT REMOVE
Yellow Natural Gas Plunger
Install Gas Fitting Here
2. Apply thread sealant to the threads on
the connection tting. While pushing in,
rotate the tting clockwise until the threads
engage the regulator. After the tting has
been hand tightened into the regulator
use a wrench to complete tightening of the
tting. Install additional tting to connect
to the house supply.
FOR NATURAL GAS (NG)
INSTALLATION: YELLOW
1. Remove the blue dust cover from the
regulator.
2. Remove the metal cap installed over the
NG regulator inlet.
3. Install metal cap over LP/Propane regulator
inlet. This will keep debris out of regulator.