INSTRUCTION MANUAL COMPRESSOR WINE COOLER This manual contains important information including safety and installation instructions of the appliances. Please read it carefully before use and follow all safety information & instructions. It is recommended to keep this manual for easy reference so that you can be familiar with the operation of the appliance.
CONTENTS IMPORTANT SAFETY INFORMATION �����������������������������������������������������1 STURCTURE AND DESCRIPTION ������������������������������������������������������������2 ●● BUILT-UNDER SERIES (Built under a kitchen table top) ��������������������������������������������� 2 ●● FLOOR-STANDING SERIES ��������������������������������������������������������������������������������������������������������������������� 5 ACCESSORY INSTALLATION BEFORE OPERATING ��������������������������������5 ●● UNPA
INSTRUCTION MANUAL IMPORTANT SAFETY INFORMATION Before use the appliance, please properly position and install it as described in this manual. To avoid the risk of fire, electrical shock, or injury when using the appliance, follow these basic precautions: • The appliance is intended to be used exclusively for the storage of wine. • Make sure the voltage/current marked on the rating label corresponds with your supply voltage.
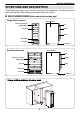
INSTRUCTION MANUAL STURCTURE AND DESCRIPTION The following pictures only show the structure of the appliance. The dimension and shelf quantity may differ among the models of the same series.
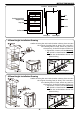
INSTRUCTION MANUAL 295mm width Installation Drawing (mm) 595mm width Installation Drawing (mm) BUILT-IN-COLUMN SERIES (Built into a kitchen cabinet) Single Zone Structure Condenser Outside Canbinet Touch-Key Control Panel & Digital Display Door Handle Deep Shelf Shallow Shelf Gasket Leveling Foot .3.
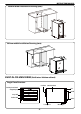
INSTRUCTION MANUAL Condenser Outside Canbinet Door Touch-Key Control Panel & Digital Display Handle Deep Shelf Gasket Shallow Shelf Leveling Foot Mounting Bar 455mm Height Installation Drawing 451 453 1. Before inserting the unit into the kitchen cabinet, please unscrew the original 4 leveling feet (in white), and screw the 2 short leveling feet (in black), which are packed as the accessory, to the front bottom of the unit. 2.
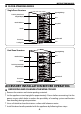
INSTRUCTION MANUAL FLOOR-STANDING SERIES Single Zone Structure Upper Right Hinge Touch-Key Control Panel & Digital Display Door Outside Canbinet Deep Shelf Handle Shallow Shelf Front Louver Lock Leveling Foot Dual Zone Structure Upper Right Hinge Door Outside Canbinet Handle Deep Shelf Touch-Key Control Panel & Digital Display Shallow Shelf Front Louver Lock Leveling Foot ACCESSORY INSTALLATION BEFORE OPERATING UNPACKING AND CLEANING THE WINE COOLER • Remove the exterior and interi
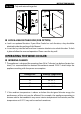
INSTRUCTION MANUAL 1st Step -Remove the gasket on the internal door to expose the two screw holes. 2nd Step -Install the handle tightly with the screws and washers provided. 3rd Step -Restore the gasket. Gasket Flat Washer Locker Washer Screw Handle Door Frame HOW TO REVERSE THE DOOR HANDLE For a unit with reversible door swing function, please follow the following steps to reverse the door handle (based on the door handle has been originally installed on the left side of the front door).
INSTRUCTION MANUAL 5th Step - Tidy and restore the gasket. Figure4 Figure3 4 3 2 5 LOCK & UNLOCK THE DOOR (FOR OPTION) ●● • Lock is an optional function. If your Wine Cooler has such function, a key should be attached inside the packing of this Manual. ●● • Insert the key into the lock and turn it counter-clockwise to unlock the door. To lock it, please follow the reversed operation. Please save the key well.
INSTRUCTION MANUAL WINE STORAGE • • The standard shelves are designed perfectly for Bordeaux bottle storage. The maximum loaded bottles may vary subject to the different size or dimension wine bottles you store. The shelves can be pull out approximately by 1/3 for easy access to the wine storage, while it is designed with a plastic stopper on each sides of the shelf track to prevent bottles from falling.
INSTRUCTION MANUAL CONTROL PANEL • For Single Zone Power Temp.Up Lighting Display Window Temp.Down ºC/ºF Interchange Lock / Unlock • For Dual Zone Lock / Unlock Power Upper Zone Display Window Lighting ºC/ºF Interchange Temp.Up Temp.Down Bottom Zone Display Window Zone Select POWER ON/OFF CONTROL • When the appliance is plugged in to a power outlet, it powers on automatically. • Touch the power mark and hold for 10 seconds to turn off (or turn on) the • appliance.
INSTRUCTION MANUAL Warning: To avoid breaking the compressor, please do not turn on the appliance again within 5 minutes after you turn it off. UNLOCKING THE CONTROL PANEL • To unlock the control panel, touch the power mark and lighting mark with 2 fingers at the same time and hold for 3 seconds . When unlocked a buzz sound will be heard. • The control panel will be automatically locked with a buzz sound heard after 10 seconds without being touched.
INSTRUCTION MANUAL appliance to achieve the temperature you have set. TEMPERATURE SETTING For Single Zone • The temperature setting range is 5-22 ºC (41-72 ºF). • Directly touch the • The first touch on or mark to set the wine cooler temperature as you want. or mark will recall the previous set temperature displayed in the digital window. If the appliance runs after a power failure (or unplugging), the previous set temperature does not exist and is replaced by the defaulted temperature at 12ºC.
INSTRUCTION MANUAL For Dual Zone , you can interchange the Fahrenheit and Celsius display Directly touch the mark for both zones at the same time. CARE AND MAINTENANCE CLEANING THE WINE COOLER • Turn off the power, unplug the appliance, and remove all items including shelves. • Wipe the inside surfaces with a sponge and baking soda solution. The solution should • • • • be about 2 tablespoons of baking soda to a quart (approx. 1 litre) of warm water. Wash the shelves with a mild detergent solution.
INSTRUCTION MANUAL TROUBLESHOOTING If you feel the appliance is out of order, follow these instructions to try to see if you can solve the problem simply by yourself before calling for service. No. PROBLEM PROBLEM POSSIBLE CAUSE / MEASURE The wine cooler does not operate Not plugged in. The awwwppliance is turned off. The circuit breaker tripped or a blown fuse. The wine cooler is not cold enough Check the temperature control setting. External environment may require a higher setting.
INSTRUCTION MANUAL REVERSE THE DOOR SWING FOR BUITL-UNDER SERIES Remarks: ●● •Reversible door swing function is only available for a unit with 870mm height, and with control panel inside the cabinet. ●● •The instruction is based on a unit with right door hinge installed already. ●● •To reserve the door from right hinge to left hinge, you need to get ready 2 new spare parts: an upper left hinge, and a bottom left hinge.
INSTRUCTION MANUAL FOR BUILT-IN-COLUMN SERIES Remarks: ●● •Reversible door swing function is only available for a unit with 4 handle screw holes reserved on the front door (2 at the left side and 2 at the left side). ●● •The instruction is only suitable for a unit with control panel on the door. ●● •The instruction is based on a unit with right door hinge installed already.
INSTRUCTION MANUAL 2nd step – Tidy the Door. 1. Pull the harness wires one by one out of the upper right hinge hole through its gap, and remove the upper right hinge (Disused). See Figure 2. 2. Tidy the harness and carefully push back it into the door frame, and cover it with the right door corner cover K. See Figure 3. Figure2 5 6 Figure3 11 Remarks: If it is difficult to push back the harness into the door frame, please follow the steps in Figure 4 & 5.
INSTRUCTION MANUAL 4.Slowly pull out the harness M at the left door corner, which must be ensured no longer than 90mm to avoid loosen the inside terminals. Insert the harness wires one by one into the upper left hinge hole through its gap. See Figure 7. Figure7 13 14 3rd step – Tidy the Cabinet. See Figure 8. to take out the harness cover O from the top left side of the 1. Loosen the 2 screws cabinet. 2. Install the harness cover at the top right side of the cabinet to cover the harness there. . 3.
INSTRUCTION MANUAL 16 Figure9 16 1a 3a 13 17 14 1a 3a 14 13 17 8 8 5th step – Reverse the Door Handle. Reverse the door handle by following the instruction of “How to Reverse the Door Handle” as mentioned above. FOR FLOOR-STANDING SERIES Remarks: ●● •Reversible door swing function is only available for a unit with control panel inside the cabinet. ●● •The instruction is based on a unit with right door hinge installed already. ●● •All removed parts must be saved to do the door reinstallation.
INSTRUCTION MANUAL 2nd step - Move the support rod F (at the bottom of the door) from the right to the left side. Move the hinge hole cover (at the top of the door) from the left side to the right side. See Figure 2 & 3. Figure3 Figure2 3rd step - Pull out the bottom hinge cover I, and take out the bottom hinge by loosing the screws. Loose the 4 screws on the bottom left side. Install the bottom hinge to the left side while screw the holes on the right side. See Figure 4.
INSTRUCTION MANUAL ENERGY LABEL .20.
INSTRUCTION MANUAL .21.
INSTRUCTION MANUAL .22.
INSTRUCTION MANUAL .23.