Dune HD Center User manual This manual is suitable for firmware version: dune_firmware_hdcenter_sony_090424_0218_beta.
Table of contents 3. Key features ● Player features ● General features of Blu-ray discs ● Graphics in the menu of BD-ROM disc ● Subtitles ● Blu-ray player ● Media file player ● Operations with HDD ● Package contents ● Notes on Discs ● Notes on Copyright ● Information on regional content protection ● Blu-Ray Regions ● DVD Regions ● Types of optical discs supported ● Safety measures ● Restrictions in respect of content playback ● Before getting started ● Exterior 11.
Key features of DUNE HD Center media player Chapter 1 Key features of DUNE HD Center media player Chapter 1 Player features: 3 Blu-Ray discs playback ● BD-ROM (Profile 1.1/2.0), as well as DVD and CD. Media content playback ● Video, Music and Pictures. Network drive operation ● NFS, SMB and some other HTTP clients. Mobile rack with SATA Direct Link for fast and easy HDD exchange ● Supports any audio and video collection on any number of hard discs w/o need to create expensive multi-disc NAS solutions.
Function description and Blu-ray disc partition contained in this manual are common and describe potential features of Blu-ray format. The menu configuration, functions set, as well as menu navigation are disc-dependent and may vary. Graphics in the menu of BD-ROM disc: Chapter 1 Interactive elements Video Video material recorded on the majority of BD-ROM discs, contains two additional full HD video layers. The first layer is used for graphics, such as subtitles and OSD.
Operations with HDD How to tаke out the HDD 1. Shift the clamp upwards. 2. Keeping the clamp, turn the handle outside 3. Pull out the internal container from a player Ключевые Key features особенности of DUNE HD медиаплеера Center media player DUNE HD Center Chapter Глава 11 How to insert the HDD 3 5 1. Having convinced that the container handle is slightly opened, insert the internal container and push it inside all the way. 2. Turn the handle inside till the clamp clicks.
Package contents: 1. Dune HD Center media player 2. Remote control (batteries not included) 3. Power supply cord 4. AV cable 5. Quick start guide 2 1 3 4 5 Chapter 1 Notes on Discs Key features of DUNE HD Center media player The regional code of BD-DVD discs is shown on the rear panel of your player. Please refer to the end of this manual for description of regional codes of BD-DVD discs.
Blu-Ray Regions А1 C3 B2 А1 Code Region 1 or A Eastern and South-Eastern Asia, USA 2 or B Europe, Oceania, Africa, Meadle East,, Greenlandia 3 or С Russia, PRC, Central and South Asia, Mongolia Chapter 1 DVD Regions 5 1 2 6 5 3 4 4 Key features of DUNE HD Center media player 2 7 Code Region 1 Canada, United States; U.S.
Safety measures 10cm 5cm 5cm To prevent Overheating If you install your device in the closed space, for maintenance of correct work of the player it is necessary to provide distances: from left and on the right not less than 5 cm, at the above and behind not less than 10 cm. Chapter 1 To avoid troubles, before to start using this device, please read this manual carefully and keep it for future reference. Warning: This Blu-ray player uses a laser beam sightless with human eye.
11 12 13 14 15 Do not hinder the opening of the tray of the media player. If something hinders the tray opening, remove it and try again. Please remove the disc out of the player after viewing and turn off the player. Do not press the disc tray. Do not place any items on the tray. Voltage fluctuations in AC mains may result in improper operation of the device. In this case, please turn off the player with the POWER button on the front panel of the device or unplug, and after 10 to 15 seconds plug in back.
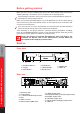
Before getting started When you start using the media player for the first time, please make sure that the shipping packing is not broken, has no compression or opening marks. If the packing was broken, the manufacturer shall not be held liable in respect of the integrity of the package contents. When you connect the media player to your AV appliances for the first time, please make sure that all seals and retainer screws on the top enclosure are in place and contain no unsealing mark.
Remote Control (RC) Chapter2 Command indicator (i.e. indicator of remote control response to button pressing) 1 2 EJECT, MUTE, POWER – opening/closing of disk tray, sound on/off and standby mode on/off, respectively 3 3 A (Red) - INFO, B (Green) - ZOOM, C (Yelow) - MODE, D (Blue) - SETUP – control menu buttons for setting of internal functions, as well as some playback modes. 4 0 - 9 – numeric buttons. Allow controlling of player in playback mode, as well as text entry.
Text entry with RC B C D i ... . . Chapter 2 A . 0, 1, 2, 3, 4, 5, 6, 7, 8, 9: Entry of characters to a position pointed by the cursor. First pressing: entry of first character from a set of characters connected with the remote control. Each subsequent pressing: you may change the entered character to the sequent one from the list. ● 0: entering of space character. ● 1: entering of special characters (punctuation marks, etc.).
Menu Chapter 3 Contextual menu Chapter 3 MENU – show contextual menu with a list of available additional commands. Through contextual menu you can copy the edited text line to clipboard and paste the text line from the clipboard (into cursor position) Remote Control (RC) STANDBY Mode 13 Pressing of POWER button switches over the player to STANDBY mode. In this mode the built-in HDD is disabled, as well as the video output, but the device does not switch off completely.
Connections Chapter 4 This section describes different connection possibilities of media player to AV equipment. Depending on model and design of TV or projection set, after connecting in one of the ways described below and plugging the power supply, the player initialization may take up to 10 sec. If after this time there is no picture (DUNE logo) on screen, it shall mean that there are connection errors. Please check Troubleshooting section in such a case.
Connection to a TV set with component video signal input (Component Video, Y, Cb, Cr) For this connection you should use a 3RCA-3RCA video cable and (optionally) a 2RCA2RCA audio cable for sound transmission to your TV set. Please note that video cable shall have an impedance of 75 Ohm, i.e. specially fitted for transmission of analog video signal 1 2 Chapter 4 3 4 AUDIO IN R L COMPONENT VIDEO IN Make sure that the player and TV set are switched off.
Transmission of digital audio signal to an AV receiver with HDMI input 1 2 Chapter 4 3 This media player is equipped with an up-to-date HDMI v 1.3 interface allowing transmission of digital video and audio streams using a single cable. If your AV receiver has a HDMI v1.3 input and decoders of up-to-date audio formats, you may enjoy a HD multi-channel sound in full. For this connection it is suggested to use an original DUNE HDMI-HDMI cable (not included, can be ordered separately).
Chapter 4 Transmission of analog audio signal to external stereo amplifier (or TV set) An analog 2RCA-2RCA cable shall be used (not included). 1 Connect audio output AUDIO L R of your playAUDIO IN er with audio input of your stereo amplifier R L 2 Select relevant input using INPUT SELECTOR switch. We recommend you to turn down the volume of your audio equipment before connection, in order to avoid lesion of your hearing ability and eliminate risk of damage of your audio systems.
Connection to LAN and Internet A standard Cat5 or Cat6 Ethernet cable with RJ45 connectors should be used (not included). Chapter 4 Connection of external USB drives Your media player is equipped with a socket for connection of external data storage devices with USB interface. There are two standard A-type USB ports for this purpose. 1 Connections 2 18 Connect a USB cable of external device to your media player.
System setup Chapter 5 This chapter describes a list of settings of different functions of your media player. Setup menu Access to the setup menu only in file browser mode WARNING During playback of media files and DVDs any access to the setup menu is disabled. In order to enter the menu you need to stop playback first Chapter 5 To enter the setup menu press SETUP on your RC or use Setup folder of the main menu of the player. To exit the setup menu, press SETUP once again or RETURN button.
System setup Chapter 5 Menu: Settings 20 General In this menu section you may adjust general interface language and time of screensaver activation.
Video System setup Chapter 5 In this section you will find settings of video output type (digital HDMI or analog) and adjusting of video resolution on selected output. Resolution value adjusted will be used by default for any file played with the media player. Read carefully your TV or projection set instructions. Some video modes may not be supported by your equipment.
Audio Chapter 5 This section of settings allows setting of connection type of relevant audio equipment System setup Digital audio output mode: you may switch the mode of digital output 22 PCM (Pulse Code Modulation, forced conversion): a mode in which original track, i.e. Dolby Digital or DTS, is converted in Pulse Code form. It is supported by decoders of virtually any up-to-date audio equipment.
System setup Chapter 5 HDMI audio: turn on and off transmition of audio signal via HDMI 23 Blu-Ray audio When set to «Best quality» and «Digital audio output mode» set to «bitstream», the primary audiotrack is sent to S/PDIF and HDMI as bitstream not depending on the presence of secondary audiotrack; secondary audio/video functions («PiP») are disabled.
Network. Chapter 5 This section describes main parameters of functioning of media player in LAN or Internet. Connection. You may select a type of connection which will be used by default. It may be Wire (twisted-pair cable connection) or Wireless (Wi-Fi connection; optional). Or you may select a LAN-free use by selecting No.
Information System setup Chapter 5 Includes all system information on your device. 25 Others This section describes additional settings of your media player.
Display view System setup Chapter 5 You may select shape and type of the player menu which will be displayed by default. You may use the menu type that is most suitable for you. It may be icons, or text messages for displaying all functions of your media player.
IPTV Chapter 5 This section describes media player setting for reception of IPTV channels. You only need to choose the name of your IPTV provider from the list in Setup. All other steps will be made by the player automatically. • List of IPTV providers may vary depending on programming time. IPTV protocols: Multicast UDP (raw), RTP. Formats: MPEG-TS container, MPEG2, H.264 video codec (SD and HD), MPEG and AC3 audio codecs.
System setup Chapter 5 Coding 28 Display of text information in the menu and submenus of media player.
Playback Chapter 6 Blu-ray operations Chapter 6 Playing of a standard Blu-ray or normal DVD disc. Before playing any optical discs, we suggest you to refer to the ‘Settings. Other. Optical drive’. In this section you will need to select an operation that will be performed by the media player by default, after inserting of a BD-ROM or DVD-ROM disc, respectively. Playback Playback of BD-ROM 29 After inserting of a BD-ROM in your media player, please wait until the disc menu is displayed.
A B C D i . ... . . POP UP/ Playback Chapter 6 TOP 30 Vol+ / Vol- – volume control INFO – information on current status of media player. • current operation: PLAY, PAUSE, etc. • type of optical media used currently: BD-ROM, BD-R, etc. • type of sound track: Stream type DD, DD+, DTS, etc. • type of content and current playback time: HDMV 00:25:53 • current disc chapter: Title 1/11 • current disc episode: Chapter 8/27 • current bit rate: Bit rate 34.
DVD-Video playback After starting playback of a DVD disk from external optical drive or a material in a DVD-Video format from a folder on HDD, you will get to the DVD player. ● This interface is only intended for operation of DVD-Video. ● f you play a DVD-Video disk already inserted in the device, its playback starts from the point where it stopped playing previously.
Mediacenter Chapter 7 Mediacenter Chapter 7 File browser 32 File browser allows browsing of all files and folders available. Browsing starts from the Main page, which includes sub-divisions corresponding to connected drives, including network resources. Up: select previous file/folder from the list. Move the cursor to the area of indication of the current path (in case of selection of the first element from the list). Down: select next file/folder from the list.
Chapter 7 Mediacenter 33 Page-Up: select a file from the top of the page displayed / move one page up. Page-Down: select a file from the end of the page displayed / move one page down. RETURN/Left: return to the main folder ENTER/Right: enter the folder (when selected). …or start playing of selected media file / showing of digital picture. …or start playback of DVD-Video (i.e. a local copy thereof). It is possible in case of prior selection of external optical drive with inserted DVD-video disk.
Selection of files and folders To execute operations with several files/folders at the same time, you may select these files/folders. Use SELECT button on your RC or commands of contextual menu. You may select files/folders only within the current folder. In case of switch to another folder, the information on selections will be reset. i . ... . Mediacenter Chapter 7 .
Chapter 7 ● To copy or relocate several files/folders at once, you should select these files/ folders. In case of moving of files/folders within one section of a drive, there is no physical copying thereof (only the drive catalog is refreshed), files/folders are moved to the new location instantly. In case of moving files/folders between different sections or different drives, files/folders will be first copied to the new location, and then deleted from the old location.
. Left/Right/Up/Down Page-Up/Page-Down. First pressing: switch to playback item change mode. C A B D ● Subsequent pressings: change desired playback item: Left/Right: backward/forward by 10 sec. Up/Down: backward/forward by 1 min. Page-Up/Page-Down: backward/forward by 10 min. ● To exit the item selection mode and switch over to selected item, press ENTER button (or wait until automatic switch to selected item after a short idle time). i 0, 1, 2, 3, 4, 5, 6, 7, 8, 9: switch to playback item: ...
Photo viever Mediacenter Chapter 7 The media player have a Photo viewing function. Supported formats: JPG, PNG, BMP. 37 In options of a mode of a Photo viewing it is possible to adjust the time of display of pictures with an interval of a delay from 3 seconds till 1 day. As it is possible to set the type of effect which will be used from one picture to another. If you use a mode «randomly» transition modes will be used in a random order.
RC usage: Chapter 7 Mediacenter B C D i ... . . 38 A . INFO: show \ hide info about current Photo file: format – file type, width – quantity of horizontal dots, Height - quantity of vertical dots, Bit Depth. MENU: show\hide Playlist of Photos ● [7] – Slideshow on/of. ● [8] – Random on/of RETURN: goes one step back (hide Playlist). PLAY: creates the Playlist and starts a Slideshow. PAUSE: pause the Slideshow. STOP: stops the Slideshow. PREV (left): backward to one Picture.
Following RC buttons are enabled in the mode of picture parameters setting: Up/Down: select previous/subsequent proportion parameter. Left/Right: decrease/increase parameter value (proportionate). CLEAR: reset to default value. ● To exit from picture parameter setting mode, press ENTER (or wait until automatic exit from the mode after short idle time). Mediacenter Chapter 7 Deinterlace: adaptive 39 MODE: switch of deinterlacer function mode.
Mediacenter A B C D i ... . . 3 40 Left/Right: decrease/increase picture size (proportionate change of frame size). Up/Down: increase/decrease vertical stretching (proportion adjustment). Page-Up/Page-Down: increase/decrease overscan area (equalizing of picture cropping by TV set). To exit ZOOM mode, press ENTER (or wait until automatic exit from the mode after short idle time). SETUP: display picture parameters setup menu, such as brightness, contrast, color-saturation.
Network disks operation Chapter 8 You may connect to your player network disks with SMB and NFS protocols. ВIt is possible to connect any number of network disks. Each network disk connected is displayed in root directory of the file browser (Main page) as a special folder or an icon. Chapter 8 Warning: current firmware version does not support network disks, if they are only accessible with UPnP/DLNA or HTTP/ HTML protocols, and if using of SMB or NFS is impossible.
2 Execute the Create a network folder command using the contextual menu (MENU button of the RC). 3 In pop-up dialog box adjust network folder parameters. 4 In Name area enter any name which you like. This name will be displayed in the file browser for this external resource. 5 In Type area select SMB or NFS, depending on protocol supported by your network disk.
Connection with NFS protocol: 1 2 3 In the Server area specify IP address of your NFS server. E.g.: 10.0.0.2. After connection to a Windows PC, you may find your IP address in network properties of Windows PC (in the way as described for SMB protocol above). ● Indication of Windows-name of server is not supported. ● If your LAN supports DNS resolution of names and network settings of your player contain correct DNS parameters, you may use DNS name of server instead of IPadress.
Troubleshooting Chapter 9 General TROUBLE: the device does not switch on. SOLUTION: check, if the media player is connected to AC mains. TROUBLE: the device is properly connected to the mains, but works improperly. SOLUTION: Chapter 9 1. it is possible that the temperature requirements were not observed, and there is condensate on internal parts. Immediately switch the device into Standby mode, and unplug it of the AC mains. Wait until the condensate evaporates, cf.
1. HDMI-connection is not available at all, although everything is duly connected and adjusted. 2. Recurrent failure or jumping of picture during video playback or operation of file browser. 3. Recurrent warning on TV screen about change of video mode during video playback or operation of file browser. 4. Sound troubles of TV set (during sound transmission through HDMI). 5. Color bars on screen. 6.
BD-ROM player: TROUBLE: none of optical media is played back or is played with noise or hang-up. SOLUTION: make sure that there is a disc in the tray duly inserted (printed labels upward). Check for deep scratches and dirt on the optical data carrier. Check the media content, it is possible that the media player does not play back this type of media or materials. Please refer to ‘Key features of DUNE HD Center’ and ‘Notes on discs’ sections for full list of discs and AV codec types.
sufficient media data reading rate (even with some reserve) of used data storage drive. If reading rate is insufficient, there will be playback failures. To avoid this kind of failures, it is advisable to store the file on a drive ensuring best reading rate and playback the file from this device. Tip: the quickest drive is the internal hard drive of your media player.
Player software or hardware limitations or errors. These limitations or errors may be potentially eliminated in future firmware updates. Please watch for updates. * If you think that a file is not played back by the player by mistake (or is played back improperly) and wish to draw attention of program developers, you may inform HDI about it by e-mail. Give as much details as possible about the essence and way of problem occurrence, as well as about the file: size in bytes, type of container (e.g.
● To change network folder settings: select the network folder in the file browser. Execute the “Change the network folder” command using the contextual menu. In pop-up dialogbox modify network folder parameters. Press OK. ● To delete the network folder: select the network folder in file browser. Execute the “Delete the network folder” command using the contextual menu.
Firmware recovery procedure Chapter 10 In a case of firmware upgrade crashed (e.g. the player is switched off during firmware upgrade), firmware recovery is possible in most cases (except the case when the new firmware version has a modified “kernel” part and the upgrade crashes exactly when rewriting this “kernel” part (first 15% of upgrade progress). 1 Copy a firmware DFF file into “dune_firmware.
DUNE HD Center specifications Chapter 11 Cahapter 11 Optical discs BD-ROM, BD-R (RE), DVD-ROM, DVD-R (RW), CD, CD-R (RW) Video file formats MKV, MPEG-TS, MPEG-PS, M2TS, VOB, AVI, MOV, MP4, QT, ASF, WMV, DVD-ISO, VIDEO_TS Video compression algorithms MPEG2, MPEG4, DivX, XVID, WMV9, VC1, H.264 Audio formats DD: AC3 (DD), EAC3 (DD+), Dolby True HD [lossless]; DTS: DTS HD High Resolution Audio (HRA), DTS HD Master Audio (MA) [lossless], decoding in PCM/analog, Bitstream on HDMI1.3.
www.HDI.co.