TM MODEL/MODELO/MODÈLE: TTT218_117D ASSEMBLY INSTRUCTIONS INSTRUCCIONES DE ENSAMBLAJE INSTRUCTIONS D`ASSEMBLAGE ATTENTION DO NOT RETURN TO THE STORE Contact MD Sports Customer Service * For additional resources and Frequently Asked Questions, please visit us at themdsports.com ATENCIÓN NO DEVOLVERLO A LA TIENDA Contacto MD Sports Servicio al Cliente * Por mayor información y Preguntas Frecuentes, favor visitarnos en themdsports.
English Español Français GARANTÍA LIMITA DE 90 DIAS GARANTIE LIMITEE DE 90 JOURS This product is covered by a limited warranty that is effective for 90 days from the date of purchase. If, during the limited warranty period, a part is found to be defective or breaks, we will offer replacement parts at no cost to you, the customer. The only exceptions to the warranty include mainframes, table tops, playing surfaces, batteries or tools.
English Español TOOLS REQUIRED HERRAMIENTAS NECESARIAS Phillips Screwdriver-Not Included Standard (Flat Head Screwdriver)-Not Included Wrench-Included Allen Key-Included Power Tools - Set Low Torque Français Destornillador Phillips-No incluido Destornillador de Cabeza Plana-No incluido Llave Inglesa-Incluido Llave Allen-Incluido Herramientas eléctricas - Ajuste en par bajo High Torque over tightened OUTILS REQUIS Tournevis cruciforme-Non inclus Tournevis standard (Tête plate)-Non inclus Clé anglaise
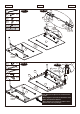
English Español Français TTT218_117D PARTS LIST / LISTA DE PARTES / LISTE DES PIÈCES FOR FIG. 1 1 FOR FIG. 1 2 x1 Table Surface - 1 Superficie de Mesa - 1 Surface de table - 1 FOR FIG. 3 5 x1 Table Surface - 2 Superficie de Mesa - 2 Tubo de Soporte Corto 9 End Panel Panel Final Tube de support- Court Tubo de Soporte Largo Cerradura de Gravedad Red 21 Safety Strap Short Correa de Seguridad Corta A1 M4x16mm Screw TTT218_117D Tornillo M4x16mm FOR FIG.
English Español Français TTT218_117D PARTS LIST / LISTA DE PARTES / LISTE DES PIÈCES A5 M8x68mm Bolt A9 Cerrojo M8x68mm FOR FIG. 7 A6 FOR FIG. 5 A7 FOR FIG. 4 A8 x4 x8 x4 Boulon M8x68mm M8x85mm Bolt FOR FIG.
English Español 1 X1 2 X1 Français FIG. 1 Player / Jugador / Joueur Note: Playfield graphic should be face down when assembling. 1 / Nota: El gráfico del campo de juego debe quedar cara abajo para el ensamblaje. / Note: Le graphique du terrain de jeu doit être face vers le bas pendant l’assemblage. Ce / C nter / C entro en tre 2 Player / Jugador / Joueur 20 X1 21 X2 A1 X3 FIG. 2 A1 FIG. 2B 20 21 A1 FIG.
English Español 5 X2 6 X2 11 X2 FIG. 3B A2 X 56 5 Français FIG. 3 FIG. 3A A2 11 A2 Player / Jugador / Joueur FIG. 3C A2 6 6 A2 1 A2 Ce / C nter / C entro en tre 2 11 Player / Jugador / Joueur A2 5 5 A2 6 3 X4 P3 X4 A7 X4 P4 X4 A9 X4 A10 X8 A13 X1 A14 X1 P3 3 FIG. 4 P4 Player / Jugador / Joueur P4 Ce / C nter / C entro en tre 1 2 P4 A9 Player / Jugador / Joueur A10 A7 P4 TTT218_117D 6 www.themdsports.
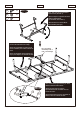
English Español 22 X2 A6 X8 A9 X8 A10 X 16 A13 X1 A14 X1 Français FIG. 5A FIG. 5 3 A6 22 A9 A10 A10 3 A9 A10 Player / Jugador 22 / Joueur A10 A6 1 Ce / C nter / C entro en tre 2 Player / Jugador / Joueur 8 X4 9 X2 10 X4 A1 X 16 A2 X 30 FIG. 6 A1 FIG. 6A A2 Player 8 / Jugador / Joueur A2 10 9 1 Ce / C nter / C entro en tre 10 2 Note: Make sure all Aprons are inside the Plastic Corners.
English Español 4 X2 12 X1 13 X2 19 X2 X2 24 A3 X8 A5 X4 A9 X 12 X8 P2 X 24 A13 X1 A14 X1 A16 X2 A17 X4 A18 X2 A19 X4 A20 X2 FIG. 7 Note: Note the position of the Gravity Lock. (See inset for details). / Nota: Observe la posición del Bloqueo de Gravedad. (Vea la inserción para más detalles). A10 / Note: Notez la position du Verrou de Gravité . (Voir encart pour détails). A9 A3 A10 FIG.
English A4 Español X4 A9 X4 A10 X8 FIG. 8 Français Note: Turn over the pre-assembled Caster Frame (See FIG. 7). / Nota: Coloque la superficie de mesa al Marco de Ruedecita (pre-instalado, Vea la FIG. 7). / Note: Retournez le Cadre Moulé Pré-assemblé (Voir Fig7). Note: At least three adults are required to move the table halves for safety. / Nota: Por seguridad, se rquiere por lo menos 3 adultos para voltear la mitad de mesa. FIG. 7 Assembly / Ensamblaje FIG. 7 / FIG.
English Español 7 X4 A14 X1 15 X4 A15 X1 23 X4 A3 X4 A8 X4 Français FIG. 9A A8 4 FIG. 9 23 A12 15 A3 A10 3 7 A11 A12 A10 A9 X4 A10 X8 A10 A11 X4 A12 X8 A9 A8 FIG. 9B A12 A3 4 23 A11 15 3 A12 A10 A9 4 A12 15 23 4 3 A9 A10 23 A11 A12 A9 7 A10 FIG. 9D A12 A8 FIG. 9C 3 A11 15 A8 A12 A10 A3 A10 A3 TTT218_117D 10 www.themdsports.
English Español 14 X4 16 X4 A17 X1 P1 X4 FIG. 10 Français FIG. 10A 16 16 4 14 14 P1 4 P1 Warning / Advertencia / Attention FIG. 11 FIG. 11A FIG. 11B Turn table on its side / Voltee la mesa sobre su lado / Retournez la table sur son côté At least four adults / Por lo menos 4 adultos / Au moins quatre adultes TTT218_117D 11 www.themdsports.
English Español FIG. 11C Français FIG. 11D Lock Wheels / Cierre las ruedas / Vérouillez les roues 20 Fold table tops in / Doble las partes superiores de la mesa / Repliez les dessus de table 21 FIG. 11F FIG. 11E DO NOT lean the table on it's legs! / ¡NO dejar la mesa inclinada a sus patas! / Ne pas appuyer la table sur ses pieds! Note: Lift off of the floor and turn in the air. / Nota: Levantar el piso para darle vuelta al aire. / Note: Soulevez et retournez TTT218_117D 12 www.themdsports.
English Español Français FIG. 11G Note: Place on all 4 wheels at once. / Nota: Coloque sobre las 4 ruedas inmediatamente. / Note: Placez de suite sur 4 roulettes A. TURN TABLE ON ITS SIDE. A.VOLTEE LA MESA A SU LADO. A. RETOURNEZ LA TABLE SUR UN COTE. B. FOLD LEGS AND TABLE HALVES AND LOCK IN PLACE. C. LIFT TABLE AND TURN IN THE AIR. D. DO NOT LEAN TABLE ON ITS LEGS! E. SET TABLE DOWN EVENLY ON ALL WHEELS, TO PREVENT DAMAGING THE LEGS. B.
English Español Français Handle / Manija / Poignée FIG. 12C Note: Pull the handle and the table top, and slowly lower the table to the floor. See FIG. 12C. / Nota: Luego tire la manija y la mesa superior, y baje lentamente la mesa al piso. Vea la FIG. 12C. / Note: Tirez sur le pied et le dessus de table puis rabaissez doucement la table vers le sol. Voir FIG. 12C. 17 X1 18 X2 FIG. 13 FIG. 15A FIG. 15B Note: Slide the Net (#17) onto the Net Post (18).
English Español FIG. 14 Français FIG. 14A FIG. 14B Note: Please make sure the gravity lock is locked when folded. 13 Nota: Por favor asegúrese de que el bloqueo de la gravedad está bloqueado cuando se pliega. Gravity Lock / Cerradura de Gravedad / Verrou de gravité Note: s'il vous plaît assurez-vous que le verrou de la gravité est verrouillé lorsqu'il est plié. FIG. 14C 2 20 FIG.14 3. Engage the Wheels Lock. In e/ t Re r ne r ou s er v Re 21 r ve 1 / sa FIG.