
Installation Guide


# 11126 6' PICNIC TABLE
W/ UNATTACHED BENCHES
ASSEMBLY INSTRUCTIONS
TOOLS NEEDED:
Drill with #2 Phillips Bit,
¼" and 3/32" Drill Bits
2 - 7/16” Wrenches or Sockets
File
TABLE ASSEMBLY
TABLETOP ASSEMBLY
(Refer to Drawing 1)
On a flat, non-abrasive surface lay out the four tabletop rails and one middle tabletop rail found in Box 1 as
shown on page 3. Set the four table brackets over pilot holes, making sure brackets are offset as shown.
Fasten brackets to tabletop rails using ¾” screws. Apply glue to the inside edges of the 7/8 x 1 ½” molded
end caps and push onto the ends of tabletop center brace. Lay the brace over pilot holes in center of
tabletop rails and fasten using 1.5” Screws. Apply glue to the inside edges of the 7/8 x 1 ½ x 28” end caps
and push onto the ends of tabletop assembly, make sure edges are flush. Do not slide end caps on from
ends of tabletop.
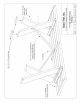
LEG ATTACHMENT AND TABLE FINISHING
(Refer to Drawing 2) (Make 2)
Loosely bolt two legs together, using 3 ½” bolts, washers and nylock nuts (make sure pilot holes for brackets
are at the same end).
Place one set of legs into the bracket slots; line up pilot holes and fasten legs to tabletop using 2 ¼” bolts,
washers and nylock nuts as shown. Repeat for opposite side.
Remove bottom nylock nut on one leg and slide bolt through the hole on diagonal brace, replace nut and
tighten snugly. Repeat for opposite side. Overlap the two diagonal braces in the center of table, drill two
3/32" pilot holes through the diagonal braces and into center brace. Fasten with 1.5" screws to the center
tabletop brace.
Apply glue to the inside edges of the 7/8 x 1 ½ x 7 ¼" angled end caps and push onto the bottoms of each
table leg.
Dura-Trel, Inc. ~ PO Box 122, Sheboygan Falls, WI 53085 ~ Toll Free 877-258-6020