
Installation Guide


weekendwarrior | P&S LVT
DuraDecor | P: (855) 700 - 5666 | customercare@duradecor.com | duradecor.com | revised on 06.23.23 | Page 4
1. Floor Substrate Preparation
Radiant Heating Substrates
When installing oor covering over a substrate that
contains a radiant heating system, ensure the radiant heat
does not directly contact the oor covering and is set at the
correct “in-service” temperature for 48-hours prior, during
and after the installation. The radiant heat may be gradually
increased or decreased to maintain the correct “in-service”
site conditions.
Note: Ensure the temperature of the radiant heating system
does not exceed 85°F (29°C).
Flatness
Check all substrates for atness - all areas should be
smooth and at. The recommended atness tolerance is
< 1/8-in. gap (2 x U.S. quarters) underneath a 6-ft. straight
level and < 1/16-in. gap (1 x U.S. quarter) under a 1-ft. level.
Make any necessary and appropriate adjustments to the
substrate before installation.
Concrete Substrates
All concrete must be clean and free of contaminates. If
required, using a moisture-resistant leveling or patching
compound, following the product instructions. Do
not install if hydrostatic pressure is visible, present or
suspected. If a chemical adhesive remover has been used,
contact the technical department.
All concrete slabs must be (and remain) surface dry and
at least 28-days old. Refer to the primer manufacturer’s
instructions regarding concrete substrate preparation.
Wood Substrates
All wooden suboors and substrates must be dry and in
compliance with all federal, state and local building codes,
have at least 18-in. of well-ventilated air space below.
If necessary, install an underlayment grade plywood
with a minimum thickness of 1/4-in. on the surface. The
underlayment must be installed in the opposite direction
to the suboor, following the product instructions. Refer
to the primer manufacturer’s instructions regarding wood
substrate preparation.
Note: Plywood is porous, therefore the seams may
telegraph through any exible resilient ooring, due to the
natural expansion and contraction from humidity changes.
This is not covered by the product limited warranty.
Gypsum Substrates
All gypsum substrates must be smooth, at, dry,
structurally sound, rmly bonded to the suboor and
free of contaminates. Refer to the primer manufacturer’s
instructions regarding gypsum substrate preparation.
Flooring Installation Instructions
Hard-Surface Substrates
All hard-surface tile, such as ceramic, porcelain or marble
tile, must be patched with a moisture-resistant leveling or
patching compound, following the product instructions. All
grout lines must be lled, smooth and ush with the surface
of the tile, in order to prevent telegraphing and adhesion
issues.
Unsuitable Substrates
These include, but are not limited to: any oating or loose
oor coverings, VAT, hardwood, carpet, cushion vinyl,
rubber, cork,foam,asphalt tile; any substrate with visible
mold, mildew, or fungi and any substrate in wet areas,
such as inside showers and saunas; substrates that
have been coated with a varnish or oil-based, enamel,
paint, primer-sealer or stain-blocker; and substrates
made of Masonite™, chipboard, wafer board, berboard,
particleboard, construction-grade plywood, CDX, OSB
(including AdvanTech™), Lauan, cement board or any
non-underlayment grade panels must be removed and
replaced or covered with an underlayment grade plywood.
Do not use pressure-treated or re-retardant plywood. Do
not install directly over adhesive residue. Do not install in
recreation vehicles, campers or boats.
Note: Electing to install over any existing oor covering
releases the manufacturer from any responsibility
regarding the suitability and continued performance of
the product, including any resulting eect on the new oor
covering, such as indentations and adhesive failure.
Other Suboors/Substrates
These may be acceptable. However, they must be
smooth, at and remain dry, without contaminates and be
structurally sound.
2. Floor Installation Instructions
Acclimation
Depending on the temperature of the oor covering, an
extended acclimation period may be required. Check the
temperature of the oor covering using a non-contact,
infrared thermometer - the oor covering must be at the
same temperature as the required site conditions (± 2° F)
before installation.
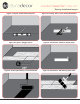
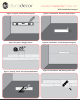
Layout
Determine the ideal installation pattern and direction.
Measure the width of each end of the area, then calculate
and mark your starting line with a pencil, which should be
near the center of the room (see gure 1). Calculate the
width of the last row – if it is less than half the width of the
oor covering, adjust your starting line by half the width
of the ooring. Make sure all pencil markings are bold and
clear so that they can be seen through the primer - do not