
Installation Guide


weekendwarrior |
P&S LVT
DuraDecor | P: (855) 700 - 5666 | customercare@duradecor.com | duradecor.com | revised on 06.23.23 | Page 5
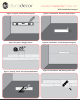
use a pen or permanent marker. It is recommended that
plank end joints be staggered randomly by at least 8 in. to
avoid an undesirable “stair stepped” or “H joint” pattern
(see gure 2). Tiles are recommended to be installed either
in a brick-bond or a 1/3rd o-set pattern.
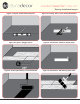
Priming & Cleaning
Clean the substrate using a HEPA ltered vacuum, then
apply the rst coat of a suitable latex-based ooring primer
(not included), following the product instructions (see gure
3). The selected primer must be designed for use with self-
adhering vinyl ooring. Once the rst coat of the primer
has dried, apply a second coat of primer in a perpendicular
direction to the rst coat and allow to dry. Clean the primed
substrate directly before ooring installation using a HEPA
ltered vacuum.
Grouting
If the product has a micro-beveled edge, the ooring may be
grouted. During installation, leave a consistent gap around
all four sides of the tile or plank – the gap should be created
using appropriate tile spacers and should be 1/16-in., 1/8-
in. or 3/16-in. wide. Remove the spacers just before rolling
and grout the joints using a exible grout specically made
for vinyl oor covering. Follow the product instructions
regarding its application and cleaning.
Note: Any grout residue left on the surface will aect
product maintenance and is not covered under the
warranty.
Cutting
To cut the oor covering, measure and mark the surface
with a pencil, then carefully score the surface a few times
using a sharp utility knife along the side of a speed square
(see gure 4). Snap the piece downwards to complete cut.
Installation
Mix oor covering from several boxes to ensure a
consistently random appearance. During the installation,
inspect each piece for visible defects, including damage,
gloss, color, or shade variations. Do not install any oor
covering with visible defects or damage, as removal,
suboor repair and replacement labor costs will not be
covered.
Remove the release paper on the bottom of the oor
covering and discard immediately in a trash can or bag
(see gure 5). Follow the layout and starting line and
carefully position each piece accordingly, keeping all joints
snug without compressing the material. Check to ensure
the starting row is straight - the acceptable straightness
tolerance is within 1/16-in. for lengths over 20-ft. or 1/32 in.
for lengths under 20-ft.
After the rst installation section is completed, roll the
entire area slowly, across the width then length, using a
wall/laminating three-section roller with extendable handle
Floor Installation Instructions
and your body weight or a 100 lb. three-section roller (see
gure 6). Failure to roll correctly may result in bond failure.
Repeat this process for the remainder of the installation.
Remove all adhesive from the surface using a small amount
of 70% Isopropyl alcohol and a clean cloth.
Completion
Save three or more extra pieces of material in the original
packaging as attic stock for the lifetime of the oor. In the
unlikely event of a product issue, attic stock can play a
crucial role in product identication, color matching,
product claim verication and possible repairs.
Protection
For furniture, use only polyurethane, silicon or felt glides
(replaced > 3-times a year), keeping them clean and grit-
free – all glides should be ≥ 1-in.
2
, especially on heavy
furniture. Use chair mats underneath rolling chairs or
soft “W-type” wheels. Use non-rubber-backed entrance
matting at all outdoor entrances, as this will improve air
quality and reduce maintenance. Do not drag heavy or
sharp objects directlyacross the surface - use hard surface
“sliders” (available at Hardware stores). For areas that
may be subjected to standing water on the surface, such
as bathrooms with a bath or shower, theperimeterof the
installation must be properly sealed using a 100% silicon
caulk to prevent water from getting beneath the ooring.
To avoid excessive fading or discoloration from direct
sunlight exposure, use appropriate window treatments.