
Installation Guide


weekendwarrior |
P&S LVT
DuraDecor | P: (855) 700 - 5666 | customercare@duradecor.com | duradecor.com | revised on 06.23.23 | Page 8
visible defects or damage, as removal, suboor repair and
replacement labor costs will not be covered.
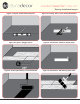
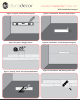
Remove the release paper on the bottom of the tile and
discard immediately in a trash can or bag (see gure 4).
Follow the layout and starting line and carefully position
each piece accordingly, keeping all joints snug without
compressing the material (see gure 5). Check to ensure
the starting row is straight - the acceptable straightness
tolerance is within 1/16-in. for lengths over 20-ft. or 1/32 in.
for lengths under 20-ft.
After the rst installation section is completed, roll the
entire area slowly, across the width then length, using a
three-section wall roller with extendable handle and your
body weight (see gure 6). Failure to roll correctly may
result in bond failure. Repeat this process for the remainder
of the installation. Remove all adhesive from the surface
using a small amount of 70% Isopropyl alcohol and a clean
cloth.
Completion
When nished, replace any wall trim, cove base, or
moldings. If hanging pictures or other objects on the wall
after installation, pre-drill through the tile to avoid damage
Save three or more extra pieces of material in the original
packaging as attic stock for the lifetime of the oor. In the
unlikely event of a product issue, attic stock can play a
crucial role in product identication, color matching,
product claim verication and possible repairs.
Wall Installation Instructions