
Full Product Manual


NEVER LEAVE THE HEATER
UNATTENDED WHILE BURNING
!
NEVER LEAVE THE HEATER
UNATTENDED WHILE BURNING
!
9
KEROSENE SHOULD ONLY BE STORED IN A BLUE CONTAINER THAT IS CLEARLY MARKED
"KEROSENE". NEVER STORE KEROSENE IN A RED CONTAINER. Red containers are associated with gasoline.
NEVER store kerosene in the living space. Kerosene should be stored in a well ventilated place outside the
living area.
NEVER use any fuel other than 1-K kerosene.
NEVER use fuel such as gasoline, benzene, alcohol, white gas, camp stove fuel, paint thinners, or other oil
compounds in this heater. These are volatile fuels that can cause explosion or uncontrolled flames.
The best way to purchase kerosene is in a pre-packaged, metal or plastic, blue colored container.
The second choice would be to buy it from a dealer who stores it in a 55 gallon drum. The third choice is to
buy kerosene from a dealer who stores it in a large underground (or above ground) tank. Kerosene that is
contaminated with even a small amount of water will prevent a kerosene heater from functioning properly.
As you move from the first choice in purchasing kerosene (pre-packaged container) to the third choice (large
storage tank), the likelihood of water being present from condensation increases.
If you purchase kerosene in bulk, know your dealer.
It is
EXTREMELY IMPORTANT to the operation of this heater that you use
the proper grade of kerosene. The proper grade of kerosene is identified as
1-K Kerosene. DO NOT OPERATE THIS HEATER WITH ANY FUEL
OTHER THAN 1-K KEROSENE! 1-K Kerosene has been refined to
virtually eliminate contaminants such as sulfur, which can cause a rotten
egg odor during operation of the heater.
Due to IRS regulations 1-K kerosene is now dyed red in many areas.
D) INSTALLING CARRYING HANDLE:
(Fig.6)
Insert the carrying handle into the holes on the cabinet
by aligning holes on brackets of top plate.
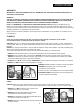
E) INSTALLING TOP GUARD: (Fig.7)
Align the 2 brackets on the top guard with the 2 mounting
brackets on the front and rear guards.
Secure each bracket with a screw. Make sure that the
brackets on the top guard are positioned outside the
mounting brackets on the front and rear guards.
F) INSTALLING BATTERIES: (Fig.8)
Battery holder is located on the back of the heater.
Open the battery cover from the battery case.
Insert two(2) “C” cell batteries according to the plus(+)
and minus(-) markings inside of the holder.
Replace the battery cover to the heater.
G) Now your heater is completely assembled: (Fig.9)
KEROSENE (1-K ONLY)
Fig.8
Fig.9
Fig.6
Fig.7
Top Grill Screw