
Installation Guide


I
·
Post-tension or pre-stressed concrete
·
Cracked concrete (in-plane movement only)
Limitations
-
Minimum 2x2 tile
-
Concrete slabs with moisture migration require the BACKER-Lite seams to be taped
with DURABASE WP seam tape for moisture protection.
-
Cracks in concrete can only be in-plane. BACKER-Lite cannot overcome vertical
cracking in concrete subfloor.
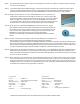
,-CERAMIC TILE
/
rBONDCOAT
I
I
r
���
i
��
r
G
/
BOND COAT
II-
CONCRETE
All installation methods should follow ANSI and TCNA specifications as well as local building
codes.
with Concrete Substrate
Preparing the Substrate
In order to accomplish a successful installation, the area of installation must be:
A.
Sound - no chipping or deterioration of substrate that is not repaired or replaced.
B.
Stable - no bouncing; no deflection; not spongy or rubbery; no shortage of fasteners.
C.
Clean- no loose debris or other matter, such as glue, residue or film, which would hinder the bonding of
the modified thinset to the substrate.
D.
Level - no crowns or valleys in the installation area; no unintended slope in the overall installation area.
Step 1. Inspect the installation area for the presence of any faults or defects listed above in the substrate.
Step 2. If there are areas where the substrate is not sound, then make the necessary repairs or replacements to the
defective area.
(Examples: Patch concrete; remove and replace defective plywood of subfloor, etc.).
Step 3. If there are problems with the stability of the floor, this will usually signify a more significant structural
problem. Very careful evaluation should be made of wood subfloors to determine if the joist structure is
strong enough to support a tile or natural stone installation. It is possible to correct stability issues by
"sistering-in" additional plies of joist material or by installing additionaI piers or foundationaI supports.
Use of some or all of these techniques might permit a successful installation. Before proceeding, discuss
this with the builder or architect because of the relative high expense of making some types of these
repairs. CAUTION: You cannot expect a successful installation if the substrate is not stable!!!
Step 4. If needed, clean the area of installation. Remove all debris or loose material from the surface - sweep
and pick up larger pieces and/or vacuum to remove any smaller or even powdered debris. Remove any
glue,
residue or film that will hinder the bonding of the modified thinset to the substrate. Some of the
necessary cleaning can be accomplished by scraping. Some types of residue will require the application of
a chemical
cleaner, caustic or removal solution.
Step 5. Any leveling that is needed should be done at this time. All Portland cement based self-levelers need to
be installed before installing BACKER-Lite.
Installing the
BA
C
K
E
R-
Lite
Step 6. Measure the installation area and cut the BACKER-Lite mat to fit. Do not butt pieces of BACKER-Lite
mat tightly against each other. Leave room for expansion or contraction joints of 1/8". The recommended
tools for cutting BACKER-Lite mat are a razor knife and/or straight-edged scissors.
Step 7. Mix the thinset to the consistency of creamy slurry that can easily be rubbed into the fibers on the
bottom of BACKER-Lite. Follow the manufacturer's recommendations for mixing thinset. *If applying
Dural BACKER-Lite to concrete it is recommended that, at this stage you wipe down the concrete surface
using a damp sponge. This is to remove any residue or film lying loose on the concrete. This process will
also hydrate the concrete, resulting in the best possible bond.