
Single Zone Outdoor Condenser Installation Manual

DURASTAR.COM
12
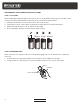
STEP 3: ANCHOR THE OUTDOOR UNIT
The outdoor unit can be anchored to the ground or to a wall-mounted bracket (sold separately) with
bolts (M10). Mount the unit on a cement slab, condenser mounting pad, or other level surface able
to support the unit's weight. Do not place the unit directly on the ground. If using a wall-mounting
bracket, make sure the attached structure can support at least four times the unit's weight.
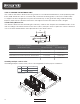
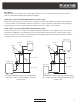
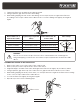
Unit Mounting Dimensions
The distance between their mounting feet varies by outdoor unit. Prepare the installation base of the
unit according to the dimensions below. In most cases, it may be easier to place the outdoor unit in its
correct location and mark the exact placement for the anchor holes.
A
B
Air inlet
Air outlet
Air inlet
Outdoor Unit - Dimensions
W x H x D inches (mm)
Mounting Dimensions
Dist. A inches (mm) Dist. B inches (mm)
DRA1U24S1A - 37 1/4”x31 7/8”x16 1/8” (946x810x410)
26 1/2” (673)
15 7/8” (403)
DRA1U18S1A - 33 1/4”x27 5/8”x14 5/16” (845x702x363)
21 1/4” (540)
13 3/4” (350)
DRA1U09S1A - 30 5/16”x21 7/8”x11 13/16” (770x555x300) 19 3/16” (487) 11 3/4” (298)
DRA1U12S1A - 31 1/2”x21 13/16”x13 1/8” (800x554x333)
20 1/4” (514) 13 3/8” (340)
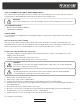
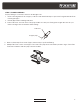
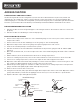
Installing multiple outdoor units
If installing multiple outdoor units, refer to the diagram below for proper clearances.
L
H
≥118” (3000mm)
A
≥59”
(1500mm)
≥9 13/16”
(250mm)
L ≤ H
L ≤ 1/2H
L A
≥9 13/16” (250mm)
1/2H < L ≤ H
≥11 13/16” (300mm)
L > H
Can not be installed
≥9 13/16”
(250mm)
≥23 5/8”
(600mm)