
Multi-Zone Outdoor Condenser Installation Manual


DURASTAR.COM
23
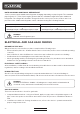
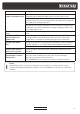
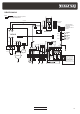
GAS LEAK CHECK POINTS
A: Low pressure stop valve
B: High pressure stop valve
C & D: Indoor unit flare nuts
Check-point of indoor unit
Check-point of outdoor unit
A
B
C
D
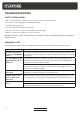
TEST RUN
TEST RUN INSTRUCTIONS
You should perform the test run for at least 30 minutes.
1. Connect power to the unit.
2. Press the ON/OFF button on the remote controller or wired thermostat to turn the unit on.
3. Press the MODE button to scroll through the following functions, one at a time:
• COOL - Select lowest possible temperature.
• HEAT - Select highest possible temperature.
4. Let each function run for 5 minutes and perform the following checks:
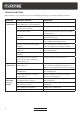
LIST OF CHECKS TO PERFORM PASS FAIL
No Electrical Leakage
Unit is Properly Grounded
All Electrical Terminals are Properly Covered
Indoor and Outdoor Units are Solidly Installed
All Pipe Connection Points Do Not Leak
Water Drains Properly from Drain Hose
All Piping is Properly Insulated
Unit Performs COOL Function Properly
Unit Performs HEAT Function Properly
Indoor Unit Louvers Move Properly
Indoor Unit Responds to Remote Controller or Thermostat
5. Double check all pipe connections. During operation, the pressure of the refrigerant system will
increase. This may reveal leaks that were not present during the initial leak check. Take time
during the test run to recheck all pipe connection points. Refer to Gas Leak Check section for
instructions.