
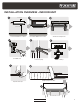
Wall Mount Installation Manual

DURASTAR.COM
14
STEP 4: PREPARE REFRIGERANT PIPING
1. Based on the position of the wall hole relative to the mounting plate, choose the side from which
the piping will exit the unit (left or right).
2. If the wall hole is behind the unit, do not remove the knock-out panel. If the wall hole is to the side
of the indoor unit, remove the plastic knock-out panel from that side of the unit. This will create
a slot through which your piping can exit the unit. Use needle nose pliers or cutters if the plastic
panel is too difficult to remove by hand. Grooves have been made in the knock-out panel in order
to cut it to size conveniently. The size of the piece removed is determined by the diameter of the
piping.
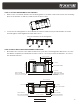
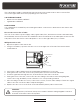
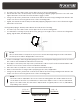
2. Using a 2 1/2" (65mm) core drill for units with a gas side connective pipe less than 5/8" (16mm), or
3 1/2" (90mm) for units with a gas side pipe greater than or equal to 5/8" (16mm), drill a hole in the
wall. Make sure that the hole is drilled at a slight downward angle, so that the outdoor end of the
hole is lower than the indoor end by about 3/16 - 1/4" (5mm to 7mm). This will ensure proper water
drainage.
Wall
Indoor Outdoor
3/16-1/4”
(5-7 mm)
Knock-out Panel
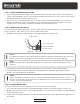
3. Place the protective wall hole sleeve into the hole. This protects pipes and cables from sharp
edges and will help seal the opening when you finish the installation process. After the sleeve is
inserted through the wall, connect the wall hole cover to the wall sleeve on the outside end. Make
sure the cover is flush with the outside wall.
3. If pre-existing connective piping is already embedded in the wall, proceed directly to Step 5:
Connect the Drain Pipe. If there is no pre-existing piping, connect the indoor unit’s refrigerant
piping to the connective piping that will join the indoor and outdoor units. Refer to the Refrigerant
Piping Connections section of your outdoor unit's installation manual for detailed instructions.