
Wall Mount Installation Manual
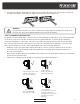

DURASTAR.COM
15
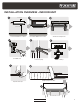
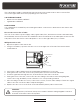
4. Position the piping to align with the wall hole. The refrigerant piping can exit the indoor unit from
four different angles: left-hand side, right-hand side, left rear, or right rear.
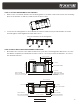
STEP 5: CONNECT THE DRAIN PIPE
By default, the unit's drain pipe is attached to the left-hand side of unit (when you’re facing the back
of the unit). However, it can also be attached to the right-hand side. To ensure proper drainage,
attach the drain pipe on the same side that your refrigerant piping exits the unit. Attach any drain
pipe extension (purchased separately) to the end of the drain pipe. Any drain pipe extension must
have an inner diameter of 5/8" (16mm) and tightly fit the unit's existing drain pipe.
• Wrap the connection point firmly with Teflon tape to ensure a good seal and to prevent leaks.
• For the portion of the drain pipe that will remain indoors, wrap it with foam pipe insulation to
prevent condensation.
• Remove the air filter and pour a small amount of water into the drain pan to make sure that water
flows from the unit smoothly.
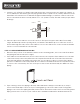
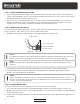
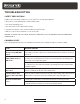
• Make sure to arrange the drain pipe according to the following illustration.
CORRECT
Make sure there are no kinks
or dents in drain pipe to
ensure proper drainage.
NOT CORRECT
Kinks in the drain pipe
will create water traps.
NOT CORRECT
Do not place the end of the
drain pipe in water or in
containers that collect water.
This will prevent proper
drainage.
NOT CORRECT
Kinks in the drain pipe
will create water traps.
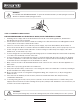
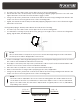
WARNING
Be extremely careful not to dent or damage the piping while bending them away from
the unit. Any dents in the piping will affect the unit’s performance.