
Installation


12
member and secure in place with screws or
nails.
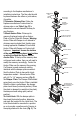
For chase enclosures,
use a Chase Top Flashing. The Chase
Top Flashing allows for a 1-1/2” clearance
maintained from the chimney and provides
required ventilation air. Install the Chase
Top Flashing at the top of the chase with a
½” minimum air clearance off the top of the
chase construction (Fig. 12, 13). Use spacing
clips provided to establish ½” air clearance.
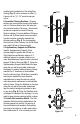
If the Chase Top Flashing does not t the
dimensions of the chase, use a Chase Top
Collar Section and extend the base of the
ashing as needed for the chase dimensions.
Ensure the minimum ½” spacing and perimeter
ventilation requirements are met as show
in Figure 12. Secure the Chase Top Collar
Section to the eld-fabricated chase top with
sheet metal screws or rivets (Fig. 14). Seal
Chase Top Collar Section to chase top with
non-hardening waterproof sealant to ensure a
weather tight connection. Additional screening
as needed for eld-fabricated chase covers is
allowed. Additional ½” minimum spacers can be
eld-fabricated as needed out of 24 GA sheet
metal or other suitable non-combustible material.
Additional non-combustible structural supports
can be eld-fabricated to help support the chase
top ashing if needed, provided the air ventilation
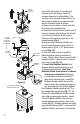
requirements are maintained. Secure the Chase
Top Flashing to the chase with at least (3) screws
or nails per side. When installed, the bottom of
the Chimney Cap must be at least 6” above the
Chase Top Flashing (Fig. 15).
Apply a non-hardening
waterproof sealant around the chimney at the
point where the Storm Collar will meet the
chimney just above the Flashing (Fig. 15). Slide
the Storm Collar down over the chimney to the
top of the Flashing. The Storm Collar must be
Figure 16
TERMINATION
CAP
Figure 14
Figure 15
6" MIN.
COLLAR
SEALANT
STORM
OPENING
ABOVE ROOF
3' MINIMUM
CHASE TOP
COLLAR
SEALANT
SCREW OR
POP-RIVET