
Installation


9
installed on the underside of the ceiling/oor
framing (Fig. 5). Use a minimum of either (1)
8 penny nail or (1) 1-1/4” wood screws per
corner.
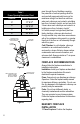
Chimney
sections are connected by lowering the female
end of a Chimney Section onto the male end
of a previous section of chimney. Sheet metal
screws are required to connect Chimney
Section together. For each additional Chimney
Section use (4) Sheet metal screws provided,
to make a secure connection between the
chimney sections (Fig. 6). Do not penetrate
the inner liner of the chimney. Use a Wall Strap
every eight (8) feet of chimney height.
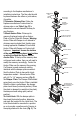
Install a Supplementary Support if total
chimney height is greater than 50-feet, or
if the replace manufacturer requires it. If
additional support is needed, install one or
more Supplementary Supports which can each
support 25-feet of chimney (Fig. 7). Clamp the
Supplementary Support band around the pipe
using the nut and bolt provided, and anchor
the support to nearby building framing. Always
maintain the 2” clearance to combustibles
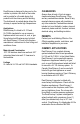
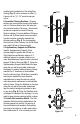
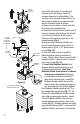
from the chimney pipe. A Stabilizer is available
and may be required by some replace
manufacturers to keep the chimney vertical
and help maintain clearances to combustibles
within a chase. Clamp the Stabilizer to the pipe
using the nut and bolt provided, and secure
legs to nearby framing using plumber’s tape
or guy-wires (Fig. 8). Note: the Stabilizer does
not support the weight of the chimney, it is only
used to keep chimney centered within a chase.
The Attic
Insulation Shield must be installed where the
chimney passes into an attic. Its purpose is
to prevent debris and insulation from getting
too close to the chimney. In attic areas where
this shield cannot t, or is not used you must
Figure 8
Figure 9
Figure 10
PLUMBERS
TAPE
STABILIZER
CHASE
FRAME
FIRESTOP
INSULATION
SHIELD
ATTIC
ATTIC
ATTIC SHIELD
ATTIC
COLLAR
FIRESTOP