
Instruction


11
(2) 8-penny nails or two (2) #8, 1-1/2” wood
screws per side (Fig. 10).
e. Wrap the Collar of the Attic Insulation
Shield around the chimney and fasten it
loosely. Slide the Collar down to meet the Attic
Insulation Shield. Tighten the bolts to secure
the Collar in place (Fig. 10).
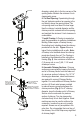
11. Install Roof Radiation Shields: Roof
Radiation Shields provide protection for roof
or chase framing members. Note: Roof
Radiation Shields do not allow for a reduced
clearance to combustibles. Clearance to
combustibles must be a minimum of 2-inch
away from the chimney pipe. Install Roof
Radiation Shields at either the top of the chase
or where the chimney penetrates the roof,
whichever is the top of the installation. Roof
Radiation Shields are built with a 1/2-inch air
gap standoff from the joist face (Fig. 11). The
corners of the Roof Radiation Shields overlap
each other to ensure proper position. Secure
the Roof Radiation Shields to the top of the
framing members using screws or nails in
the corners (Fig. 11). If framing members are
further away from the chimney than 2inches,
center the Roof Radiation Shield to the chimney
on the framing member and secure in place with
screws or nails.
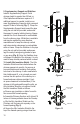
12. Attach Flashing: For chase enclosures,
use a Chase Top Flashing. The Chase Top
Flashing allows for a 1 ½-inch clearance
maintained from the chimney and provides
required ventilation air. Install the Chase Top
Flashing at the top of the chase with a ½-inch
minimum air clearance off the top of the chase
construction (Fig. 12, 13). Use spacing clips
provided to establish ½-inch air clearance.
If the Chase Top Flashing does not t the
dimensions of the chase, use a Chase Top
Collar Section and extend the base of the
ashing as needed for the chase dimensions.
Figure 13
1 1/2” VENTILATION OPENING
AROUND CHIMNEY PIPE
MINIMUM
1/2 INCH
AIR SPACE
1/2 INCH
ESTABLISHED
BY SPACERS
AIR SPACE
1/2"
CHASE TOP
FLASHING
REQUIRED
SPACERS
Figure 12
Figure 11
(4) ROOF
RADIATION
SHIELDS
CHASE
ENCLOSURE