
Instruction


6
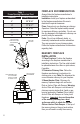
Table 1
Frame Opening Dimension Chart
Diameter Framing Dimension
8" 16" X 16"
10" 17" X 17"
12" 19" X 19"
14" 21" X 21"
16" 23" X 23"
FIREPLACE RECOMMENDATIONS
Always follow the replace manufacturer’s
installation instructions.
Installation: Install your replace as described
by the replace manufacturer. Be sure to
maintain all required clearances.
Flues: Connect only one replace per chimney.
Operation: Follow the replace safety manual
for maximum efciency and safety. Do not over
re. Any damage to the replace or chimney can
possibly void your warranties.
Fuels: Do not burn driftwood, plastic, or
chemically treated wood such as railroad ties.
They are corrosive to your chimney system.
Follow the replace manufacturer’s instructions
regarding fuels.
MASONRY FIREPLACE
INSTALLATION
1. Place Fireplace: Position the replace
according to the replace manufacturer’s
installation instructions. The ue outlet should
be placed between the rafters or joists above,
if possible.
2. Determine Chimney Size: Follow the
replace manufacturer’s instructions for
chimney size or use Table 2 to determine the
correct diameter chimney for your replace.
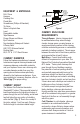
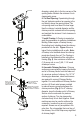
3. Mount Anchor Plate: Chimneys for
masonry replaces begin with an Anchor
Plate or Anchor Plate with Damper. Warning:
Anchor Plate with Damper is not allowed in
chimneys serving stoker-red, liquid or gas-
burning appliances. Caution: Do not install
Anchor Plate with Damper on Factory-built
replaces. Important: be sure the surface
of the masonry chimney has a level
surface on which to attach the Anchor
Plate or Anchor Plate Damper. If the top of
the masonry does not have a level surface,
then you will need to modify the masonry
MASONRY
ANCHORS
HI-TEMP
SEALANT
ANCHOR PLATE
OR ANCHOR PLATE
WITH DAMPER
Figure 2
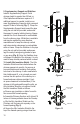
Figure 3
ANCHOR PLATE
WITH DAMPER
NOTE: DAMPER PLATE
IS CLOSED WHEN
CHAIN IS HOOKED
ON LINTEL HOOK
LINTEL
HOOK