PolyPro Single-Wall Gas Vent System for Category II & IV Gas-Burning Appliances ® PolyPro Installation Instructions
A MAJOR CAUSE OF VENT RELATED FIRES IS FAILURE TO MAINTAIN REQUIRED CLEARANCES (AIR SPACES) TO COMBUSTIBLE MATERIALS. IT IS OF THE UTMOST IMPORTANCE THAT POLYPRO® BE INSTALLED ONLY IN ACCORDANCE WITH THESE INSTRUCTIONS. WARNING CARBON MONOXIDE POISONING HAZARD. Failure to follow the steps outlined below for each appliance connected to the venting system being placed into operation could result in carbon monoxide poisoning or death.
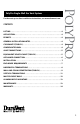
For the most up-to-date installation instructions, see www.duravent.com CONTENTS PolyPro PolyPro Single-Wall Gas Vent System LISTING. . . . . . . . . . . . . . . . . . . . . . . . . . . . . . . . . . . . . . . . . . . .. . . . . . . . . . . . . . . . . 4 APPLICATION. . . . . . . . . . . . . . . . . . . . . . . . . . . . . . . . . . . . . . . . . . . .. . . . . . . . . . . 4 PERMITS . . . .. . . . .. . . . . . . . . . . . . . . . . . . . . . . . . . . . . . . . . . .. . . . . . . . . . . . . . . . .
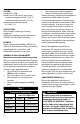
LISTING Listed to ULC S636 Rated Class IIA, IIB, and IIC vent system maximum temperature 230°F (110 °C) maximum positive pressure 15 in-w.c. Massachusetts Plumbers Board, # G1-0811-42 APPLICATION ANSI Category II and IV gas-burning appliances Appliances specifically tested and listed to use M&G DuraVent PolyPro Venting PERMITS Check with your local Building Official, Fire Official, or other authority having jurisdiction regarding permits, restrictions, and installation inspections in your area.
WARNING CARBON MONOXIDE POISONING HAZARD Failure to follow these installation instructions could result in personal injury or death IMPORTANT To prevent possible recirculation of flue gases, the installer must consider the effects of prevailing wind conditions, eddy zones, nearby buildings, obstructions, or other obstacles such as shrubs when planning exhaust and air intake locations.
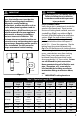
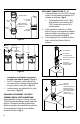
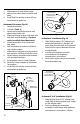
APPLIANCE CONNECTION: 2" - 4" 1. If the appliance has a PVC/CPVC female outlet use the Appliance Adapter/ PVC Adapter and Clamp. (Fig.4) • If the appliance has a PVC/CPVC Male outlet use a matching PVC/ CPVC coupling to convert to a female outlet. 2. If the appliance outlet has a rubber boot or Fernco-style appliance adapter, then the PolyPro vent pipe may attach directly to the appliance (Fig.5). 3. If the appliance has a FasNSeal outlet then use the FasNSeal to PolyPro adapter.
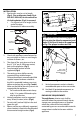
INSTALLATION 1. Pipe lengths may be cut to length (Fig.6). Use an alternate clamp (Fig.4PPS-PAC / PPS-LBC) for the connection if a locking button (Fig.3) is removed. • Cut square (not at an angle) to the end of the pipe. • Remove burrs before assembly. TO APPLIANCE 5/8" MIN 1/4" - 5/8" (7.5mm - 15mm) 12" Figure 7 MARK IMPORTANT CUT WITH HACKSAW PP Pipe sections must be disengaged 1/4"5/8" per joint (to allow for expansion) and sloped 3°(5/8"per ft) back to the appliance per Fig.
Multi-Story: Consult local building or other applicable codes for requirements in your area. In the U.S., NFPA 211 10.6.3 (2013) states: “Vents that pass through the floors of buildings requiring the protection of vertical openings shall be enclosed within an approved enclosure. The enclosure walls shall have a fire resistance rating of not less than 1 hour where a vent is located in a building less than four stories in height.
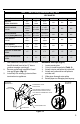
Table 3 - Wall & Ceiling Penetration Sizing Table VENT DIAMETER Termination 2" 3" 4" 5" 6" 8" 4 1⁄8" 105mm 5 1⁄8" 130mm 6 1⁄8" 155mm N/A N/A N/A TWIN PIPE HORIZONTAL CLASS IIB 7 3⁄8" x 25⁄8" 187mm x 65mm 8 3⁄8" x 37⁄8" 212 x 85mm 9" x 43⁄8" 228 x 100mm N/A N/A N/A TWIN PIPE HORIZONTAL CLASS IIC (Framing Dimensions) 8" x 3" 200 x 77mm 8 7⁄8" x 37⁄8" 225 x 98mm 9 3⁄8" x 4 3⁄8" 238 x 112mm N/A N/A N/A SINGLE HORIZONTAL CLASS IIB 25⁄8" 65mm / 3 3⁄8" " 85mm 4" " 100mm N/A N/A N/A
7. 8. Slide exhaust tip into exhaust pipe. Mount outer cover plate to exterior wall plate. install Poly Pro venting system to/from termination to appliance. 9. Horizontal Concentric (Fig.13) 1. Locate penetration. 2. Cut hole. (Table 3) 3. Attach and seal exterior exterior wall plate onto outside wall. 4. Slide cap through exterior wall plate into hole from outside building. Cap must not be installed sloped downward. 5. Orient termination so air intake slots face down. 6.
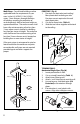
3. pipe is to be installed on the exhaust outlet. Once securely installed to exterior, verify exhaust pipe cannot be removed from termination cap. Stainless Horizontal (Fig.16) 1. Cut opening in the wall. 2. Add Trim Plates and locking band (if applicable) to final pipe length before installing. Make sure flanges are facing towards the wall. Use non-hardening sealant where necessary. 3. After exterior trim plate is mounted to wall, measure 3" from exterior plate and cut off female pipe end. Duburr.
8. Install gaskets into Co-Linear Adapter (if applicable). (Fig.13) 9. Connect Co-Linear Adapter to termination (if applicable). (Fig.19) 10. Install Poly Pro venting system to/from Co-Linear Adapter or termination to appliance. BIRD GUARD BLACK UV PROTECTED PIPE RUBBER FLASHING max length rectangle, 4 vent runs max per support. The listing requires clearance holes no larger than 5 1/8" Dia, with spacing 1 3/4" apart. The upper support plate (with a flange for B vent and factory built chimney, Fig.
HANGER MOUNTED TO TOP OF SUPPORT, BELOW GASKET PLATE M&G DURAVENT POLYPRO CHIMNEY CAP TERMINATION STORM COLLAR SEAL AS REQ'D COMBUSTION AIR INTAKEFLEX HANGER BRACKET AND HARDWARE Figure 22 ALUM FLEX AIR INTAKE (Fig.23) Important: This section only applies to sourcing combustion air! FLEX CLAMP M&G DURAVENT POLYPRO EXHAUST SYSTEM AIR INTAKE FLEX ENCLOSURE Reference Fig.23 for installation of air intake flex when used with the M&G DuraVent Chimney Cap Termination.
THIS PAGE INTENTIONALLY LEFT BLANK
THIS PAGE INTENTIONALLY LEFT BLANK
POLYPRO WARRANTY M&G DuraVent, Inc. (“DuraVent”) provides this warranty for PolyPro® for ten years. Subject to the limitations set forth below, DuraVent warrants that its products will be free from defects in material or manufacturing, if properly installed, maintained and used. DuraVent products are fully warranted if installed only by a professional installer. This Warranty is transferable from the original homeowner to the buyer of the home within the warranted ten years.