
Install Instructions
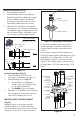


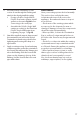


Stainless Horizontal (Fig.14)
1. Cut opening in the wall.
2. Add Trim Plates and Locking Clamp/
Band (if applicable) to nal pipe length
before installing. Make sure anges
are facing towards the wall. Use non-
hardening sealant where necessary.
3. After Exterior Trim Plate is mounted to
wall, measure 3" from Exterior Plate and
cut o female pipe end and deburr. Seal
pipe to Exterior Plate. Slide Bird screen
over cut pipe end and tighten clamp.
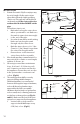
Vertical single pipe (Fig.15)
1. Follow instructions for Vertical
Concentric Termination on page 16.
2. Attach Flashing to roof. (Fig.15)
• Use a rubber boot ashing or
similar, ensure an eective, leak-
proof seal is maintained.
• Use BLACK UV protected pipe.
3. Maintain 12 in. (305mm) min. clearance
above highest anticipated snow level,
max 24 in. (610mm) above roof.
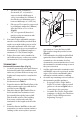
MULTIPLE VENTS IN ONE CONDUIT
Fig.16
Multiple PolyPro vent systems may be
installed within one conduit, including
but not limited to masonry or factory-built
chimneys. Listed 2"-4" components must
11
CUT LINE
THROUGH HOLE SIZING
4PPS: 4.125" 5PPS: 5.25"
6PPS: 6.125" 8PPS: 8.00"
EXTERIOR TRIM PLATE
INTERIOR TRIM PLATE
PP PIPE
INITIAL
FINAL
BIRD
SCREEN
CLAMP
FLANGES
Figure 14
BLACK
UV PROTECTED PIPE
RUBBER FLASHING
Figure 15- Vertical Pipe Termination
BIRD GUARD
be used, the conduit cannot be in use for
another appliance, and the conduit (if pre-
existing) must be inspected and deemed
sound.
Upper supports may be eld supplied and
listed. The listing requires: Min thickness of 24
ga (0.020") SS, no larger than 18" Dia or 18"
max length rectangle, 4 vent runs max per
support. The listing requires clearance holes
no larger than 5 1/8" Dia, with spacing 1 3/4"
apart.
RIGID BLACK
UV PROTECTED
POLYPRO
GASKET
PLATE
STAINLESS
RELINE
HANGER
BRACKET
RIGID
POLYPRO
STAINLESS
UPPER
SUPPORT
PLATE
GASKET PLATE
/ HANGER
MOUNT
HARDWARE
FLANGE
Figure 16
CLEARANCE
HOLE
1.75" MAT'L
SPACE MIN