Installation Guide














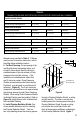
7. Assemble Chimney Sections:










8. Install Attic Insulation Shield: 














Where the chimney passes into the attic,
install the Attic Insulation Shield as follows:
a.

Figure 9










Figure 10
Figure 11








