
Installation Guide


18
Use (2) 5/16 inch, 3-inch long lag screws to
attach the straps to the wall. Replace the Tee
Cleanout Cap and screws, once the Tee is
installed.
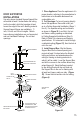
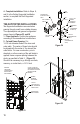
6. Complete Chimney: Attach the Chimney
Sections as in Step 7 of the Ceiling Supported
Installation section. Secure the chimney to
the wall with Wall Straps at 4-foot intervals
to maintain at least 2 inches of clearance to
combustible materials. Slip the Wall Straps
around the chimney, tighten the bolts, and
fasten the Wall Straps to the wall with (2)
5/16-inch, 3-inch long lag screws. Snap the
Chimney Cap into the top of the chimney,
once it is at the height specied in Figure 1. If
the chimney penetrates an overhang, frame
for at least 2 inches of clearance, and install
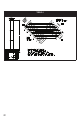
Figure 28
WALL STRAP
ALLOW A MINIMUM OF
2 INCHES AIR SPACE
ON ALL SIDES
2 INCHES MINIMUM
2 INCHES MINIMUM
a Flashing and Storm Collar as described
in Steps 8, 9 and 10 for Ceiling Supported
Installations. Another option is to cut away
the overhang for a 2-inch clearance. (Figure
28). If the chimney extends more than 4 feet
above the top Wall Band, or Flashing, use an
Extended Roof.
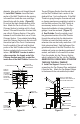
7. Install Chase Cover. If a chase enclosure
has been constructed, installing the chase
cover requires some special considerations.
The chase must be ventilated at the top
and a 1/2-inch air gap must be established
between the cover, and the framed chase
top. In addition, a 1/2-inch air gap should
exist between the hole in the cover, and the
Chimney Pipe Sections. Figure 29 displays
in some detail, how these air gaps are
established with locally fabricated spacers and
covers. These are not furnished by DuraVent,
but may be made from 28 gage or heavier
sheet metal. Should the installer elect to use
Flat Roof Flashing, (which is a stock item), the
air spaces are still required. When installing
the Storm Collar, do not push it down all the
way to the cover, but allow an air space for
ow between the Chimney Pipe and the hole
in the cover.
MASONRY FIREPLACE
INSTALLATIONS
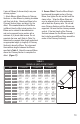
1. Determine Chimney Size: Use Table 4
to determine the correct diameter chimney for
your replace.
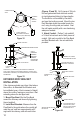
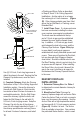
2. Mount Anchor Plate: Chimneys for
masonry replaces begin with an Anchor Plate.
Center the Anchor Plate on a brick or concrete
base over the masonry ue opening. Seal the
Anchor Plate with a high-temperature sealant,
and secure with (4) 1/4-inch masonry anchors.
(Figure 30). Be sure it is level. The Anchor
Plate is available in two styles. One contains
the perforated Starter Section, which is used