
Installation Guide


19
in the event the chimney is to be enclosed.
The other is a at plate, to be used in cases
when the chimney is not enclosed.
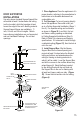
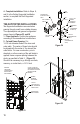
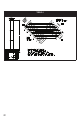
3. Attach Chimney: Place the rst Chimney
Section over the ange on the Anchor Plate
with the arrows pointing up. Drill 1/8-inch
diameter holes through the outer sleeve of the
Chimney Section which match the location of
the corresponding holes in the Anchor Plate.
Secure the Chimney Section to the Anchor
Plate with #8 self-tapping sheet metal screws.
4. Finish Chimney: Install the rest as directed
in the Ceiling Supported Installation section,
Steps 4 through 10. Refer to Figure 1 and
Table 4 for chimney height requirements.
Always maintain at least 2 inches of clearance
to combustible materials, and enclose the
chimney where it passes through occupied
areas. Use a Wall Strap for every four feet of
chimney height.
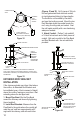
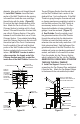
Figure 29
1/2 INCH AIR SPACE
1/2 INCH AIR SPACE ESTABLISHED
BY SPACERS
12 INCH MINIMUM
FLAT ROOF FLASHING
FRAMED
CHASE
ENCLOSURE
NAIL (AS REQ)
CAP
SDP-C
STORM COLLAR
(SDP-SC)
FLAT ROOF FLASHING
(SDP-TF)
MUST BE VENTILATED
SPACERS LOCALLY
FRABRICATED (NOT
FURNISHED BY DURAVENT)
CHIMNEY
SECTIONS
SDP-P
1/2
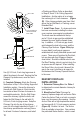
Figure 30
CHIMNEY PIPE
SECTION SDP-P
LOW-PROFILE
STARTER SECTION
(REQUIRED IF
CHIMNEY IS
ENCLOSED)
MASONRY
ANCHORS
(4) REQ (NOT
FURNISHED)
EXISTING
MASONRY
CHIMNEY
HI-TEMP
SEALANT
SHEET
METAL
SCREWS (4)
REQ
ANCHOR PLATE
SDP-AP