
Installation Guide


17
diameter hole must be cut through the wall.
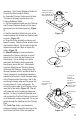
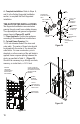
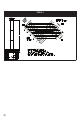
3. Install Wall Thimble: Insert the black
section of the Wall Thimble into the opening
in the wall from inside the room, and align
the nail holes with the studs. (Figure 26).
Do not nail the black thimble section at this
time. Attach the Tee to a 9-inch or 12-inch
Chimney Section by twisting until it is rmly
locked. If the wall is less than 6 inches thick,
use a 9-inch Chimney Section; if the wall is
between 6 and 9 inches thick, use a 12-inch
Chimney Section. From outside the building,
insert the Chimney Section into the hole until
the vertical part of the Tee is 2 inches away
from the outside of the wall, and the black
portion of the Wall Thimble and the Chimney
Section protrude into the room at least 2
inches. IMPORTANT: In order to make a
safe connection, the female end of the
Chimney Section must fully contact the
inside face of the Wall Thimble. Remove the
Figure 26
5/16 X 3” LAG
SCREWS (6 REQ)
NOT FURNISHED
14 1/2”
14 1/2”
8-PENNY NAILS (4) REQ
SHIMS TO
MAINTAIN
CIRCULARITY
OF THIMBLE
(2) REQ (NOT
FURNISHED,
MAY BE MADE
OF WOOD)
2 INCHES MINIMUM
DURA PLUS
CHIMNEY PIPE
TEE
SDP-T
2 INCHES MINIMUM
CLEARANCE
INTERIOR
PORTION OF
WALL THIMBLE
SDP-WT (BLACK)
OUTSIDE
VIEW FROM OUTSIDE
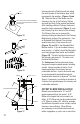
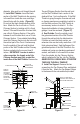
Figure 27
NOTE: IF SYSTEM EXITS
THRU WALL INTO GARAGE, AN
ENCLOSURE ISREQUIRED.
VENTILATED FLASHING
MUST BE USED
2 INCHES MINIMUM
ENCLOSURE
GARAGE
2 INCHES
MINIMUM
ACCESS DOOR
FOR CLEANING
Tee and Chimney Section from the wall, and
nail the Wall Thimble’s black section to the
studs with four 1-inch roong nails. If the Wall
Thimble is going through a concrete wall, and
no framing members are available to which to
nail the black portion of the Wall Thimble to,
use masonry anchors to attach it. If a Tee-
Supported installation is being installed in a
garage, it must be enclosed. (Figure 27).
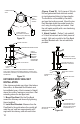
4. Seal Outside: From the outside, insert
the galvanized section of the Wall Thimble
through the wall and into the black section.
If it does not reach the black section, an
extension tube can be locally made from .018”
thick galvanized steel. Seal the ange of the
galvanized portion of the Wall Thimble to the
outside wall, using non-hardening waterproof
sealant, and fasten it to the wall with screws.
From the outside, slip the Chimney Section,
which is attached to the Tee, into the Thimble.
NEVER INSTALL SINGLE WALL STOVEPIPE
THROUGH THE WALL THIMBLE!
5. Install Tee Support: Remove the two
screws from the Tee Cleanout Cap, and detach
it from the Tee. Attach the Tee Support Straps
to the base with the nuts and bolts provided.