
Installation Guide


12
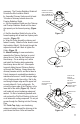
chimney above the Flashing, and also along
the vertical seam of the chimney pipe, which
is exposed to the weather. (Figures 14 and
15). Slide the Storm Collar down over the
chimney to the top of the Flashing. Tighten
and seal the Storm Collar against the sealant.
After installing sufcient Chimney Sections to
meet the height requirement, (Figure 1), snap
the Chimney Cap onto the top of the chimney.
The Chimney Cap can be removed for
chimney cleaning as described in the Chimney
Maintenance section of the instructions. Use
an Extended Roof Bracket if the chimney
extends more than 4 feet above the roof.
(Figures 18, and 19) in the Extended Roof
Bracket section. If you are located in heavy
snow country, a “splitter” should be fabricated
from heavy gauge sheet metal, and installed.
(Figure 16). This will route the snow around
the chimney, and protect it. This item is not
furnished by DuraVent.
11. Enclosures: Enclose chimneys where
they pass through occupied spaces, including
closets. Always maintain at least a 2 inch
clearance between the chimney and any
combustible surface. Interior enclosures may
be constructed with standard framing and
sheathed with sheetrock or plywood. Use Wall
Straps, if necessary, to maintain a minimum of
2 inches of air space between the chimney and
combustible materials.
OFFSET ELBOW INSTALLATION
Elbows are manufactured in 15° and 30°
angles measured from the vertical. A 30°
Elbow is the largest that can be used in an
offset. A 30° Elbow may not be combined with
a 15° Elbow to make a 45° offset for example.
Avoid Elbows if possible, since a totally vertical
chimney is more efcient. When Elbows
are necessary to avoid obstructions such as
rafters, ridgepoles, or joists, use no more than
CAP
SDP-C
Figure 15
APPLY SMALL BEAD OF NON-HARDENING
SEALANT ALONG SEAM SEAM OF CHIMNEY
PIPE SECTION
Figure 16
SPLITTER
SPLITTER
TOP VIEW
Figure 17
SDP-ES
SDP-E 15º / 30º
NOT MORE THAN 48 INCHES
SDP-P
RISE
SDP-P
OFFSET