DuraTech Installation Instructions Combustion Air System Combustion Air System (CAS) brings in outside air for wood-burning appliances. Used with the DuraTech chimney system.
A MAJOR CAUSE OF CHIMNEY RELATED FIRES IS FAILURE TO MAINTAIN REQUIRED CLEARANCES (AIR SPACES) TO COMBUSTIBLE MATERIALS. IT IS OF THE UTMOST IMPORTANCE THAT COMBUSTION AIR SYSTEM BE INSTALLED ONLY IN ACCORDANCE WITH THESE INSTRUCTIONS AND THE INSTRUCTIONS OF THE RELATED CHIMNEY SYSTEMS. NOTE: Read through all of these instructions before beginning your installation.
CONTENTS Clearances; Permits; Equipment & Materials; Installation Notes . . . . . . . . . . 4 DuraTech Chimney CAS Installation; General Installation Requirements . . 5 Through-The-Ceiling Installations.. . . . . . . . . . . . . . . . . . . . . . . . . . . . . . . . . . . . . .6 Through-The-Wall Installations. . . . . . . . . . . . . . . . . . . . . . . . . . . . . . . . . . . . .
The Combustion Air System (CAS) is a system designed to bring in outside combustion air directly into your wood-burning stove or appliance, while still venting the exhaust gases safely into a listed chimney. The CAS system is available for the DuraVent DuraTech chimney system. CLEARANCES Always follow the required clearance to combustibles for the vent or chimney system you are installing. DuraTech chimney pipe requires a minimum of 2” clearance to any combustible.
DURATECH CHIMNEY CAS INSTALLaTION The DuraVent Combustion Air System (CAS) can be used with both vertical (through-the-ceiling) and horizontal (through-the-wall) DuraTech chimney installations. The CAS system is designed to be used with stoves that have a specific air-inlet on the back of the stove. Verify the stove you are using has an air-inlet to which the CAS system can be attached.
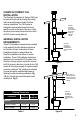
Maintain at least 8" clearance between CAS Stove Pipe and ceiling Through-the-Ceiling Installations MAINTAIN AT LEAST 8" CLEARANCE BETWEEN CAS STOVE PIPE AND CEILING for thruthe-wall installations using a chase enclosure, provide an access door for cleaning Step 1. Determine the location of the CAS Ceiling Support. The CAS Ceiling Support is installed instead of a standard Support Box.
the underside of the roof. In this type of installation, the combustion air is drawn in through the flashing, underneath the Storm Collar (Fig 5). air enters under the storm collar through the flashing for attic chase installations Step 3. Install CAS Connector Pipe. After the CAS Ceiling Support is installed and the stove is located, the CAS Connector Pipe can be installed.
attach elbow to branch of adapter with (3) screws provided. Tighten collar around chimney section. Slide collar down to rest on top of Ceiling Support attach flex to stove and elbow using hose clamps provided Figure 8 attach flex adapter over stove air inlet by using (4) screws. secure flex to flex adapter by using hose clamp provided. Figure 9 air must be allowed to flow under collar into ceiling support. do not seal openings between collar and ceiling support. of the Adapter.
desired length, secure the two halves with (3) 3/8” screws provided. If an offset in the connector pipe is needed, CAS 45-degree and 90-degree elbows are available. Elbows cannot be combined to create a bend more than 90-degrees. chimney sections into the CAS Ceiling Support as normally directed in the full DuraTech Installation Instructions. You should install enough chimney to reach at least a few inches above the CAS Ceiling Support. The remainder of the chimney pipe will be installed later. Step 4.
Through-the-Wall Installations Step 1. Determine location for CAS Wall Thimble. The CAS Wall Thimble should be located near the stove to keep the connector pipe to a reasonable length. Step 2. Install CAS Wall Thimble. Cut and frame an opening in the wall for the CAS Wall Thimble. Refer to Table 1 for framing dimensions. Install the black-painted inside portion of the CAS Wall Thimble into the framed opening.
Tee with the Tee Support as detailed in the full DuraTech installation instructions. Continue to install the remainder of the chimney system as described in those installation instructions. Step 6. Ensure CAS system has access to outside air. The CAS system needs to have access to outside air for the stove to use. If the chimney is unenclosed on the outside of the home, no steps are needed to provide air. The outside portion of the CAS Wall Thimble has air-inlet openings to provide air to the stove.
M&G DuraVent limited lifetime Warranty M&G DuraVent, Inc. (“DuraVent”) provides this limited lifetime warranty for all of its products with the exception of Ventinox® (lifetime), and PolyPro® (ten years). Subject to the limitations set forth below, DuraVent warrants that its products will be free from defects in material or manufacturing, if properly installed, maintained and used. DuraVent products are fully warranted if installed only by a professional installer.