
Manual


6
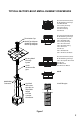
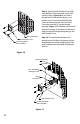
Figure 3
chimney, a Top Adapter (985K) and Flashing
are used at the top of the masonry chimney.
The 4-inch aluminum liner is connected to
the adapter and is passed down the chimney
and out through the masonry wall. This
is attached to the Retro Connector (909B)
which is in turn, attached to the masonry wall
and is then connected to the direct vent pipe
leading to the appliance.
INSTALLATION INSTRUCTIONS
FOR CONVERTING A FACTORY
BUILT METAL CHIMNEY
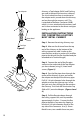
Step 1. Remove the existing chimney cap.
Step 2. Measure the distance from the top
end of the chimney to the bottom of the
ceiling support box, add 3 inches to this
measurement, and cut a section of 4-inch ex
pipe to that length (the ex should already be
extended to its nominal length).
Step 3. Connect the end of the ex pipe
section to the underside of the Top Adapter
you have selected, using (3) sheet metal
screws. (Figure 2.)
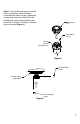
Step 4. Pass the ex pipe down through the
center of the chimney system, and center
the adapter on the top of the chimney pipe.
Drill (4) 1/8-inch diameter holes through the
adapter, and into the chimney top. Insure
that you are in fact, drilling into the metal on
the chimney. Twist-lock the Termination Cap
(980 or 991) onto the Adapter. (Figures 3 and
4.)
Step 5. Pull the ex pipe down through
the ceiling support box, until it protrudes
approximately 3 inches. Connect the ex
pipe to the Retro Connector by slipping it
into the 4-3/4-inch diameter sleeve on the
top side of the Connector. Use (3) Sheet
Metal Screws, to assemble these two parts.
Figure 2
Top Adapter
Flex Pipe
Sheet Metal
Screws