
Manual


8
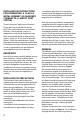
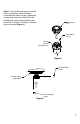
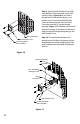
Figure 7
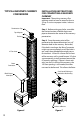
INSTALLATION INSTRUCTIONS
FOR CONVERTING A MASONRY
CHIMNEY
Important: The existing masonry ue
opening needs to have an area of at least a
35-sqr-in. to insure proper intake / exhaust
ow.
Step 1. Before cutting any holes, assemble
the desired sections of black direct vent
pipe to determine the center of the masonry
penetration.
Step 2. Once the center point of the
penetration has been determined, cut a 6”
diameter hole in the masonry. Be careful,
if the hole is too large, the Retro Connector
might not mount properly, and if the hole is
too small, then the appliance might starve
for intake air. If there is a frame wall in front
of the masonry wall, cut and frame a 10” clear
square opening in wall (centered around the
6” masonry opening). If there is sheet rock
only (no studs) in front of the masonry, the
10” clear opening is still needed, but does
not need to be framed. This allows the Retro
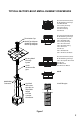
Figure 6
TYPICAL MASONRY CHIMNEY
CONVERSION
Termination Cap
Top Adapter
Flashing
4” Flex Liner
Retro
Connector
Black Direct
Vent Pipe
Cut & bend ashing as
needed to t chimney
Sealant adhesive