Installation instructions Shower tray with integrated tile flange Notice de montage Receveur de douche avec bride de carrelage intégrée Instrucciones de montaje y uso Plato de ducha con cinta selladora para juntas de azulejos # 720244 .. . .. ..90 # 720245 .. . .. ..90 # 720246 .. . .. ..90 # 720247 .. . .. ..90 # 720248 .. . .. ..90 # 720249 .. . .. ..90 # 720250 .. . .. ..90 # 720252 .. . .. ..90 # 720253 .. . .. ..90 # 720254 .. . .. ..
70300170_Mounting_Shower tray_Tile flange_US
en 4 Installation 5 Remarques importantes 8 Montage 9 es fr Important information Información importante 12 Montaje 13 70300170_Mounting_Shower tray_Tile flange_US 3
en About these instructions Prior to the installation The installation instructions come as part of the Duravit product and must be read carefully prior to installation. Please read the specification sheets prior to the installation. Specification sheets are available for download at www.pro.duravit.us. Target readership and qualifications This is a professional grade product.
en Delivery contents # 720244 .. . .. ..90 # 720245 .. . .. ..90 # 720246 .. . .. ..90 # 720247 .. . .. ..90 # 720248 .. . .. ..90 # 720249 .. . .. ..90 # 720250 .. . .. ..90 # 720252 .. . .. ..90 # 720253 .. . .. ..90 # 720254 .. . .. ..
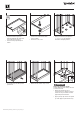
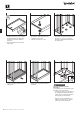
2 3 en 1 > Inspect shower tray for any potential damage that may have occured during transport. > Do not install if any damage is visible. 4 > Connect no-caulk shower drain (not included). > Outlet size 3 ½" (9 cm) 5 > Apply floor-leveling compound in 2 - 2 ½" (5 - 6,5 cm) diameter mounds at tub feet positions. 6 6x > Set shower tray into designated frame area. > Make sure the shower tray is level.
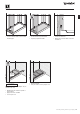
8 9 en 7 > Connect shower drain (not included) to drain pipe. > Fill the shower tray with water. > Inspect for potential leaks. 10 11 > Finish wall and tiles. > Make sure to install water-resistant wallboard. ~110 lbs ~50 kg NOTICE Apply silicone recommended for acrylic shower trays only. > Remove weight. > Test for leaks to ensure proper seal. > Weigh down the shower tray with a heavy object. > Apply silicone as needed. > Let it sit for 24 h.
À propos de ces instructions Avant l’installation Ces instructions d’installation font partie du produit Duravit et doivent être lues soigneusement avant l’installation. Veuillez lire les fiches de spécifications avant l’installation. Les fiches de spécifications peuvent être téléchargées sur www.pro.duravit.us. fr Lectorat ciblé et compétences Il s’agit ici d’un produit de niveau professionnel.
fr Contenu de la livraison # 720244 .. . .. ..90 # 720245 .. . .. ..90 # 720246 .. . .. ..90 # 720247 .. . .. ..90 # 720248 .. . .. ..90 # 720249 .. . .. ..90 # 720250 .. . .. ..90 # 720252 .. . .. ..90 # 720253 .. . .. ..90 # 720254 .. . .. ..
2 3 fr 1 > Vérifiez la présence sur le receveur de douche d’éventuels dommages pouvant être survenus durant le transport. > Ne pas installer si des dommages sont visibles. 4 > Raccordez le drain de douche sans calfeutrage (non fourni). > Taille de la sortie 3 ½" (9 cm) 5 > Appliquer le composé de nivellement du sol de 2 - 2 ½" (5 - 6,5 cm) de diamètre à l'emplacement des pieds de la baignoire. 6 6x > Placez le receveur de douche dans le cadre prévu.
8 9 fr 7 > Raccordez le drain de douche (non fourni) au tuyau d’évacuation. > Remplissez le receveur de douche d’eau. > Vérifiez la présence d’éventuelles fuites. 10 11 > Terminez la cloison et le carrelage. > Assurez-vous d’installer un panneau mural résistant à l’eau. 24:00:00 ~110 lbs ~50 kg ATTENTION > Appliquez uniquement le silicone recommandé pour les receveurs de douche en acrylique. > Retirez l’objet lourd. > Vérifiez l'absence de fuites pour assurer une bonne étanchéité.
Acerca de estas instrucciones Antes de la instalación Las instrucciones de instalación forman parte del producto Duravit y se deben leer detenidamente antes de la instalación. Leer las fichas técnicas antes de la instalación. Las fichas técnicas pueden descargarse en www.pro.duravit.us. Lectores destinatarios y cualificaciones Este es un producto de calidad profesional.
es Contenido de la entrega # 720244 .. . .. ..90 # 720245 .. . .. ..90 # 720246 .. . .. ..90 # 720247 .. . .. ..90 # 720248 .. . .. ..90 # 720249 .. . .. ..90 # 720250 .. . .. ..90 # 720252 .. . .. ..90 # 720253 .. . .. ..90 # 720254 .. . .. ..
1 > Conectar el desagüe de la ducha sin utilizar sellador (no incluido). > Diametro del desagüe 3 ½" (9 cm) 3 > Aplique nivelador de pisos en 2 - 2 ½" (5 - 6,5 cm) de diámetro montículos en las posiciones de los pies de la bañera. es > Inspeccionar el plato de ducha por si hubiera ocurrido algún daño potencial durante el transporte. > No instalar el producto si hay daños visibles. 2 4 5 6 6x > Encajar el plato de ducha en el área designada en el marco.
7 8 > Llenar con agua el plato de ducha. > Inspeccionar por si hubiera posibles fugas. 10 11 > Realizar el acabado en la pared y los azulejos. > Asegurarse de instalar un tablero resistente al agua. es > Conectar el desagüe de la ducha (no incluido) con la tubería de desagüe. 9 ~110 lbs ~50 kg AVISO > Aplicar solamente silicona recomendada para platos de ducha acrílicos. > Retirar el peso. > Compruebe la impermeabilización. > Cargar el plato de ducha con un objeto pesado.
Order Number (manual): 70300170/21.03.1 Reference Number (manual): 57478/21.03.1 We reserve the right to make technical improvments and design modifications to the products illustrated. DURAVIT USA, INC. 2635 North Berkeley Lake Rd., Ste. 100 Duluth, GA 30096 Toll Free 888-DURAVIT Phone 770-931-3575 Fax 770-931-8454 info@us.duravit.com www.duravit.