C.
MAL_57159/17.06.
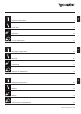
en 4 Installation 5 Operation 11 Care & maintenance 12 Remarques importantes 15 Montage 16 Commande 22 Entretien & maintenance 23 Información importante 26 Montaje 27 Manejo 33 Conservatión y mantenimiento 34 es fr Important information MAL_57159/17.06.
en These instructions are part of the Duravit product and must be read carefully and kept available at all times. Target readership and qualifications The product may only be installed by a qualified plumber. Explanation of the key words Indicates a hazardous situation which, if not avoided, could result in minor or moderate injury. CAUTION Addresses practices not related to physical injury.
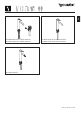
en # C11010 001U 10, # C11020 001U 10, # C11030 001U 10, # C11040 001U 10 # C11010 002U 10, # C11020 002U 10, # C11030 002U 10, # C11040 002U 10 # C12400 001U 10 MAL_57159/17.06.
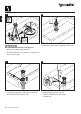
2 en 1 2 1 NOTICE >> Inspect the faucet for any damages. Tap unit malfunction due to dirty pipes >> Flush the pipes according to the applicable standards before mounting the tap unit. Water damage >> Enclose pipes with silicone that does not contain acetic acid. 3 4 CAUTION Cut and crush injuries >> Wear gloves during installation. >> Insert lift rod into the back of the faucet body. 6 MAL_57159/17.06.1 >> Insert faucet body through sink.
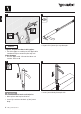
6 en 5 7 Nm / 5 ft-lbs. >> Assemble the O-ring over the hoses and then place the spout assembly into center opening in sink. >> Install the wahsers and securing nut onto the spout body from underneath. 7 >> Tighten the screws maximum torque 5 ft-lbs. 8 70 Leakage through wrong installed hoses >> Make sure that hoses are not kinked or twisted during installation. NOTICE CAUTION >> Avoid contact. The hot valves can cause scalding >> Attach supply lines to shutoff valves. MAL_57159/17.06.
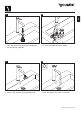
10 en 9 8 Nm 5.9 ft-lbs 19 mm CAUTION Cut and crush injuries >> Wear gloves during installation. >> Place the waste seat in opening of the sink. >> Use two wrenches, as shown, to connect the hoses to the stops. 11 12 >> From the underside of the sink, thread the drain body into the waste seat. >> Slide the pull rod onto lift rod. >> Tighten the bolt with a flat head screwdriver. 8 MAL_57159/17.06.
14 >> Push the waste seat through sink opening. >> Install the pop-up drain. >> Turn on hot and cold water supply. 15 16 en 13 00:02:00 >> Remove the aerator using provided tool. >> Flush the faucet for at least 2 minutes. MAL_57159/17.06.
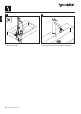
18 >> Check for leaks. >> Reinstall the aerator using provided tool. en 17 X 10 X MAL_57159/17.06.
X en X >> Open. X >> For cold water turn on the handle to the right. >> Close. X >> For hot water turn on the handle to the left. MAL_57159/17.06.
2 en 1 >> To ensure a good water outlet, clean the aerator each month. >> Remove the aerator using provided tool. 3 4 >> Reinstall the aerator using provided tool. 12 >> Flush the aerator on both sides. MAL_57159/17.06.
en microfib re Chemical/Cleaners to avoid: • Abrasives and polishes, including bleach based cleaners • Scrubbing bubbles and Lysol basin tub • Soft scrub, tile cleaner and Windex original • Fantastic antibacterial heavy duty and comet bathroom cleaner • Products containing hydrofluoric • Hydrochloric and/or phosphoric acids • Anything with caustic agents • Anything with ammonia, bleach or acid Cleaning tools to avoid: • Abrasive cleaning pads • Scraping tools • Abrasive cleaning tools Cleaning tools reco
2 en 1 59 77 °F Spray mist can ingress and cause damage to the faucets and fittings >> Spray cleaner onto the cleaning cloth. NOTICE 3 4 >> Rinse cleaner and dirt with water. 14 >> Ensure that temperature exceed 59 – 77 °F. MAL_57159/17.06.1 >> Dry off faucet with the clean leather cloth.
Ces instructions font partie du produit Duravit et doivent être lues attentivement et conservées en tout temps. Lectorat ciblé et compétences Le produit peut seulement être installé par un plombier compétent. Explication des mots-clés ATTENTION Indique une situation dangereuse qui, si elle n'est pas évitée, entraînera des blessures mineures ou moyennes. lessures et coupures B >> Portez des gants lorsque vous installez le produit.
fr # C11010 001U 10, # C11020 001U 10, # C11030 001U 10, # C11040 001U 10 # C12400 001U 10 16 MAL_57159/17.06.
X 1 X 2 2 1 X 3 >> Assurez-vous que les robinets ne sont pas endommagés. fr Dysfonctionnement de la robinetterie en raison d’une tuyauterie malpropre >> Rincez les tuyaux selon les normes applicables avant d’installer la robinetterie. Dégât d’eau >> Joignez les tuyaux en silicone qui ne contiennent pas d’acide acétique. ATTENTION X 4 MISE EN GARDE Blessures et coupures >> Portez des gants pendant l'installation. >> Insérez le robinet dans le lavabo.
5 X 6 X fr 7 Nm / 5 ft-lbs. >> Assemblez l'anneau en O sur les tuyaux, puis placez l'assemblage du bec verseur dans l'ouverture au centre du lavabo. >> Installez les rondelles et serrez l'écrou dans le bec verseur par en dessous. X 7 >> Serrez les vis avec un couple maximal de 5 pi-lb. 8 X 70 Fuite entraînée par une mauvaise installation des tuyaux >> Assurez-vous que les tuyaux ne sont pas entortillés ou enroulés pendant l'installation. ATTENTION 18 MAL_57159/17.06.
9 X 10 X 8 Nm 5.9 ft-lbs 19 mm Blessures et coupures >> Portez des gants pendant l'installation. >> Placez le raccord à déchet dans l'ouverture du lavabo. fr MISE EN GARDE >> Utilisez deux clés, tel qu'illustré, pour relier les tuyaux aux bouchons. 11 X 12 X >> Par en dessous du lavabo, ajustez le filage du corps dans le raccord à déchet. >> Faites glisser la tige de traction dans la tige de levage. >> Serrez les boulons avec un tournevis à tête plate. MAL_57159/17.06.
fr 13 X 14 X >> Poussez le raccord à déchet dans l'ouverture du lavabo. >> Installez la bonde mécanique. >> Ouvrez les robinets chaud et froid. 15 X 16 X 00:02:00 >> Enlevez l'aérateur à l'aide de l'outil fourni. 20 MAL_57159/17.06.1 >> Rincez les robinets pendant au moins 2 minutes.
18 X >> Vérifiez qu'il n'y a pas de fuites. >> Réinstallez l'aérateur à l'aide de l'outil fourni. fr 17 X MAL_57159/17.06.
>> Fermez. >> Pour l'eau froide, tournez la poignée vers la droite. >> Pour l'eau chaude, tournez la poignée vers la gauche. fr >> Ouvrez. 22 MAL_57159/17.06.
>> Pour assurer une bonne sortie de l'eau, nettoyez l'aérateur chaque mois. >> Enlevez l'aérateur à l'aide de l'outil fourni. 2 >> Rincez l'aérateur des deux côtés. fr 1 3 >> Réinstallez l'aérateur à l'aide de l'outil fourni. MAL_57159/17.06.
microfib fr re Produits chimiques/nettoyants à éviter : • Des produits abrasifs et polissant, dont des nettoyants à base de javellisant • Scrubbing bubbles et Lysol pour la baignoire • Soft scrub, nettoyant pour carrelage et Windex original • Fantastik antibactérien puissant et Comet nettoyant pour la salle de bain • Des produits contenant des acides fluorhydriques • Des acides chlorhydriques et/ou phosphoriques • Tout produit contenant des agents corrosifs • Tout produit contenant de l'ammoniaque, de l'
1 2 59 77 °F 3 >> Rincez le nettoyant et la saleté avec de l'eau. >> Assurez-vous que la température dépasse les 15 à 25 °C (59 – 77 °F). fr La fine brume peut s'infiltrer et endommager les robinets et les raccords >> Vaporisez le nettoyant sur le linge. ATTENTION 4 >> Séchez les robinets avec la cuirette propre. MAL_57159/17.06.
Estas instrucciones de montaje forman parte del producto Duravit y es necesario leerlas detenidamente antes del montaje. Lectores destinatarios y cualificaciones La instalación del producto solo puede llevarse a cabo por un fontanero cualificado. Explicación de las palabras clave ATENCIÓN AVISO Indica una situación peligrosa que puede provocar lesiones de gravedad media o leve si no se evita. Describe prácticas no relacionadas con lesiones físicas.
# C11010 001U 10, # C11020 001U 10, # C11030 001U 10, # C11040 001U 10 # C11010 002U 10, # C11020 002U 10, # C11030 002U 10, # C11040 002U 10 es # C12400 001U 10 MAL_57159/17.06.
1 2 2 1 Funcionamiento defectuoso de la grifería debido a que las tuberías están sucias >> Antes de montar la grifería, descargar las tuberías según las normas aplicables. Daños por agua >> Sellar las tuberías con silicona sin ácido acético. AVISO 4 es 3 >> Inspeccionar la grifería por si hubiera daños. ATENCIÓN Lesiones por corte y aplastamiento >> Llevar guantes durante la instalación. >> Insertar la varilla de elevación en la parte posterior del cuerpo de grifería. 28 MAL_57159/17.06.
5 6 7 Nm / 5 ft-lbs. >> Montar la junta tórica en las mangueras y posteriormente colocar el conjunto de llenado en la abertura central del lavabo. >> Desde abajo, instalar las arandelas y la tuerca de seguridad en el cuerpo de llenado. 7 >> Apretar los tornillos a un par máximo de 5 ft-lb. 8 es 70 Fuga en mangueras instaladas incorrectamente >> Asegurarse de no retorcer ni doblar las mangueras durante la instalación. AVISO Las válvulas calientes pueden causar quemaduras >> Evitar el contacto.
9 10 8 Nm 5.9 ft-lbs 19 mm ATENCIÓN Lesiones por corte y aplastamiento >> Colocar el asiento de desagüe en la abertura del lavabo. >> Llevar guantes durante la instalación. >> Utilizar dos llaves, según se muestra, para conectar las mangueras a los topes. 12 >> Desde la parte inferior del lavabo, enroscar el cuerpo de desagüe en el asiento. >> Deslizar el varillaje por la varilla de elevación. >> Apretar el perno con un destornillador de cabeza plana. es 11 30 MAL_57159/17.06.
13 14 >> Empujar el asiento de desagüe a través de la abertura del lavabo. >> Instalar la válvula de desagüe automática. >> Abrir el suministro de agua caliente y de agua fría. 15 16 es 00:02:00 >> Retirar el aireador utilizando la herramienta suministrada. >> Descargar la grifería durante al menos 2 minutos. MAL_57159/17.06.
17 18 >> Comprobar por si hubiera fugas. >> Volver a instalar el aireador utilizando la herramienta suministrada. X es X 32 MAL_57159/17.06.
X >> Abrir. >> Cerrar. X es X X >> Para el agua fría, abrir el mando girándolo a la derecha. >> Para el agua caliente, abrir el mando girándolo a la izquierda. MAL_57159/17.06.
1 2 >> Para garantizar una buena salida del agua, limpiar mensualmente el aireador. >> Retirar el aireador utilizando la herramienta suministrada. 4 es 3 >> Volver a instalar el aireador utilizando la herramienta suministrada. 34 >> Descargar el aireador en ambos lados. MAL_57159/17.06.
microfib re Productos químicos/limpiadores que se deben evitar: • Productos abrasivos y abrillantadores, incluidos los productos de limpieza con base de lejía • Burbujas de limpieza y Lysol para lavabos • Cepillo de cerdas suaves, producto para limpiar azulejos y Windex original • Fantástico producto de limpieza para baños Comet, antibacteriano y altamente resistente • Productos que contienen ácido fluorhídrico • Ácidos clorhídricos y/o fosfóricos • Cualquier producto con agentes cáusticos • Cualquier pro
1 2 59 77 °F La neblina de spray puede penetrarse en la grifería y los accesorios y dañarlos >> Aplicar el producto de limpieza en el paño. AVISO 4 es 3 >> Asegurarse de que la temperatura no sea superior a 59-77 °F. >> Aclarar con agua para eliminar el producto de limpieza y la suciedad. 36 MAL_57159/17.06.1 >> Secar la grifería utilizando una gamuza limpia de piel natural.
DURAVIT USA, INC. 2635 North Berkeley Lake Rd., Ste. 100 Duluth, GA 30096 Toll Free 888-DURAVIT Phone 770-931-3575 Fax 770-931-8454 info@us.duravit.com www.duravit.us Order no. 57159/17.06.1 We reserve the right to make technical improvements and enhance the appearance of the product shown. DURAVIT NYC 105 Madison Avenue New York, NY 10016 Toll Free 888-DURAVIT Phone 212-686-0033 Fax 212-686-8033 info@us.duravit.com www.duravit.