
Operation Manual


2-12
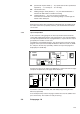
and press the Plus/Minus key until 150 ms is set. This assures that the
presser foot is lifted safely after seam end.
2. Position the cursor on the value of the holding voltage (upper row, value in
the middle of the display) and press the Plus/Minus key until 15 V is set.
This assures that the magnetic valve for the foot release will not be
overloaded.
3. Position the cursor on the value of the start delay (right edge) and enter
120 ms here. This time is required to assure that the sewing foot rests
safely on the cloth before sewing starts.
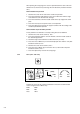
4. Position the cursor on both presser foot icons and set them to „Presser
foot up“ like shown in the picture.
5. Press the Special key to leave this page.
6. Check, whether the presser foot is programmed on „up“ on page „PROG
000“, too.
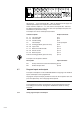
3.5.4 Needle cooling
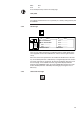
SETUP-03
[ms] 100
The needle cooling must be enabled during the sewing and will be disabled
100 ms after seam end.
Press the Special key to leave this page.
3.5.5 Step motors: pinking mechanism and metering
The motor of pinking mechanism and metering are optimized as a factory
setting and should not be modified. Open the corresponding setup page to
check the settings:
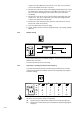
SETUP-03
1234
80 80
2
2
1
10
116
1
1
7
1
80
8
8
8
1
10
JS
KJ
KP
KA
IL
IH
80
8
8
8
1
10
All values must be set like shown in the drawing.
JS jog speed: tape transportation speed for manual tape threading up;
KJ speed factor in POS mode: tape transportation speed during program
sequence;