Durock Shower System ™ Strength Beneath the Surface ™ Sistema de Ducha Durock™ / Système de Douche Durock™ Shower Assembly with Prefabricated Durock Shower System ™ Conjunto de ducha con Sistema de Ducha Durock™ Prefabricado Ensemble de douche avec Système de Douche Préfabriqué Durock™ Installation Guide Guía de instalación / Guide d’installation
Pipe Seal Table of Contents Sello de tubería Joint de tuyau Approved Substrate Introduction Substrato aprobado Fond recommandé Durock Shower System Kits . . . . . . . . . . . . . . . . . . . . . . . . . . . . . 2 . . . . . . . . . . . . . . . . . . . . . . . . . . . . . . . . . . . . . . . . . . . . . . 2 Special Features . . . . . . . . . . . . . . . . . . . . . . . . . . . . . . . . . . . .
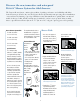
Discover the new, innovative and waterproof Durock™ Shower System for tiled showers. The Durock Shower System continues the tradition of quality, performance and reliability, which has defined Durock products for 30 years.
Shower Walls Pipe Seal 5. Install Durock™ Shower System Waterproofing Band at all vertical inside wall corners using unmodified thin-set mortar and a 3/16" x 3/16" (5 mm x 5 mm) v-notched trowel or 1/8" x 1/8" (3 mm x 3 mm) square or u-notched trowel. 2. Place seal over pipe and embed into the mortar using a finishing trowel, drywall taping knife, or similar tool to remove air pockets and to ensure proper adhesion. cont. Shower Floor cont. 1.
Shower Floor Shower Floor 7. Install Durock Shower System Waterproofing Band at all floor/wall junctions using unmodified thin-set mortar and a 3/16" x 3/16" (5 mm x 5 mm) v-notched trowel or 1/8" x 1/8" (3 mm x 3 mm) square or u-notched trowel. 9. Next, install the Durock™ Drain Assembly into the pre-sloped shower tray disk, pressing firmly to ensure proper alignment and full support of the bonding flange. Once in place apply unmodified thin-set mortar to the top of the bonding flange.
Shower Floor Grate Assembly 15. The Durock Shower System waterproofing application is now complete. Before water testing and setting tile, allow a minimum of 24 hours to ensure both proper curing of thin-set mortar and waterproof performance at all seams and connections. 1. The Durock™ Shower System Grate Assembly is installed at the same time as the floor tile. Drain Assembly cont. 16. Insert a water test plug and fill the shower with approximately 3" of water.
Descubra el Sistema de Ducha Durock™ para duchas de azulejos, nuevo, innovador e impermeable. El Sistema de Ducha Durock continúa la tradición de calidad, desempeño y fiabilidad que durante 30 años ha definido a los productos Durock.
Paredes de la ducha Sello de tubería (cont.) (cont.) Piso de la ducha 5. Instale la Banda Impermeable del Sistema de Ducha Durock™ en todas las esquinas de paredes interiores verticales utilizando mortero de fraguado delgado sin modificar y una llana con ranuras en V de 3/16 pulgada x 3/16 pulgada (5 mm x 5 mm) o llana cuadrada o con ranuras en U de 1/8 pulgada x 1/8 pulgada (3 mm x 3 mm). 2.
Piso de la ducha Piso de la ducha 7. Instale la Banda Impermeable del Sistema de Ducha D urock™ todas las uniones del piso/pared utilizando mortero de fraguado delgado sin modificar y una llana con ranuras en V de 3/16 pulgada x 3/16 pulgada (5 mm x 5 mm) o llana cuadrada o con ranuras en U de 1/8 pulgada x 1/8 pulgada (3 mm x 3 mm). 9.
Piso de la ducha Conjunto de rejilla 15. La aplicación de impermeabilización del Sistema de Ducha D urock ha finalizado. Antes de probar la impermeabilidad e instalar los azulejos, deje que transcurra un mínimo de 24 horas p ara garantizar el curado adecuado del mortero de fraguado delgado y la impermeabilidad de todas las costuras y conexiones. 1. El Conjunto de Rejilla del Sistema de Ducha Durock™ y las losetas para pisos se instalan simultáneamente. (Conjunto de drenaje cont.) 16.
Découvrez le dernier Système de Douche Durock™ novateur et étanche pour douches carrelées. Le Système de Douche Durock poursuit la tradition de qualité, de performance et de fiabilité qui a distingué les produits Durock depuis 30 années.
Parois de douche Joint de tuyau Sol de la douche 2. Placer le joint sur le tuyau et le sceller dans le mortier à l’aide d’une truelle de finition, un couteau de rubanage pour cloison sèche, ou d’un outil similaire pour enlever les poches d’air et assurer une forte adhésion. 1. Placer l’anneau du receveur de douche sur le sous-plancher à l’emplacement voulu pour le drain.
Sol de la douche Sol de la douche 7. Installer une Bande d’Étanchéité de Système de Douche Durock dans tous les raccords de sol et de paroi en utilisant un mortier à couche mince non modifié et une truelle à encoches en V de 5 mm x 5 mm (3/16 po x 3/16 po) ou à encoches carrées ou en U de 3 mm x 3 mm (1/8 po x 1/8 po). 9.
Sol de la douche Ensemble de grille 15. L’application de l’étanchéité pour Système de Douche Durock est maintenant terminée. Avant de vérifier avec de l’eau et de poser les carreaux, laisser un minimum de 24 heures pour garantir la prise correcte du mortier à couche mince ainsi que la bonne étanchéité de tous les joints et raccords. 1. L’Ensemble de Grille du Système de Douche Durock™ est installé en même temps que les carreaux pour sol. Suite de l’Ensemble de drainage 16.
Notes/Notas/Remarques 14
Product Information Visit durockshowersystem.com to download the complete Durock™ Shower System Installation Guide. Safety First! Follow good safety and industrial hygiene practices during handling and installation of all products and systems. Take necessary precautions and wear the appropriate personal protective equipment as needed. Read material safety data sheets and related literature on products before specification and/or installation.