
Installation Guide


11. Apply unmodified thin-set
mortar to the subfloor and
edge of the pre-sloped
shower tray, curb(s), and
adjacent walls—using a
1/4" x 3/8" (6 mm x 10 mm)
square or u-notched
trowel—and firmly press
shower curb(s) into the
mortar.
12. Apply unmodified thin-set
mortar to the pre-sloped
shower tray and curb(s)
using a 3/16" x 3/16"
(5 mm x 5 mm) v-notched
trowel or 1/8" x 1/8"
(3 mm x 3 mm) square or
u-notched trowel.
13. Apply
Durock Shower
System Waterproofing
Membrane to remaining
pre-sloped tray section,
overlapping seams a
minimum of 2", and wrap
over and around curb(s). Use
a finishing trowel, drywall
taping knife, or similar tool
to remove air pockets and
ensure proper adhesion.
14. Install
Durock
™
Shower
System Preformed Inside
and Outside Corners to seal
curb/wall junctions using
unmodified thin-set mortar
and a 3/16" x 3/16"
(5 mm x 5 mm) v-notched
trowel or 1/8" x 1/8"
(3 mm x 3 mm) square or
u-notched trowel. Embed
preformed corners in the
thin-set mortar using a
drywall taping knife or
margin trowel to ensure
proper adhesion to shower
curb(s) and wall.
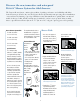
7. Install
Durock Shower
System Waterproofing Band
at all floor/wall junctions
using unmodified thin-set
mortar and a 3/16" x 3/16"
(5 mm x 5 mm) v-notched
trowel or 1/8" x 1/8"
(3 mm x 3 mm) square or
u-notched trowel.
Tip: To center waterproofing
band at floor/wall junctions,
crease waterproofing band by
folding in half lengthwise. Embed
waterproofing band in thin-set
mortar using a drywall taping knife
or margin trowel.
8. Apply unmodified thin-set
mortar to the surface of the
pre-sloped shower tray, and
tray disk—make sure to fill
the shower tray disk—and
apply the mortar to the bottom
of the drain bonding flange.
Apply the mortar with a
3/16" x 3/16" (5 mm x 5 mm)
v-notched trowel or
1/8" x 1/8" (3 mm x 3 mm)
square or u-notched trowel.
Tip: Before applying mortar to
shower tray and shower tray
disk, establish the location of the
hole in the shower membrane
that corresponds to the recessed
area at the top of the drain body
by first dry-fitting the drain body
and membrane. Cut the opening
in the shower membrane using
the provided membrane cut-out
template.
9. Next, install the Durock
™
Drain Assembly into the
pre-sloped shower tray disk,
pressing firmly to ensure
proper alignment and full
support of the bonding
flange. Once in place apply
unmodified thin-set mortar
to the top of the bonding
flange. Do not fill the recessed
areas of the bonding flange
with thin-set mortar until the
grate assembly is ready to be
installed.
Note: If there is no access to
the waste line from below, the
Durock Drain Assembly must be
connected to the waste line at the
same time it is pressed into the
mortar.
10. Embed Durock Shower
System Waterproofing
Membrane into the thin-set
mortar using a finishing
trowel, drywall taping knife,
or similar tool to remove air
pockets and ensure proper
adhesion to the pre-sloped
shower tray and drain
assembly bonding flange.
Shower Floor
cont.
Shower Floor
Drain Assembly (See Drain Assembly and Grate Assembly on page 5)
4