
Replacement Part List


7
crankcase. You will know the crankcase is full when the oil level has reached the lower
lip of the opening you have just poured the oil into (see figure 3).
4. Replace oil filler cap.
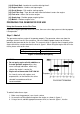
Figure 2- Unscrewing the oil cap Figure 3 - Adding oil
Step 2- Add Gasoline
WARNING: Gasoline and gas fumes are highly flammable.
• Do not fill tank near an open flame.
• Do not overfill. Always check for fuel spills.
To ensure that the generator runs smoothly use only FRESH, UNLEADED GAS WITH AN
OCTANE RATING OF 87 OR HIGHER. To add gasoline:
1. Make sure the generator is on a level surface.
2. Unscrew gas cap and set aside (NOTE: the gas cap may be tight and hard to
unscrew).
3. Slowly add unleaded gasoline to the fuel tank. Be careful not to overfill. Please refer
to the chart in figure 4 to find the gas capacity of your generator model. The fuel
gauge on the top of the generator indicates how much gasoline is in the generator
gas tank. NOTE: Gas can expand. Do not fill the gas tank to the very top.
4. Replace fuel cap and wipe up any spilled gasoline with a dry cloth.
IMPORTANT:
• Never use an oil/gasoline mixture.
• Never use old gas.
• Avoid getting dirt or water in the fuel tank.
• Gas can age in the tank and make it hard to start up the generator in the future.
• Never store generator for extended periods of time with fuel in the tank.
Model number DS4000S
Gas tank capacity
15L(3.96 us. gallons)
Figure 4 - Gas Tank Capacity
Step 3- Ground the Generator
WARNING: Failure to properly ground the generator can result in electrocution.
Ground the generator by tightening the grounding nut against a grounding wire (see figure 5).