
User Manual


not start
(continued
from page
19)
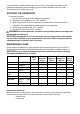
Spark plug is broken. Replace spark plug.
Generator is not on level
surface.
Move generator to a level surface to
prevent low oil shutdown from
triggering.
Oil is low Add or replace oil.
Engine
runs but
there is no
electrical
output
Circuit breaker is off.
Set the circuit breaker to the “ON”
position.
Bad connecting wires/cables.
If you are using an extension cord,
try a different one.
Bad electrical device
connected to generator.
Try connecting a different device.
Generator
runs but
does not
support all
electrical
devices
connected.
Generator is overloaded
Try connecting fewer electrical loads
to the generator.
Shorten one of the connected
devices.
Try disconnecting any faulty or
short-circuited electrical loads.
Air cleaner is dirty. Clean or replace air cleaner.
GENERATOR ASSEMBLY AND MOUNTING
Generator is supplied with a wheel kit. If you want to install the wheel kit on your unit, please
follow the instructions below. If you will not be using the wheel kit, skip this section.
1. Place the bottom of the generator cradle on a flat, even surface. Temporarily place
unit on blocks to ease assembly.
2. Secure the support leg to the cradle with cap screws (M8 x 16) and lock nuts (M8)
(see figure 22 ).
3. Secure the axle to the cradle with cap screws (M8 x 16) and lock nuts (M8) (see figure
23).
Figure 22 Figure 23 Figure 24
4. Slide a wheel over the axle, then secure the wheel with a retaining pin.
(see figure 24,Figure 25, Figure 26).
5. Position the handles on the cradle and attach, cap screws (M8 x 16) and lock nuts (M8)
( Figure 27,Figure 28).
6. Check that all fasteners are tight.