
Installation Guide

INSTALLATION INSTRUCTIONS
CENTER MOUNT POST SYSTEMS
Tools and/or Materials Required:
• Shovel or posthole digger
• Concrete mix and gravel (optional)
• Level, ½ inch open/box end wrench or socket set.
• Fastening hardware - included
• Other tools/materials may also be necessary depending upon actual installation.
Installation Procedure:
1. General Installation Requirements
: Customers are required to contact the local Post Office before
installing the mailbox to insure its correct placement and height at the street. Generally, mailboxes are
installed at a height of 41–45 inches from the road surface to inside floor of the mailbox or point of mail
entry (locked designs) and are set back 6 – 8 inches from front face of curb or road edge to the mailbox
door.
2. Dig a hole for the in-ground mailbox post. Hole should be approximately 6” in diameter and 24-28” deep.
Use level to straighten pole, back fill hole and tamp dirt as needed (Note: “Quick Crete” or concrete may
also be used – installations at highways edge require separate instructions).
3. Periodically check the vertical alignment of the post when back filling or as the concrete is curing.
4. When back fill tamping is complete, or concrete is cured, you are now ready to mount the mailbox to the
center mount post system – See Center Mount Mailbox Mounting Instructions (below)
CONCRETE MUST BE BELOW FROST LINE. TAKE CARE NOT TO PUNCTURE WATER SEWER,
GAS, CABLE OR TELEPHONE LINES WHEN DIGGING HOLES.
Center Mount Mailbox Mounting Instructions:
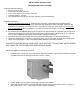
1. Rotate mailbox and place it on its head upside down and locate the 4 knock outs that will face the post
top plate and knock out the holes as shown in Figure 1 below.
Figure 1
2. Locate mailbox keys and open access door in the fully open position
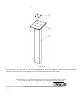
3. Place and align the mailbox on the top post plate over the bottom set of holes as shown in Figure 2,
and install 4, 5/16” -18 x 1” long machine screws. Tighten as needed