User Manual TViX Slim S1 DUO ** Some specifications could change with new firmware versions. Please refer to the FAQ on our homepage for further information ** TViX Slim S1 DUO : DVB-T Dual Tuner with Background Recording.
Ultimate PVR with HD Digital Jukebox Safety Notice Place all magnetized devices, such as speakers, away from the TVIX-HD .It may erase or cause damage to the data stored in the hard disk. Do not try to disassemble or remodel the TVIX-HD unit. Doing so may cause malfunction or fire. Keep your TVIX-HD away from heated areas, such as direct sunlight exposure, heaters and etc. Place it in a well ventilated location. Ensure that a free airflow is maintained around the appliance.
Ultimate PVR with HD Digital Jukebox Usage Precautions Thank you for choosing this TVIX-HD product. Please read the following usage precautions before using your TVIX-HD. Connect the A/V cable Make sure the power is off when you connect the A/V cable between the TVIX-HD and TV. Cleaning the TVIX-HD When cleaning the TVIX-HD unit, disconnect the power cord, and then wipe the TVIX-HD case with a soft piece of dry cloth.
Ultimate PVR with HD Digital Jukebox Table of Contents Safety Notice .............................................................................................................................................. 2 Usage Precautions ..................................................................................................................................... 3 1 Introduction................................................................................................. 5 1.1 1.2 1.3 1.4 1.
Ultimate PVR with HD Digital Jukebox 1 1.1 Introduction HDTV PVR Function The TViX PVR can play HDTV broadcasts without a digital TV settop box, with excellent and super-clear pictures on HDTV screens. The TViX PVR supports standard DTV features, such as EPG and Time-shifting. Time-shifting is a function that allows the user to record broadcasts, and save them in a storage device so that they can be viewed at a more convenient time for the user.
Ultimate PVR with HD Digital Jukebox 1.2 Multimedia Player Function The TVIX-HD is a standalone, multimedia hard disk player that plays digital videos, digital music, digital still images and DVD files on TV screens and home entertainment systems. You can enjoy digital contents in your living room without having to burn discs or to play it back on a DVD or CD player anymore. TVIX-HD plays back DVD movies with the full functionality of DVD navigation.
Ultimate PVR with HD Digital Jukebox 1.3 Audio Player Function TVIX-HD can play a variety of audio files such as FLAC, MP3, Ipod, AAC, Ogg Vorbis and WMA (Windows Media Audio) through TV speakers and many other audio systems. You can listen to your favorite music files without hesitation, by organizing a custom winamp playlist. Now you can enjoy music all day long without having to keep changing CDs. TVIX-HD supports playlist function that is based on *.pls or *.m3u.
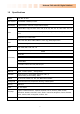
Ultimate PVR with HD Digital Jukebox 1.5 Specifications MODEL TViX Slim S1 DUO Main Chipset RTD1283DD+ 400Mhz processor VFD Display 7 Alpha-Numeric Character, 5 Digit Numeric Display Format: .MKV, .mpg, .avi, .wmv, .divx, .vob, .tp, .ts, .trp, .dat, .iso, .ifo, .m2t, .m2ts, .mov, .flv Video Codec: MPEG 1/2/4, AVI, XVID,WMV9(MP@HL),H.264( MP@HL4.
Ultimate PVR with HD Digital Jukebox 2 2.1 Name of Each Part Unit Control button TVIX-HD can be controlled by the buttons on the product as well as by the remote control. The current state of the product can be checked on the VFD on the front. The image of the VFD below could be different from the actual one. 2.2 Cable Connection You can connect the TVIX-HD to an analog TV display or audio amplifier using the A/V cable.
Ultimate PVR with HD Digital Jukebox 2.3 Package Contents Thank you for choosing this TVIX-HD product. The TVIX-HD package contains the following items. The items described below may differ from the TVIX-HD unit Remote Control USB PC Cable Quick Guide Manual CD Power Adaptor RCA Cable * TVIX-HD automatically formats when you install an unformatted new hard disk. Do not shut down the power when formatting the hard disk. ** Connect the included power cable on the back of the TVIX-HD.
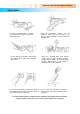
Ultimate PVR with HD Digital Jukebox 2.4 HDD Installation/Exchange ** Installing or exchanging your HDD is very easy. Please install the Hard Disk Drive (HDD) following the instruction is shown below. If you have a pre-installed HDD, you may skip this chapter. Pull the product Disk Cover located on the side, and separate it from the body. HDD installation is possible to do without using the screws. Before doing HDD installation to product, release the safety-lock button upward. When 3.
Ultimate PVR with HD Digital Jukebox After installation of the HDD, press the safety-lock button back in its place. For the safety of using HDD, it is recommended tightening a screw between the HDD and the HDD holder. Load the HDD holder into product. When replacing the HDD from the HDD holder, please do in reverse order.
Ultimate PVR with HD Digital Jukebox 3 Installation and Connection 3.1 Connecting the Video The TVIX-HD supports HDMI, Component and Composite video output for connection to a TV, and each output needs to be selected in the settings menu depending on what cable is being used. Connection to Composite Connect the TVIX-HD output to your TV using the included Composite (yellow) video cable.
Ultimate PVR with HD Digital Jukebox 3.2 Connecting the Audio Connection to 2 CH Normal TV Connection to 5.1CH Amplifier (Digital) Connect the two audio cables, the white one on the left side and the red one on the right side, to the appropriate terminals of your TV or Hi - Fi system for sound output. If you have a multi-channel decoder/amplifier with a coaxial/optical input, you can enjoy 5.1 CH highquality sound through the coaxial or optical cables.
Ultimate PVR with HD Digital Jukebox 3.3 Connecting the USB /e-SATA HOST The TVIX-HD also provides two USB-host ports with USB 2.0(e-SATA) compliant host/ function processor. USB-host allows communication between two USB devices. You can connect any external storage device (e.g. memory stick) or any external hard disk to play files stored in these external devices. You can even connect your Digital Camera directly to play digital images and pictures without any other devices.
Ultimate PVR with HD Digital Jukebox 3.4 Using the remote control This indicates Remote control Buttons.
Ultimate PVR with HD Digital Jukebox 3.5 Initial Setting Connect the TVIX-HD to your TV using A/V cables, and turn on the TVIX-HD. You will see the following screens when you turn the unit on for the first time or when you select “Load Default Setting”. When you see the initial page on your TV screen shown in the picture below, press the “OK” button on the remote control.
Ultimate PVR with HD Digital Jukebox 4 TVIX-HD Setup Menu 4.1 SYSTEM Setting This section is about SYSTEM (Language or Time) settings. Press SETUP button on the remote control and select SYSTEM. This screen allows you to adjust the SYSTEM settings of your TVIX-HD to your personal taste. Select menu to exit this SETUP. Press ‘NEXT’ button to move on to the next setup. Language : Select your language or text encording. File List Type : Select File list type.
Ultimate PVR with HD Digital Jukebox Cover Art Date & Time : Adjust the clock by using the arrow and numeric keys. Auto (Via Network) is also available. Press Left/Right button on your remote control to move to another option. Press Up/Down button on your remote control to make changes on the setting. Data/Time format : You can change year/ month/ day format and choose between 12/24 hours. Auto Run : You can make files play automatically when TVIX-HD gets loaded.
Ultimate PVR with HD Digital Jukebox 4.2 Audio/Video Setting This section is about A/V (Video or Audio) settings. Press SETUP button on the remote control and select the A/V. This screen allows you to adjust the A/V settings of your TVIX-HD to your personal taste. Select menu to exit this SETUP. Press ‘NEXT’ button to move on to another setting. Set the audio output setting. Select the HDMI or the S/PDIF that you want to hear the audio.
Ultimate PVR with HD Digital Jukebox Aspect Ratio : 4:3 Letter Box / 4:3 Pan & Scan for ordinary TVs; 16:9 for Wide TVs, such as HDTV or Plasma TV. If the ratio of the TV is 4:3, select the 4:3 letter box or 4:3 Pan & Scan. If the ratio is 16:9, select 16:9. * The 4:3 Letter box can show the original ratio of the multimedia file in 16:9. * The 4:3 Pan & Scan will adjust the image of the 16:9 multimedia file to the 4:3 of the TV screen by scaling the image.
Ultimate PVR with HD Digital Jukebox 4.3 HDTV Setting This section is about HDTV settings. Press the SETUP button on the remote control and select HDTV. This screen allows you to adjust the HDTV settings of your TVIX-HD to your personal taste. Select menu to exit this SETUP. Press ‘NEXT’ button to move on to the next setting. TV Input : Select your input. Country/Location : Select your country or location.
Ultimate PVR with HD Digital Jukebox 4.4 PVR Setting This section is about PVR settings. Press the SETUP button on the remote control, and select PVR. This screen allows you to adjust the PVR settings of your TViX to your personal taste. Select to exit this SETUP. Press ‘NEXT’ button to move on to the next setting. menu This setting will be activated when you connect the tuner box. TimeShift Duration : Set the maximum time-shifting interval.
Ultimate PVR with HD Digital Jukebox 4.5 NETWORK Setting This section is about NETWORK (Network or FTP) settings. Press the SETUP button on the remote control, and then select NETWORK. This screen allows you to adjust the NETWORK settings of your TVIX-HD to your personal taste. Select menu to exit this SETUP. Press ‘NEXT’ button to move on to the next setting. ** For detailed Network instructions, please refer to the enclosed TVIX-HD CD or the latest pdf file on the TVIX-HD Homepage.
Ultimate PVR with HD Digital Jukebox TVIX-HD Network Info : You can see the information of TVIX-HD’s Network. FTP ID/PW : to use FTP function, you must use the ID & password displayed on the Network in Menu within SETUP. The FTP ID is tvixftp. You can use capital letters only for the password.
Ultimate PVR with HD Digital Jukebox 4.6 MISC Setting This section is about MISC (Photo effect and Subtitle) settings. Press the SETUP button on the remote control, and then select MISC. This screen allows you to adjust the MISC settings of your TVIX-HD to your personal taste. Select menu to exit this SETUP. Press ‘NEXT’ button to move on to the next setting. Screen Saver : If there is no activity the screen saver will be activated after a certain time.
Ultimate PVR with HD Digital Jukebox 5 5.1 Initial Usage of TVIX-HD Making an HDD Folder As shown in the picture below, one end of the USB cable should be connected to the USB connector of the TVIX-HD, and the other end to the computer. After connecting to the PC, turn on the power of the TVIX-HD. Double click on the icon ‘My Computer’, and you will see a newly created drive; TVIX-HD as shown in picture ‘A’. ( The name of the drive can be changed.
Ultimate PVR with HD Digital Jukebox 5.2 Movie Playback When installation is successfully finished, you will able to see Main MENU screen. You’d better copy a video file into the MOVIE folder in advance. MOVIE, MUSIC, PHOTO, SETUP icons are shown. Select the MOVIE menu by using the Up/Down arrow button on your remote control. After selecting the icon, press the OK( ) button. If you want to change the partition of the HDD, press the Jump/Left button.
Ultimate PVR with HD Digital Jukebox 5.3 Music Playback You can copy audio files to the MUSIC folder in advance and play music files.. If you cannot see the MAIN MENU screen, press the MENU( ) button on your remote control. Select the MUSIC menu on the Main screen and press the OK( button. ) You will see the audio file contents that you have just copied. Select the audio file content using the up/down button.
Ultimate PVR with HD Digital Jukebox 5.4 Photo Playback You may copy image files into the PHOTO folder in advance and play the image or photo files. You can press the PHOTO button on your remote control without selecting from the menu screen Press PHOTO ( ) button. You can see the image files that you just copied. Select the image files using the up/down button. By pressing the OK button, you can easily play the image file content. If you want to play the next image, press the NEXT(>>|) button.
Ultimate PVR with HD Digital Jukebox 6 Using TViX PVR • The PVR can play HDTV without a digital TV set-top box with excellent and super-clear display on HDTV screens. The PVR supports standard DTV features, such as EPG and Time-shifting. • The PVR has various recording features, including direct recording, scheduled recording, and repeated manual recording, to enable the user not to miss a single program of digital TV.
Ultimate PVR with HD Digital Jukebox 6.2 Using TViX PVR Select HDTV icon on the main menu to play the HDTV mode ( Without tuner box, this menu is not available.) : Press HDTV button on your remote control to switch the TV mode 6.2.1 Channel switching Press CH +/- button to change the TV channels. You can also enter the channel number by using the numeric keypad on the remote control and the channel will change after a few seconds. - Previous Channel( SHUFFLE button).
Ultimate PVR with HD Digital Jukebox • Clicking on the REC button( ). • When recording, Press the INFO button( information. ) on the remote control, and you can see recording • When recording, press the Add/delete button, the recording will be canceled. • When recording, if the available storage space runs out, the recording will automatically stop. • The information about the current broadcast program can be seen when you press the INFO button ( ) while viewing broadcast programs.
Ultimate PVR with HD Digital Jukebox • If the available hard-disk space is less than 50MB, recording will not work. If the available hard-disk space reaches 10MB or less when a recording is in progress, it will stop automatically and show “No space” on the OSD. Record Notice • The first partition of the internal hard disk must use the NTFS format. FAT32 format will cause an error message. • When the signal is weak or unstable, recording cannot work properly.
Ultimate PVR with HD Digital Jukebox 6.2.3 Using DTV EPG Guide DTV EPG (Electronic Program Guide) shows the guide obtained from the real-time broadcast data stream. Press the Guide button( ) in DTV mode to see an EPG window similar to that shown below. Select the desired channel to record or watch and then press the View or Record button to tune the channel or schedule the recording. Open/Close an EPG Guide window. Change the displayed EPG Date backward. Change the displayed EPG Date forward.
Ultimate PVR with HD Digital Jukebox 6.2.4 Manual Recording Setting up of manual recording reservation can be done in TV mode or in file list mode. In TV mode, press the BOOKMARK/SCHEDULE button ( ). Manual reservation bases on the time shown on VFD. Please set the date as auto(Via TV) mode in SETUP-SYSTEM before you do the manual reservation. Press ADD/DELETE button ( ) in order to manually reserve for recording. Reservation set up goes through three steps.
Ultimate PVR with HD Digital Jukebox ) on the remote Reservation steps could be rearranged when you press the Next Content button ( control. In order to play the recorded files, press MOVIE, switch to File Mode, and then select the recorded file. Or you can also press BOOKMARK/SCHEDULE button, select Recording List, and then play the recorded file. You can play a recorded file on the REC list.
Ultimate PVR with HD Digital Jukebox 6.2.5 Using Time-Shifting Time shifting is the recording of programming to a storage medium to be viewed or listened to at a more convenient time. If interrupted while watching live TV programs (for example, to pick up phone calls or answer the door), you simply press the OK button to freeze the picture for a period of time and then later press OK again to pick up right where you left off. The Time-shifting buffer is preserved when you change the channel.
Ultimate PVR with HD Digital Jukebox 7 Using the remote control 7.1 Descriptions of Each Button Basically, for playback of multimedia files you choose the file you want by navigating to it with the menu buttons and left/right and up/down arrow buttons and then press the OK button. 7.1.1 Video Playback When you press the MOVIE button ( displayed on the TV Screen.
Ultimate PVR with HD Digital Jukebox ① The 4:3 Letter box can show the original ratio of the multimedia file in 16:9. ② The 4:3 Pan & Scan will adjust the image of the 16:9 multimedia file to the 4:3 of the TV screen by scaling the image. (Currently this mode is not supported) ③ 16:9 can adjust any ratio of the multimedia file to the TV screen with the original image. Pressing the Zoom button while you are playing files, you can change the screen Vol + : change from 1X to 9X.
Ultimate PVR with HD Digital Jukebox Pressing GOTO button while you are playing files, You can choose the time. After choosing you can play directly. The present playing time will be displayed with the GOTO function. FF/REW Button Pressing FF button while you are playing files, you can change the FF mode. 2XÆ4XÆ 8X Æ16X Æ 32X. Up/Down Button : 15 seconds skip forward or backward. (Down button) : Back 15 seconds. (Up button) : Skip 15 seconds.
Ultimate PVR with HD Digital Jukebox 7.1.2 DVD Navigation For playback of DVD files copied to the HDD, navigate to the VIDEO_TS.IFO file and press OK. Full DVD navigation works as with a standard DVD player. < DVD Jukebox Keys > Play/Pause (when a movie is playing). Select file (in the menu screen). Stop playing. Go to the next chapter Go to the previous chapter Show the information of DVD. MENU : Go to the DVD root menu. FF/REW Button Up/Down Button : 15 seconds skip or 15 seconds backward.
Ultimate PVR with HD Digital Jukebox 7.1.3 Audio Playback When you press the MUSIC button( will be displayed. ) on your remote control, the contents of the TVIX-HD Music folder If you press audio file, then you will get the screen of music window. You can choose another song to hear in this music window. ** Some functions may require updating to the latest firmware. < NOTE > Play or pause file. Stop playing Go to the next file. Go to the previous file. Change a music while playing. FF/REW button.
Ultimate PVR with HD Digital Jukebox 7.1.4 Image Playback When you press the PHOTO button( folder will be displayed. TVIX-HD displays ) on the remote control, the contents of the TVIX-HD PHOTO on screen when you press an invalid key. < NOTE > Play or pause file. Stop playing Go to the next file. Go to the previous file. Show the information of the image. Rotate the image. You can change and set the size of the picture with the ZOOM.
Ultimate PVR with HD Digital Jukebox 7.2 Extra Features 7.2.1 Using Cover Art Please change the File list type to Cover Art on the SETUP-SYSTEM. If a name of folder, which on the root folder, is starts with one of below words (case insensitive), it will shows Video cover art mode instead a normal icon mode. Folder name : "MOVIE", "movie", "Movie", "VIDEO", "video", "Video" To play a video, press PLAY button.
Ultimate PVR with HD Digital Jukebox If file name is Preview_~~, PREVIEW menu iwill be activated.( File name : Preview_aaa.mkv) Press ‘GOTO’ button on the remote controller, you can change the Device. Press ‘STOP’ button on the remote controller, you can go to up folder. ** Audio Album Art : It will show 186*186 Album art for all the folders under "MUSIC", "music", "Music", "AUDIO", "audio", "Audio".
Ultimate PVR with HD Digital Jukebox ** If you want add icon image and background image manually, please insert folder.jpg and tvix.jpf file in the folder. tvix.jpg : 1280*720 resoultion. Video icon (folder.jpg) : 138*186 resoiution. Music icon (folder.jpg) : 186*186 resoiution. Photo icon (folder.jpg) : 186*186 resoiution. 7.2.2 Using the AutoRun Function When you want to play music with the TVIX-HD, but do not have any display devices, the following function may come in handy.
Ultimate PVR with HD Digital Jukebox 7.2.3 Using playlist TVIX-HD allows you to make/edit a playlist without you having to turn on your PC. Move to a folder where you want to create a list, and then press the FUNCTION button. From the set-up image(as shown below), select the playlist image. ( ) Playlist addition is separated into two windows. Select a file that you want to add from the left window, and then click on OK in order to add the file to the list on the right side.
Ultimate PVR with HD Digital Jukebox 7.2.4 Using File Copying TVIX-HD supports File Copy functionality without Using PC. You can now copy Contents from external USB hard disk to the internal hard disk of TVIX-HD and also Copy the contents within the internal hard disk of TVIX-HD. TVIX-HD internal HDD < -- > internal HDD, TVIX-HD internal HDD < -- > Network DISK) TVIX-HD internal HDD < -- > external USB DISK (except nonstandard devices.) Select the folder containing source files.
Ultimate PVR with HD Digital Jukebox 7.2.5 Folder Security TVIX-HD supports folder protection by assigning a password to the folder. Select the folder that you want to password protect. Press the Function button on your remote control. Select the Set Password icon to set up the password. Press a 1~8 digit number from the Numeric key on the remote ( Ex: 1234). Press the OK button to complete set up. Perform the SETUP-SYSTEM-Load default settings to clear the password if the Admin Password is lost.
Ultimate PVR with HD Digital Jukebox 8 Using Network 8.1 Using UPnP < When connecting the computer directly to the TVIX-HD > Connect the LAN cable to the LAN port of both the TVIX-HD and the PC. TIPS In this case, you generally use a LAN cross cable type. If the computer’s LAN card was connected to an Internet line, you can install an additional LAN card to your PC and connect that LAN card to the TVIX-HD.
Ultimate PVR with HD Digital Jukebox 8.1.1 How to set up UPnP server to your PC Although there are various UPnP servers for PC users, We would like to recommend you all to use XBMC UPnP server which is relatively easy to use and supports external subtitles. Download the latest XBMC Media Center for Window from XBMC homepage at http://xbmc.org/download/ Run the XBMC Media center Wizard. When you click ‘NEXT’, it installs automatically. Then, additional setup is not necessary.
Ultimate PVR with HD Digital Jukebox 8.1.2 How to set up XBMC server Once the installation is done, XBMC program will start automatically. If it does not, you are requested to run it by clicking XBMC icon( ). The page is the main. You may change working environment at the Settings as your taste. Click SYSTEM - NETWORK. Click ‘Share video and Music…’ and ‘Allow Control of XBMC via UPnP’ option. Click ‘VIDEOS’ on the main screen.
Ultimate PVR with HD Digital Jukebox Click ‘Add Source’ and ‘BROWSE’. Choose a folder to share and click ‘OK’ click ‘SET COTENTS’. Choose you want to use as SCRAPER and click ‘OK’.
Ultimate PVR with HD Digital Jukebox Click ‘SCAN FOR NEW CONTENT’ on the popup menu to scan contents. Click “MANUAL ADD TO LIBRARY” to add a file manually, and write file name and Genres name.. In the same way, you can share the Music’. ◈ Caution while using XBMC - Some file’s extensions may be shown strangely on TVIX-HD.
Ultimate PVR with HD Digital Jukebox 8.1.3 How to set up network The TViX can be connected to the local area network using a wired or wireless network connection for access to streaming video and online and offline media content. You can watch movies without a hard disk with wireless network support. Play videos, music, photos saved in your PC hard disk without having to transfer them to your TVIX-HD. << Ethernet Network (Wired) Setup >> 1. Plug an Ethernet cable into the Ethernet connector on the TViX. 2.
Ultimate PVR with HD Digital Jukebox 7. Once the network is detected, the following screen appears. 8. To configure Samba client or NFS(Netshare), press the Net disk button. 9. Select your network disk to configure. 10. Select share list and then press OK button. Once the network is configured, you can change see network device on the file list.
Ultimate PVR with HD Digital Jukebox 11. Select Manual to manually set your network connection. 12. Write to key in your IP address , subnet mask, gateway, and DNS server using numerick key on the remote controller and then press Connect. 13. Once the network is detected, the following screen appears.
Ultimate PVR with HD Digital Jukebox << Wireless Network Setup >> You can play most of the HD video files (up to 18mbps) with 802.11n wireless Wi-Fi dongle (available as an option). 1. Connect a USB wireless adapter (optional) to the USB port on your TViX. if your device has internal Wi-Fi, you don't need USB type separately. 2. Go to the SETUP-NETWORK setting. 3. Press the Network Settings. 4. Select the Wireless network device, then press NEXT.
Ultimate PVR with HD Digital Jukebox 5. Select the access point you want to connect to, then press NEXT. Choose unknown(MAC address) SSID at AP browser windows to input the SSID manually, then go to step 8. 6. Use the navigation buttons to key in the Network key(passcode) for the access point, then press OK button. TViX will memorize previous NETWORK KEY up to 4 APs (access points). You don't have to re-input the NETWORK KEY during the setup procedure, if you done it once before. 7.
Ultimate PVR with HD Digital Jukebox ** Select your network disk to configure for SAMBA or NFS. ** Select share list and then press OK button. Once the network is configured, you can change see network device on the file list. 8. Choose unknown(MAC address) SSID at AP browser windows to input the SSID manually.
Ultimate PVR with HD Digital Jukebox 9. Press NEXT. 10. Use the navigation buttons to type in the SSID for the access point you want to connect, then press OK. 11. Press NEXT.
Ultimate PVR with HD Digital Jukebox 12. Use the navigation buttons to key in the Network key(passcode) for the access point, then press OK button. TViX will memorize previous NETWORK KEY up to 4 APs (access points). You don't have to re-input the NETWORK KEY during the setup procedure, if you done it once before. 13. Once the network is detected, the following screen appears.
Ultimate PVR with HD Digital Jukebox 8.1.4 How to use UPnP Select ‘MOVIE’ mode at the main page Press ‘GOTO’ button and then ‘Right’ button of the remote, then it moves to ( device, press ‘OK’ button on the remote. ) device. To see UPnP If you select one of them, you can see the contents that you set up on XBMC server. If you select ‘Video Library’, you can see medial files that are in the PC or network device. If you select a file that you want to play, it will be played like you do with the HDD.
Ultimate PVR with HD Digital Jukebox 8.2 Using NetShare 8.2.1 TVIX-HD NetShare Installation Netshare program allows you can play the TP or DVD jukebox without stutter easily. We recommend sharing files using the NTFS file system. The FAT32 file system does not contain enough information to create a lasting file name, so TVIX-HD doesn't load the file after changing the file name. Most likely there will be an updated NetShare version on our web site.
Ultimate PVR with HD Digital Jukebox We recommend sharing files using the NTFS file system. The “Setup status” window will appear. Press YES button if you want to run the TVIX-HD Net Share automatically. By clicking the Finish button, the software installation is done.
Ultimate PVR with HD Digital Jukebox Press “Unblock” for the Windows Security Alert.
Ultimate PVR with HD Digital Jukebox 8.2.2 Using TVIX-HD NetShare Click Start, point to Program->DVICO->TVIX-HD NetShare. If TVIX-HD Netshare is already running, you don’t need to run this program again. After starting the Net Share program, you can see the NetShare icon in the tray.. Start the setting by right clicking the NetShare tray icon at the lowerrighthand corner of the screen.
Ultimate PVR with HD Digital Jukebox 8.2.3 Sharing of Multi folders After running the Netshare software Application, right click on the Netshare ICON. Click on Browse, Corresponding to Folder 1 to Share. Select the Appropriate folder, Containing Media Files from desired Drive and Click OK. Again Click on Browse, Corresponding to Folder 2~ Folder4 to Share. Select the Appropriate folder, Containing Media Files from the desired drive and Click OK.
Ultimate PVR with HD Digital Jukebox 8.3 SAMBA Client and SAMBA Server 8.3.1 Set Network Configurations Under Windows XP (SAMBA mode) Select the folder you want to share. Right-click that folder and click ‘Sharing and Security’ in the popup menu. Check ‘Share this folder’ on the network and type in the share name ‘TVIX-HDhd1 (this is the only available one at the moment)’. Use ‘Everyone’ if ‘Everyone’ is displayed, otherwise you don’t have to change anything. Also, add ‘Everyone’ to the security tab.
Ultimate PVR with HD Digital Jukebox Move to 'Settings' > 'Control Panel' > 'Administrative Tools' > 'Computer Management' > 'Local Users and Groups' > 'Users', and double click ‘Guest’. CAUTION This is for Windows XP Professional. Windows XP Home users cannot see this window. If you cannot find ‘Administrative Tools’ in the Control Panel, click “Switch to classic view” in the upper-left corner of the screen.
Ultimate PVR with HD Digital Jukebox ‘GUEST’ must be shown as the following image (a red X mark should not be shown on ‘Guest’). Move to 'Control Panel' > 'Network connections', and select 'Properties' s by right click on the mouse. Remove “Guest” from the ‘User Rights Assignment’ > ‘Deny access to this computer from the network’ option.
Ultimate PVR with HD Digital Jukebox 10) Move to ‘Access this computer from the network’, and then select ‘Properties’ by right clicking the mouse or double clicking it. 11) Click on ‘Add User or Group’ 12) Type in “Guest” and then click on “OK” button. 13) Press OK, and Guest will be registered.
Ultimate PVR with HD Digital Jukebox < When connecting Computer to TVIX-HD directly > In this case, you have to use Cross LAN cable type generally. If the computer’s LAN card was connected to Internet line, you can mount additional LAN card to your PC and connect that additional LAN card to TVIX-HD. Move to ‘Control Panel’ > ‘Network connections’, and select ‘Properties’ by right click on the mouse.
Ultimate PVR with HD Digital Jukebox < When connecting with IP Router or Hub > If you have already been assigned dynamic IP address from a DHCP Server or IP Router in your local area network, then no need to write a static IP address. Then obtain the automatically assigned IP address or write an IP address & Subnet mask that the DHCP Server or the IP Router provides. Select ‘Control Panel’ > ‘Network Connections’, and select ‘Status’ properties by right clicking the mouse.
Ultimate PVR with HD Digital Jukebox 8.3.2 Setting Static IP Network Configurations in TVIX-HD Press [SETUP] button on the remote. setup screen will be displayed. On that Set UP screen, select Network settingÆNetwork disk and type the IP address in the Server IP. (ex: 172.28.1.70) The default is DHCP and if you want to set Static IP, you can select and change Static IP on the IP setting. If you have used the DHCP you don’t need to assign the IP address because it will be assigned automatically.
Ultimate PVR with HD Digital Jukebox 8.3.3 Using SAMBA Server Using SAMBA Server, You can copy/move/delete files from PC to TVIX-HD via LAN. SAMBA is supports internal hard disk only. Press the Network Info on the SETUP-NETWORK. And note down the TVIX-HD IP Click on Internet explorer, and then type the TVIX-HD IP as shown Tvixhd1 network driver will be shown. \\172.28.1.70. Hard disk content are displayed on the PC. You can copy/ move/ delete files in this directory.
Ultimate PVR with HD Digital Jukebox 9 Firmware Upgrade Firmware Version Check. Connect the TVIX-HD to your TV and then turn on the TVIX-HD. Press the SETUP button on the top panel and the setup screen will be displayed. Check the latest firmware version of TVIX-HD Homepage *** You’ll be notified of any firmware updates or news if you fill out the customer registration form at TVIX-HD homepage. Downloading the Firmware. Download the latest firmware from TVIX-HD Homepage to your PC.
Ultimate PVR with HD Digital Jukebox New firmware upgrade is in process (takes about 3 minute). When the upgrade is successfully finished, the TVIX-HD will reboot automatically. < CAUTIONS: Safe Mode Upgrading > Even if the TVIX-HD accidentally turns off during the firmware upgrade, the safe mode will enable the TVIX-HD to be re-upgraded. Please follow the steps below: Connect the TVIX-HD to your PC with a USB and then turn it on.
Ultimate PVR with HD Digital Jukebox 10 Using USB Connection with a PC TVIX-HD uses a SATA HDD as its contents storage device and works just like an external USB 2.0 hard drive when you connect it to your PC. The USB cable has a different shape on both ends. We use USB 2.0 "A" Plug (male) type to "B" Plug(male) type. After connecting to your PC, turn on the power of the TVIX-HD.
Ultimate PVR with HD Digital Jukebox Choose the partition type and format the HDD. If you want several partitions, select Extended Partition. Select the partition size. If you want one partition, press “Next>”. For FAT32, size is limited to 32000MB or under.
Ultimate PVR with HD Digital Jukebox Select the Drive Letter. Then press the “Next>” button. Select the partition Format. If you choose FAT32 file format on Windows 2000/XP, the drives maximum size will be limited to 32GBs. If you want to use a single drive letter of 32GBs or more, you have to format on Windows 98SE/ME. When completed, detailed information will appear as shown below. Click the “OK” button to finish.
Ultimate PVR with HD Digital Jukebox 10.2 Unplug or Eject Hardware On the windows tray, double click the hot swap icon. The “Unplug or Eject Hardware” window will appear. Press the Stop button if you want to unplug the device. Press OK on “Stop a Hardware device” window. Press OK and unplug the device. Close TVIX-HD folder or disk on My computer before unplugging the Hard disk. If TVIX-HD folder is open, unplugging it may not work properly.
Ultimate PVR with HD Digital Jukebox 11 Troubleshooting ** For detailed instructions, please refer to the latest pdf file on the TVIX-HD Homepage or TVIX-HD FAQ. Under no circumstances should you try to repair the system yourself, as this will invalidate the warranty. Do not open the system as there is a risk of electric shock. If a fault occurs, first check the points listed below before taking the system for repair. No Screen Display. Video Output not working. 1.
Ultimate PVR with HD Digital Jukebox 12 Appendix - Technical Terms HDMI -------------------------------------------------------------------------------The High-Definition Multimedia Interface (HDMI) is an all-digital audio/video interface capable of transmitting uncompressed streams. HDMI is compatible with High-bandwidth Digital Content Protection (HDCP) Digital Rights Management technology.
Ultimate PVR with HD Digital Jukebox DTS -------------------------------------------------------------------------------By supplying film studios with outstanding techniques for delivering soundtracks to an attentive audience, DTS digital sound is now featured on virtually 100% of major Hollywood releases.
Ultimate PVR with HD Digital Jukebox 13 GNU General Public License DVICO Co., Ltd is using a part of Free Software code under the GNU General Public License in operating TVIX-HD player. This General Public License applies to most of the Free Software Foundation’s code and to any other program whose authors commit by using it. The Free Software is copyrighted by Free Software Foundation, Inc. and the program is licensed “As is” without warranty of any kind.
Ultimate PVR with HD Digital Jukebox protection in exchange for a fee. 2. You may modify your copy or copies of the Program or any portion of it, thus forming a work based on the Program, and copy and distribute such modifications or work under the terms of Section 1 above, provided that you also meet all of these conditions: a) You must cause the modified files to carry prominent notices stating that you changed the files and the date of any change.
Ultimate PVR with HD Digital Jukebox 7. If, as a consequence of a court judgment or allegation of patent infringement or for any other reason (not limited to patent issues), conditions are imposed on you (whether by court order, agreement or otherwise) that contradict the conditions of this License, they do not excuse you from the conditions of this License.