
Instruction Manual


-6-
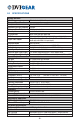
On the front of the unit there is an EDID selection switch. This switch controls
what EDID information the splitter will report to the source device. The EDID
information provided to the source can either be EDID from one of the connected
displays (AUTO EDID Mode) or from an on-board memory chip that contains a
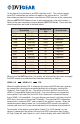
library of the most commonly used resolutions (INT EDID Mode). These internally
stored resolutions are listed in the table below.
Resolution
Vertical Rate
(Hz)
Scan Format
480p 720x480 60 Progressive
576p 720x576 50 Progressive
720p 1280x720 50,60 Progressive
1080i 1920x1080 50,60 Interlaced
1080p 1920x1080 50,60 Progressive
VGA 640x480 60 Progressive
SVGA 800x600 60 Progressive
XGA 1024x768 60 Progressive
SXGA 1280x1024 60 Progressive
UXGA 1600x1200 60 Progressive
WXGA 1280x800 60 Progressive
WXGA+ 1440x900 60 Progressive
WSXGA+ 1680x1050 60 Progressive
WUXGA 1920x1200 60 Progressive
When set to the AUTO position, the splitter will automatically discover and apply
the EDID based on a predetermined selection hierarchy as follows:
HDMI v1.3 HDMI v1.2 DVI
When the splitter powers ON, it automatically begins the EDID discovery process
by sequentially scanning the connected displays on all outputs, starting with
Output #1, then Output #2, etc. The splitter will select the EDID from the rst
HDMI v1.3 compatible display that it nds. If no such displays are connected
to the splitter, it will select the rst EDID that it nds from a connected display
that is HDMI v1.2 compatible. If no such displays are found, it will select the rst
EDID that it nds from a connected DVI display. The selected EDID information
becomes the “reference EDID” and is stored in the splitter’s memory. When the
connected source device boots up, it will read the EDID stored in the splitter’s
memory and react as if it were connected directly to the display that provided it.
For example, if the display connected to Output #1 is a DVI monitor, or if no
display is connected, the splitter will search for EDID information from Output
#2, then Output #3, and Output #4, until it nds a display with valid HDMI EDID