MODEL : VXA-2000 ATTACHMENT E. - USER’S MANUAL - HYUNDAI CALIBRATION & CERTIFICATION TECHNOLOGIES CO., LTD. SAN 136-1, AMI-RI, BUBAL-EUP, ICHEON-SI, KYOUNGKI-DO, 467-701, KOREA TEL:+82 31 639 8517 FAX:+82 31 639 8525 www.hct.co.kr Report No.
UserŪ s Manual Ҷ Navigation function Ҷ Audio player function Ҷ Game function Ҷ Aux function Please write your phurchasing date down here, which is needed for custom service and registration at our web site. ƕ Please, be sure to read theũSafety PrecautionsŪcarefully before using this product. ƕ Limited warranty is included in this UserŪ s Manual. ƕ Specifications and design are subject to change without notice.
Thank you for purchasing our product. Navigation System Userœs Manual is designed to support convenient usage of the navigation system and safe driving. Please read the manual carefully before using the product for safe usage. The content of this manual can vary according to the navigation system version, and function or performance of the navigation system and this manual are subject to change without prior notice for userœs convenience. Make sure to read this manual for safe driving.
Table of Contents Basic Operation 3 V-Up Pro 56 About Navigation System 1. Directions before using this product 1-1. Usage directions 1-2. Installation directions 1-3. Upgrade directions 1-4. Troubleshooting 2. Components 3. Description of external features 3-1. Front/Right side 3-2. Rear/Left side 4. Installing product 3 3 3 4 5 5 6 7 7 8 9 V-Up Pro 56 1. Installing ActiveSync and V-Up Pro Program 1-1. Install ActiveSync Program 1-2. Install V-Up Pro Program 2. Running V-Up Pro Program 3.
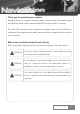
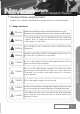
About Navigation System 1. Directions before using this product Read thisŔUserœs Manualŕwithout fail before using this product to use this product safely. Warning Refrain from operating the product in motion. Please park the car at a safe location when operating the product, because there is danger of a traffic accident. Warning Voice guide and map route can be different from the actual road condition. Ensure to comply with the actual road signal system and traffic regulation for safe driving.
About Navigation System 1-2. Installation directions Warning Connect the wires properly by referring toŔInstalling productŕsection. Otherwise, malfunction or accident may occur. Warning Do not install the product in a position where driving can be interfered or driverœs field of vision can be blocked. Warning Install the product in a position that does not interfere with driving or safety devices like an air bag.
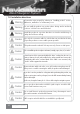
About Navigation System 1-3. Upgrade directions Ș Do not connect 12V power when connecting ActiveSync. Ș Depending on the USB memory product, the USB sensing time may vary or sensing may fail. Ș Only the USB memory with FAT32 format is supported. Format the USB memory as FAT32 before using it. 1-4. Troubleshooting 1) Touchscreen does not work If you cannot set up the touchscreen in the Setup menu due to wrong setting, use the remote controller instead.
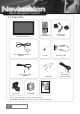
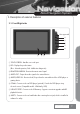
About Navigation System 2. Components MUTE SCREEN OFF AUX AUDIO MAIN FILE LIST CH.SCAN DIMMER ENTER CH PLAY TYPE SUB-T ZOOM A-B Navigation System unit Aux cable(AV In terminal) [Option] TITLE VOL LANGUAGE DISPLAY SETUP Remote controller[Option] GPS antenna/ mount plate Test jack Cigar jack cable Red : + Stereo output cable [Option] Suction cap DVD-ROM USB cable Userœ s manual ƕ Specifications and design are subject to change without notice.
About Navigation System 3. Description of external features 3-1. Front/Right side Not supported ڤ ڥ ڦ ڧ ڨ ڡ ڣ ڢ Basic Operation ڡTOUCH SCREEN : Handles user touch input. ڢLED : Displays the product status. (Blue : Normal operation, Red : Malfunction diagnostic) ڣREMOTE IR WINDOW : Receives the remote control signal. ڤAUDIO OUT : Output the audio signal to the external device.
About Navigation System 3-2. Rear/Left side ڣ ڤ ڥ ڡ ڢ ڡGPS : Connects to the GPS antenna cable. ڢSPEAKER : Outputs 1 watt audio. ڣPOWER SWITCH : Turns the power on/off. ڤDC 12V : Connects to the provided cigar jack. ڥUSB SLAVE PORT(Activesync Port) : Connects to the PC using the provided USB cable for map upgrade or background download.
About Navigation System 4. Installing the product 1) Fix the suction cup on the car windshield where the driver feels comfortable. Caution Remove any dust or foreign object from the windshield so that the suction cup can be attached firmly. Then, fix it with knob to prevent falling down due to shock. Do not install the navigation set in a position that hampers driverœs vision or driving. Be careful not to interfere with driving or safety devices like an air bag.
About Navigation System 3) Adjust the position to fit into the driverœs field of vision after fixing the product on the suction cup. 4) Connect the power cable to DC 12V terminal located at the left side of the product. Caution Use the car cigar jack that is included in the product package. If you use other cigar jack, the product may not work properly. 5) Remove the test jack from the Safety terminal and then, connect the cable to the hand brake.
Using Navigation System 6) Flip the power switch ON that is located at the left side of the product. 1. Basic functions of Navigation System 1) Navigation function : Helps car navigation using GPS (Global Positioning System) engine and antenna, and electronic precision map. 3) Game function : Provides enjoyable games. 4) Aux function : Displays external A/V sources such as DVD players or gaming devices.
About Navigation System 2. Learning basic remote controller functions You can access frequently used function using the remote controller, in addition to the touch screen for more convenient usage of Navigation System. ȯ 9 Stqmr nm.nee sgd KBC rbqddm- Unhbd fthcd `mc `tchn ok`xa`bj SCREEN OFF MUTE SCREEN OFF MAIN FILE LIST ȯ 9 Ltsdr sgd rntmc sdlonq`qhkx- AUX AUDIO CH.
Using Navigation System Ș : Moves MP3 or DVD playback section backward in the audio player/Aux mode. Ș : Moves MP3 or DVD playback section forward in the audio player/Aux mode. Ș : Pauses MP3 or DVD playback in the audio player/Aux mode. Ș : Rewinds MP3 or DVD playback in the audio player/Aux mode. Ș : Fast forwards MP3 or DVD playback in the audio player/Aux mode. Ș CH Ș VOL Ș PLAY TYPE : Sets channel up or down in TV mode. [Option] : Sets volume up or down.
Using Navigation System 3. Main menu Screen on/off The main menu is composed of Navigation, Audio Player, Game, Aux, Setting, and Screen On/Off button. 4. Quick Start This section will walk you through using your Personal Navigation Device for the first time, acquainting you with the basic operation of the navigation system. ҶSwitch on the unit and tap on NAVI or NAVIGATION in the first screen. ҶIf more than one language is available on your device, you are prompted to choose your language.
Using Navigation System 4-1. Start Screen The start screen is split in two. On the left hand you will find the menu buttons, on the right you see a map with your current GPS position. It is not possible to browse the map in the start screen. This screen merely shows your current GPS position, provided that you have a GPS connection. With the buttons on the start screen you access all functions of the application: ҶPress Destination to choose your destination.
Using Navigation System 4-2. Choose a destination ҶSelect Destination to set your destination. A menu will open where you can choose a destination: You have various ways to select your destination: Address: If you know the city and street address for your destination, simply enter it and the application will guide you directly there. (See Address Search on page 19.
Using Navigation System 4-3. Navigation Screen On the navigation map, the route will be shown in blue. The red arrow will indicate the direction of your next maneuver. Crosshairs identify your current position. When you come up to a turn or other maneuver, you will hear a voice command at the appropriate time. For one-way streets, the transit direction is indicated with a red arrow. Manoeuvre icon Next junction/exit no.
Using Navigation System Arrow mode You can choose to display the navigation screen in a simpler mode, the so called arrow mode. In this mode, only the most essential information will be shown — like arrows, street names, speed and time information. ҶTap on the screen during navigation to open the navigation options (see Change settings during navigation on page 36). ҶChoose Settings. ҶChoose the Arrows/Map symbol to switch between map and arrow modes. Next junction/exit no.
Using Navigation System 5. Detailed Description This chapter describes the functions of your Personal Navigation Device in detail. On the following pages you will learn how to - Choose your destination (see page 19) - Plan your route (see page 31) - Configure the application (see page 34) 5-1. Choose your Destination This section describes the different ways of setting your destination.
Using Navigation System Enter the appropriate data to find your address. Set the State ҶPress State to select your state. ҶChoose your state from the list. The State field will be populated with the name of the chosen state. Search for the city ҶPress City to select your city. The keypad screen will show on the screen: ҶEnter the name of the town/city you are looking for (at least three characters). Switch between letter and number mode by pressing 123 or ABC.
Using Navigation System ҶPress Zip code to enter a zip code. ҶEnter the zip code of the town/city you are looking for. ҶPress the search symbol (magnifying glass). A hit list will be displayed. ҶChoose the appropriate town/city from the list. You will return to the Find Address screen. The City and Zip code fields will be populated with the chosen city/zip code. Basic Operation Search for the street Once you have found the city or zip code you are ready to look for the street name.
Using Navigation System ҶEnter the name of the street you are looking for (at least three characters). ҶPress the search symbol (magnifying glass). A hit list will be displayed. ҶChoose the appropriate street from the list. You will return to the Find Address screen. The name of the chosen street will be shown in the Street field. Additionally you may enter the number. Navigate to the address found Once you have narrowed down your search to a unique address, you can start navigation.
Using Navigation System My Home ҶPress My Home. Your home address will be displayed on a map: ҶChoose Menu. ҶOn the following screen, choose Navigate to be guided to your home address (press Change or Delete if you want to change/delete your home address). Navigation will start immediately. If no home address has been set, you are prompted to do so. You can choose it by searching for an My Work ҶBy pressing My Work, your work address will be displayed on a map. ҶChoose Menu.
Using Navigation System Bookmarks The bookmarks list contains the destinations you have saved as favorites (from the guides, by choosing it on a map, etc.). This means that you do not need to perform repeated searches for those destinations. ҶPress Bookmarks. The bookmark list will show on the screen: Use the up and down arrows to scroll up and down in the list. ҶSelect an item by clicking on it.
Using Navigation System Use the up and down arrows to scroll up and down in the list. ҶSelect an item by clicking on it. Navigation will start immediately. POI/Guides With the POI finder you can quickly find points of interest like gas stations and restaurants that are chosen from a database of millions of POI, either nearby or at a remote location. Within the POI menu you will see the guides, an optional and highly recommendable feature.
Using Navigation System ҶPress At location to look for POIs at a remote location. You need to enter a city or zip code through the keypad, similar to the address search (see Address Search on page 19). ҶPress Nearby to open a list of POIs near your current location. By pressing Everywhere you can perform an overall search, encompassing the whole POI directory as well as all guides. A menu showing the POI categories will be shown: ҶPress on the desired POI category.
Using Navigation System Guides are an optional feature and may be purchased at customer service web site(please, see page 81). ҶOn the start screen, choose Destination. ҶOn the following screen, choose POI. ҶChoose Guide. The guide list will be shown: ҶSelect the guide you wish to use by clicking on it. Basic Operation The categories page of the chosen guide will be displayed: You can now browse the guide by categories or search the guide.
Using Navigation System Search the guide ҶPress the search symbol (magnifying glass). ҶIn the search window, enter a search term (at least three characters), and start searching by pressing the search symbol (magnifying glass). The hit list will be displayed: ҶSelect an entry by tapping on it. On the following menu you can . Ҷget detailed information about the selected location by pressing Detail. Ҷ explore the location s surroundings by pressing Map. Ҷuse the item for guidance by pressing Navi.
Using Navigation System On the following menu you can . Ҷget detailed information about the selected location by pressing Detail. Ҷexplore the location s surroundings by pressing Map. Ҷuse the item for guidance by pressing Navi. Ҷsave the item as a bookmark by pressing Save. Map The map not only shows roads and squares, but also points of interest such as restaurants, cultural attractions, parking garages, etc. You can zoom out or zoom in to see all kinds of details.
Using Navigation System Functions of buttons Discover your surroundings by dragging the map with your finger (or with the pen). ҶPoint at the symbol of a location to display its name. ҶUse the scroll bar on the right to zoom in (down) or out (up). ҶUse the symbol in the bottom right-hand corner of the map to toggle between 2D and 3D view. ҶWith the compass icon (in the bottom left hand corner) you may adjust the orientation.
Using Navigation System ҶCheck the boxes of any category you want to have displayed on the map. Uncheck those that should be hidden. ҶPress the confirmation symbol in the bottom right-hand corner to select/deselect all categories. ҶPress the arrow symbol to return to the map. It is not possible to browse the map in the start screen. This screen merely shows your current GPS position, given you have a GPS connection. This section describes the route planning feature.
Using Navigation System You will switch to the Choose stopover screen. You may choose stopovers like your home or work addresses, a bookmark, a point of interest, a recent location or by searching for an address or pinpointing a destination on the map. Once you have added stopovers (with the + symbol) and returned to the Destination List, you have several options: ҶWith the + symbol you can choose additional stopovers.
Using Navigation System ҶPress Simulate to simulate the route to come. ҶPress Start Navi to start guidance. The display will switch to the navigation map. ҶWith Routing the system will calculate your route. The Route Summary will be displayed. Tap on one of the items in the Route Summary to display the Waylist. Tap again to show the map view. 5-3. Settings You can configure your Personal Navigation Device to suit your needs.
Using Navigation System Guidance Settings ҶChoose Guidance to change the guidance settings. The window with the guidance settings will be displayed: If you have purchased additional features (see Optional Features on page 37), like TMC, SpeedCam Alert or Route Recording, you can switch them on or off through this menu. ҶTo switch between the modes just touch the icons. These will toggle so you can quickly see the activated settings.
Using Navigation System Settings (General Settings) ҶChoose Settings to change the general settings. The windows with the general settings will be shown: ҶPress Info Layers to adjust the complexity of the map, i.e. to select which items are to be shown on the map (see Map on page 29). The other settings include switching between day and night as well as 2D and 3D mode and adjusting the Volume. Language Choose Language to select the language of your navigation system.
Using Navigation System Change settings during navigation ҶTouch the screen during guidance to open the settings screen: Here you will find the following items: Settings Open a menu with general settings, as described in Settings (General Settings) on page 35. Additionally you can toggle between map and arrow mode for guidance. When you change to the arrow mode, the navigation screen will not show the map but only an arrow indicating the upcoming maneuver.
Using Navigation System 6. Optional Features You can further enhance your Personal Navigation Device through a set of optional features. The following features are available as options for your navigation system: ҶGuides ҶTraffic Message Channel (TMC) ҶRoute Recording ҶSpeed Camera Alert 6-1. Guides At www.navi-plugins.com you can find lots of valuable information services, including directory services, WiFi hotspot locators, and city guides.
Using Navigation System ҶPress the TMC button (transmitter symbol) to switch between the TMC settings Automatic, Manual and Off. With the Automatic option, your Personal Navigation Device will automatically guide you around all the traffic jams on your route. With the Manual option your navigation system will alert you about traffic jams and ask you if you would like to switch to an alternate route.
Using Navigation System 7. Frequently asked questions I can’t find an address. Please make sure you have correctly spelled your entry. If you do not know how an address is spelled correctly, simply enter the parts of the address, you know for sure (e.g. New York , Times for Times Square in New York City). Then browse in the result list and look for the address. Also make sure that the city in which you are looking for an address is correct.
Using Navigation System 8. Audio player You can play back music by selecting Audio player in the main menu. Basic functions include Play, Pause, Stop, Select Next, and Select Previous. Playback function includes Repeat, Repeat Selected, and Random. The supported music file formats are MP3, WMA, and WAV. You can save music files in the Navigation System internal memory or in the USB memory. The audio player manages the music file by albums.
Using Navigation System 8-1. Basic screen Repeats playback of the selected music file. Random playback. Repeats all music files. Play/Pause : Plays back the music file or pauses it. Stop : Stops playback. Previous Moves to the next or previous music file. Basic Operation Next Volume control : Increases sound volume. Volume control : Decreases sound volume. Mute : Suppresses sound volume. List : Displays the list of music files. Main menu : Returns to the main menu.
Using Navigation System 8-2. List screen Internal memory : Displays a list of music files saved in the internal memory. USB memory : Displays a list of music files saved in the external USB memory. Close : Closes the list screen. 1. Select the music file to play back from the internal memory or external USB memory. 2. Select the album that contains the desired music file. 3. Select the music file you want.
Using Navigation System 9. Game Select the Game in the main menu. How to play : If you place more than three of the same items in arow vertically or horizontally, these items will disappear. To get higher score, remove as many items as possible at a single time. Normal mode : The game will be over if no further mioves are possible. Basic Operation If the bar on the right side is filled, the next level will start. Ҷ Time trial mode : The game will be over if the time bar on the right side runs down.
Using Navigation System 10. Aux You can use the simple Aux function if you set A/V input as ’Others’ in the settings section. As shown by the above figure, only volume control and screen setting are supported in ’Others’ mode. DVD player control is not supported. If you press the [Screen Setting] button, the below screen will appear and you can change saturation, brightness, and contrast.
Using Navigation System Optional function The following functions are available when connected to the DVD player. VXM and VXD are the model name. If you have DVD player connected and select VXM or VXD as A/V input in Setup menu accordingly, you can access the DVD player function via the touchscreen controls. You can also use the remote controller to use the following functions. ڨ ک ڣ ڤ ڧڦ ڥ Basic Operation ڢ ڡ ڸPlay/Pause : Starts or pauses the DVD player.
Using Navigation System The following screen will appear if you press the [Setting] button. ڡ ڢ ڤ ڣ ڸDVD menu : Switches to the DVD title menu and displays the direction key menu, which makes cursor movement easier in the DVD title. ڹSets saturation, brightness, and contrast. ںDimmer : Controls brightness in 5 discrete levels. ڻReturns to the previous menu. The below figure shows the screen when you press the DVD Setting button.
Using Navigation System The below figure shows the menu screen when you select saturation setting, brightness setting, or contrast setting button. 11. Setup You can change many settings if you select Setup in the main menu. 11-1. Slide show Basic Operation If no input is made for more than one minute in the main menu, specified images will be displayed sequentially in a slide show.
Using Navigation System 11-2. Background image You can select the background image you prefer. 1) Select the image to change and press the [SELECT] button. 2) If you press the [Previous] button, the background image will not be changed and the set up menu will reappear.
Using Navigation System 11-3. Touch setting For touch screen setting, press and briefly hold the center of the cross symbol. Then, the cross symbol will appear at the left upper side, left bottom side, right bottom side, and right upper side one by one. To complete touchscreen setting, press the center of the cross symbol for 5 times in total. Caution If you press the point that is far away from the cross symbol during touchscreen setting, the cross symbol will appear indefinitely.
Using Navigation System 11-4. Volume You can select from 16 levels of sound volume. 11-5. Dimmer You can select from 5 levels of screen brightness. 11-6. Upgrade or download using USB memory You could download navigation map database, OS, background images and slide show images to your system by using the USB memory stick. Especially, to change the the navigation map in your system, you have to down another map from DVD-ROM disc provided to USB memory by using V-Up Pro.
Using Navigation System ȯ OS upgrade 1) Download and run V-Up Pro from DVD-ROM disc and select USB as a storage media. 2) Save the upgrade file in the USB memory. 3) Connect the USB memory to the device. When the USB connection icon appears, select OS Upgrade. 4) Press the [OK] button. Basic Operation 5) When upgrade is complete, restart the unit. ȯ Background download (Only 480 X 234 size BMP file is supported.
Using Navigation System 4) Press the [OK] button. ȯ SLIDE download (Only 480 X 234 size BMP or JPG file is supported. You can create the slide show file conveniently using the V-Up Pro program that is provided in the DVD-ROM disc.) 1) Create a folder named ’\UPGRADE\SLIDESHOW\’ in the USB memory. 2) Save necessary upgrade files in this folder. 3) Connect the USB memory to the device. When the USB connection icon appears, select Slide Show Upgrade. 4) Press the [OK] button.
Using Navigation System ȯ Upgrade will fail if you try to upgrade when the internal memory is not sufficient, or the external USB memory is not available, or no upgrade files are saved in the USB memory. If the internal memory capacity is insufficient, delete some files to secure enough memory space. When upgrading, see if upgrade files are saved in the USB memory, and the USB memory is connected properly.
Using Navigation System 2) Deleting the slide show file ȯ Press the [Delete] button to delete the selected file only, or press the [Delete All] button to delete all slide show files. 3) Deleting the music file ȯ Press the [Delete] button to delete the selected file only, or press the [Delete All] button to delete all music files in the album.
Using Navigation System 11-9. Confirm settings You can save all settings by pressing this button. 11-10. Cancel settings You can cancel all settings you made by pressing this button. 11-11. Restore default Basic Operation The factory default setting will be restored, if you press this button.
V-Up Pro 1. Installing ActiveSync and V-Up Pro Program 1-1. Install ActiveSync Program A. Execute ActiveSync installation file (MSASYNC_3_8.EXE) in DVD-ROM disc provided. B. Carry out ActiveSync program installation. C. Connect the navigation set to PC using USB cable. D. If PC find unknown device, update device using device driver file (wceusbsh.inf) in DVD-ROM disc. ƕ If device update correctly, you could see the device information at device manager. (Device name : DVS Korea USB EZ-Link Cable) 1-2.
V-Up Pro C. Program installation will be started. See Figure 1-2. Figure 1-2. V-Up Pro Installation Progress V-Up Pro D. If successfully installed, theūSetup CompleteŬmessage will be displayed. See Figure 1-3. Figure 1-3. Completion of V-Up Pro installation E. The following program group and the shortcut icon will be created in Programs menu as shown in Figure 1-4. Figure 1-4.
V-Up Pro 2. Running V-Up Pro Program A. Select Start آPrograms آPlenio آV-Up Pro آV-Up Pro shortcut icon. B. V-Up Pro will be started. See Figure 2-1. ڤ ڣ ڡ ڢ ڥ Figure 2-1. V-Up Pro main screen ڸV-Up Pro program version ڹConnection status and remaining memory capacity ںMinimize window button ڻClose window button ڼTitle Bar: You can move the V-Up Pro program window.
V-Up Pro 3. Closing V-Up Pro Program A. When you click the [Close] button, the program closing confirmation window will appear as shown in Figure 3-1. B. Click [Yes] to exit from V-Up Pro program. V-Up Pro Figure 3-1.
V-Up Pro 4. System Upgrade A. Execution A-1) Click theūSystem UpgradeŬicon in the V-Up Pro main screen. A-2) Then, the screen shown in Figure 4-1 will appear. ڡ ڢ ڥ ڤ ڣ Figure 4-1.
V-Up Pro A-3) Select the upgrade type using the radio button shown in Figure 4-1. Transfers upgrade files directly to the navigation set through ActiveSync connection. Saves upgrade files in the local drive specified by the user. (See Figure 4-2 for specifying the local drive.) Reads upgrade files from the user-specified local drive and transfers them to the navigation set. (See Figure 4-2 for specifying the local drive.
V-Up Pro B. Selecting upgrade items ƕ Upgrade selection window will appear only whenūUpgrade directlyŬorūDownload upgrade filesŬis selected. B-1) Select the item to upgrade using theūSelect upgrade itemsŬcheck box (Figure 4-3 )ڸ. (Navigation, OS) ڡ ڤ ڢ ڣ ڦ ڧ ڥ Figure 4-3.
V-Up Pro B-2) To upgrade the navigation, select the navigation selection check box (Figure 4-3 )ڸand select the target area using the map coverage and voice language check box (Figure 4-3 )ں. See Figure 4-4. ڡ Figure 4-4. Navigation data selection screen ڸCalculate and display checked componentsŪmemory. B-3) To upgrade to the latest OS, select the OS selection check box (Figure 4-5) and click the V-Up Pro [Next] button (Figure 4-3 )ڽ. Figure 4-5.
V-Up Pro ƕ The alarm message window appears when navigation upgrade is selected (Figure 4-6). Select the [Yes] button to continue upgrade. Figure 4-6. Navigation upgrade alarm window C. Upgrade C-1) If the upgrade type and item are properly selected, the upgrade progress screen will appear as shown in Figure 4-7. ƕ The selected upgrade item list will appear at the Figure 4-7 ڹposition. ڡ ڢ Figure 4-7.
V-Up Pro C-2) Click the [Cancel] button (Figure 4-7 )ڸto stop upgrading and return to the previous step. D. Upgrade completion D-1) When upgrade is complete successfully, the Complete message window shown in Figure 4-8 will appear. V-Up Pro Figure 4-8.
V-Up Pro 5. Music Management A. Execution A-1) Click theūMusic ManagementŬicon in the V-Up Pro main screen. A-2) The screen shown in Figure 5-1 will appear. ڤ ڣڢ ڡ ڥ ڧ ڨ ک ڦ Figure 5-1. Music Management execution screen ڸOpens the music file from the user PC. ڹCreates a music album in the navigation set. ںEdits a music album in the navigation set. ڻDeletes a music album, and music file selection in the navigation set. ڼSelects the music album in the navigation set.
V-Up Pro B. Opening music file from user PC B-1) Click theūOpen Music FileŬbutton (Figure 5-1 )ڸand select the music file folder in the user PC. B-2) If any music file is available in the selected folder, it will be displayed in the music file list window. See Figure 5-2. ƕ Supported music file type: MP3, WMA,WAV. V-Up Pro Figure 5-2.
V-Up Pro C. Creating and selecting music album in the navigation set C-1) Click theūCreate music albumŬbutton (Figure 5-1 )ڹand input the name of the album to create in theūNameŬinput window. (See Figure 5-3.) Figurer 5-3. Music album name input window C-2) Click [OK] to register the album name in the music album selection input combo box (Figure 5-1 )ڼ. See Figure 5-4. Figure 5-4. Music album selection combo box C-3) Select the album from the music album selection combo box.
V-Up Pro D. Editing music album in the navigation set D-1) Select the music album to change its name from the music album selection combo box. D-2) Click theūEdit music albumŬbutton (Figure 5-1 )ںand input the album name to change. See Figure 5-5. Figure 5-5. Music album name edit window D-3) Click the [OK] button to register the edited album name in the music album selection V-Up Pro combo box. See Figure 5-6. Figure 5-6.
V-Up Pro E. Deleting music album from the navigation set E-1) Select the music album to delete from the music album selection combo box. E-2) Click theūDelete music albumŬbutton (Figure 5-1 )ڻ. E-3) If no music file is available in the selected music album, the music album will be deleted. E-4) If any music file is available in the selected music album, the Confirmation window will appear. See Figure 5-7. Figure 5-7.
V-Up Pro Figure 5-8. Selecting music file in the user PC F-4) Click theūCopy music fileŬbutton (Figure 5-1 )ڽbutton. F-5) While the file(s) is being copied, the file copy progress bar (Figure 5-9 )ڸwill be displayed. F-6) When file copying is complete, the copied music file will be displayed inūMusic file in the navigation setŬlist window. G. Cancelling music file copy V-Up Pro G-1) To stop file copy while in progress, click the [Cancel] button (Figure 5-9 )ڹ. ڢ ڡ Figure 5-9.
V-Up Pro H. Deleting music file from the navigation set H-1) Select the music file to delete from theūMusic file in Plenio setŬlist window. (Multiple selections are supported.) H-2) Click theūDelete music fileŬbutton (Figure 5-1 )ڻ. H-3) The selected music file will be deleted. 6. Bitmap Management A. Execution A-1) Click theūBitmap ManagementŬicon in the V-Up Pro main window. (See Figure 6-1.) Figure 6-1.
V-Up Pro A-2) The screen shown in Figure 6-2 will appear. ڡ ڣ ڤ ڢ ڥ ڧ ڦ Figure 6-2. Bitmap Management execution screen ڸOpens the image file from the user PC. ڹDisplays the image file. ںDeletes the image file from the navigation set. ڻBackground image/Slide show folder selection combo box.
V-Up Pro B. Opening image file from user PC B-1) Click theūOpen image fileŬbutton and select the image file to open. B-2) Image will be resized to fit into the the navigation set display resolution. See Figure 6-3. ƕ Supported image file format : bmp, jpg ƕ The navigation set supporting resolution : 480x234 Figure 6-3. Displaying the selected image file.
V-Up Pro C. Resizing image C-1) You can select 1) Keep aspect ratio, or 2) Full screen image before saving it. C-2) Use the radio button that set the image file output format (Figure 6-2 )ھto change the display type. Example 1. Image with aspect ratio Example 2. Full screen image D. Selecting target folder to save in the navigation set D-1) Select the target folder to save using theūSelect background/slide show folderŬcombo box. See Figure 6-4.
V-Up Pro D-2) If any bit map file is in the selected target folder, the file will be displayed in the image file list window (Figure 6-2 )ڼ. See Figure 6-5. Figure 6-5. List of file(s) in the background folder E. Copying image file to the navigation set E-1) When you click theūCopy image fileŬbutton (Figure 6-2 )ڽ, the image file name input window will appear. See Figurer 6-6. Figure 6-6.
V-Up Pro F. Previewing bit map in the navigation set F-1) The image file list window (Figure 6-2 )ڼdisplays the list of image files in the selected target folder, as well as provides the image file preview function. F-2) Select one image in the image file list window (Figure 6-2 )ڼ. F-3) When the image file is opened (See Figure 6-7), the selected image file will be displayed in the image file display window. See Figure 6-8. V-Up Pro Figure 6-7. Image file loading status Figure 6-8.
V-Up Pro G. Deleting image file from the navigation set G-1) Select the image file to delete from theūimage file in the selected folderŬwindow. (Multiple selections are supported.) G-2) Click theūDelete image fileŬbutton (Figure 6-2 )ں. G-3) The selected image file will be deleted.
Upgrading Navigation System Downloading Navi or OS You can download ActiveSync installation file and various download files from the DVD-ROM disc. What is V-Up Pro? V-Up Pro is the Navigation System management program and performs the following functions. 1. Managing the music files (MP3, WMA, and WAV) 2. Managing background images and slide shows ȯ You can download ActiveSync and the latest version of ActiveSync from the dvssales web site.
Upgrading Navigation System Specification Item Details OS MS WINDOWS CE.NET 4.
Customer support and Product Enquiry Customer support and Product Enquiry The product warranty period is calculated from the date of product purchase. Therefore, make sure to write down the purchase data and keep your sales receipt for proper after service. [If the product purchase date cannot be known, the product warranty period will start 3 months from the manufacturing date or import customs clearance date.
MEMO 82 Navigation System
MEMO Navigation System 83