
Installation manual


Installing and Connecting the Unit
9
To change the unit’s IP address
1. Insert the CD included in the package in your computer’s disk drive.
Note:
The PC and the unit must be physically connected on the same subnet.
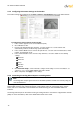
2. Run the dna.exe file by clicking the icon. The DNA application opens and the device is
displayed in the window.
3. Select the unit by right-clicking on it.
Figure 7: DNA Discovery Window
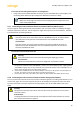
4. If there are devices located on a separate VLAN, click on the DNA toolbar to
add them manually.
5. Select the unit by right-clicking on it and click Assign IP or select the Assign IP option.
The Assign IP dialog box opens.
Figure 8: DNA Assign IP – Use DHCP Dialog Box