
Installation manual


trk-101-P Installation Manual
12
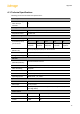
3.2.5 Configuring PTZ Camera Settings on the Encoder
PTZ camera settings are configured in the Setup > Camera > Type & Model screen in the web interface.
Figure 12: Camera > Type & Model Screen
To configure PTZ camera settings on the encoder
1. In the Camera Type area, select Pan/Tilt/Zoom (PTZ).
2. Check Enable Re-arm.
3. From the Re-arm Duration drop-down list, select the number of seconds until the unit
automatically rearms itself after being operated manually.
4. In the Camera Model section, from the drop-down lists, select the camera manufacturer, model
number, and maximum zoom.
5. In the Communication section, from the drop-down lists, select the details for the following
settings:
Device ID
Baud rate
Parity
Start bits
Stop bits
6. Click Start PTZ Setup to run the wizard to configure PTZ settings. For more information, see
section 5.3.1.2.1.1 in the HTML Edition Units User’s Guide.
7. When completed, click Apply to save settings.
3.2.6 Connecting the Analog Video Output to an Analog Device
Note:
The analog video output signal of the unit is disabled by default. Enable it if necessary using the
unit’s web interface.
The analog video output (composite video) contains the video from the camera combined with On-Screen
Display (OSD) overlays such as detected objects, tracking boxes and trails, time stamp, alarm, camera
status, and so on. These OSDs can be enabled and customized using the unit embedded HTML user
interface.
The analog video output can be monitored using an analog monitor or recorded on a digital video recorder
(DVR). For more information, refer to the HTML Edition Units User’s Guide.