
Operating instructions

15 of 29
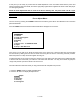
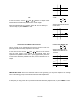
Tilt
At the Tilt screen, use the / and / buttons to adjust center
horizontal and vertical lines parallel to the screen edges.
When Tilt adjustments are complete, press “8” to move directly to
the next step, or press “MENU” to exit.
7. Tilt
50
50
Adjust Horizontal & Vertical
Center lines
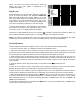
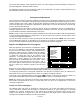
Horizontal Lines/Bottom Pin Cushion:
This is another set of adjustments that set the picture so that it is
perfectly parallel and evenly adjusted to the screen.
At the menu screen use the / and / buttons on the remote
until the outer edges of the picture at the left/right sides and
top/bottom are parallel to each other . (insert graphic here) The lines
on the screen should be parallel to the floor, and not bowed in an “S”
shape.
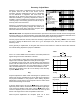
8. Hor Lines/ Bottom Pin
50
50
Adjust Horizontal Lines
Rotation and Bottom Pin-
Cushion
IMPORTANT NOTE: Due to the interactive nature of the geometry you may find it helpful to run through
each of the setting groups a second time after the initial adjustments.
At this point you may press “0” to proceed with the Red Geometry adjustments, or press “MENU” to Exit.