
Owner's manual


A
djustment of Split Range (SPLIT)
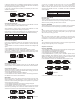
1
. Push <ENTER> at VALVE mode and ACT RA or ACT DA is displayed.
2
. Push <DOWN> five times and SPLIT mode is displayed. The numbers on the
L
CD are the range of current signal input to the positioner. 4 to 20 mA current signal
is set as the standard.
3. Push <ENTER>. *SPLIT mode is displayed and input signal range can be
adjusted. Adjust input signal range with <UP> or <DOWN> and save it with
<
ENTER>.
4
. +SPLIT mode is displayed while saving adjusted range. Push <ESC> three times
t
o return to RUN mode.
VIEW Mode
T
his mode provides users with various information about the Series 195 and 295
p
ositioners. In this mode, users can change the valve stroke types displayed on the
L
CD to % or numbers. Refer to the next table for information and description
displayed on VIEW mode.
1. Push <DOWN> at AUTO CAL mode and VIEW mode is displayed.
2. Push <ENTER> at VIEW mode, then information mode is started.
3
. Check information by using <UP> or <DOWN> and push <ESC>.
4
. Push <ESC> again to return to RUN mode.
E
rror and Warning Code
I
f there are any problems during Series 195 and 295 positioner operation, you can
c
heck the error and warning code at VIEW mode as follows:
Error Code
This code is displayed when the Series 195 and 295 positioner control becomes
impossible. Code C, D applies.
Warning Code
This code is displayed when the positioner control is available but there is a
possibility of malfunction or low accuracy. Code B, F, G, H applies.
YT-2500L
VERSION
HART V
POL AddR
bIAS VI
0Y 0d
FULL_OP
FULL_CL
VM NOR
Erro
VALUE I
ABS
Description
Positioner model
Main software version
HART Protocol version
Channel address that is used in HART Protocol
BIAS value for motor/piezo valve control. Can be adjusted only by
manufacturer.
Total used time duration. If a unit was used less than 1 minute, the
time does not accumulate.
Time elapsed for valve to fully open.
Time elapsed for valve to fully close.
Display type of valve stroke on LCD (either in percentage or value).
Display error code or warning message <Figure XX>.
Current I-Value. Can be adjusted only by manufacturer.
Display absolute resistance value.
Information Checked on VIEW Mode
E
rror Code
M
T ERR L
M
T ERR H
CHK AIR
R
NG ERR
C
D
C
ode Description and Cause
Positioner is improperly installed.
Positioner lever is not parallel to
the ground at 50% point. Lever is
a
t lower position than actual 50%
p
oint.
P
ositioner is improperly installed.
P
ositioner lever is not parallel to
the ground at 50% point. Lever is
at lower position than actual 50%
point.
V
alve does not operate when
p
ositioner receives “Full Open”
s
ignal during auto calibration.
Operating angle is too small due
to improper mounting of
positioner.
Error 10% or above persists more
t
han 1 minute.
N
o valve movement.
Friction of valve is too large.
Setting pressure of actuator
c
hanges.
I
-Value reaches at maximum or
m
inimum limit point.
Friction of valve changes.
Setting pressure of actuator
changes.
Action
Re-install/mount the positioner.
M
ake sure the feedback lever
d
oes not touch the stopper at both
0
and 100%.
Re-install/mount the positioner.
Make sure the feedback lever
does not touch the stopper at both
0
and 100%.
C
heck if supply pressure is stable
and appropriate.
Adjust bracket so the positioner
can be mounted closer to actuator.
P
erform BAS calibration.
C
heck setting pressure of actuator
and set the pressure as
recommended.
P
erform AUTO calibration.
C
heck setting pressure of actuator
a
nd set the pressure as
recommended.
Warning Code
B
F
G
H
Code Description and Cause
PV end-PV zero range is below
500. The angle of feedback
lever is too small.
Time elapsed for either full-open
or full-close is less than 1
second.
The size of the actuator is
too small.
Pv zero is below 100.
The angle of feedback lever
is too large.
Pv end is over 4000.
The angle of feedback lever
is too large.
Action
Re-install/mount the positioner.
Make sure the feedback lever
does not touch the stopper at
both 0 and 100%.
After re-installation, perform
AUTO1 calibration.
Use variable orifice.
Replace actuator with larger
capacity.
Re-install/mount the positioner.
After re-installation, perform
AUTO1 calibration.
Re-install/mount the positioner.
After re-installation, perform
AUTO1 calibration.
P
age 9
<ENTER>
6 seconds
<DOWN>
5 times
<ENTER>
<UP>/<DOWN>
then <ENTER>
<ESC>
3 times
<ESC> 3 times
then <ENTER>
<DOWN>
4 times
<ENTER> <UP>/<DOWN>
confirm the changes,
then <ESC>
<ESC>
COMPLETED