
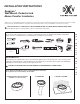
Installation Sheet

- 1 -
INSTALLATION INSTRUCTIONS
Seagram
™
Wall Mount, Pedestal and
Above Counter Lavatories
7302023-100 Rev. D
Product names listed herein are trademarks of AS America, Inc.
© AS America, Inc. 2014
7302023-100 Rev. D 7302023-100 Rev. D 7302023-100 Rev. D
A1
A2
C1
C3
C4
C5
C6 C7
A5
A4
A6
REPLACEMENT USE
Most of the procedures require the use of common tools and materials, which are available from hardware and plumbing,
supply stores. It is essential that the tools and materials be on hand before work is begun.
RECOMMENDED TOOLS AND MATERIALS
7302023-100 Rev. D 7302023-100 Rev. D 7302023-100 Rev. D7302023-100 Rev. D
SAVE FOR FUTURE USE
Three different installations are possible with these lavatories;
check options for each lavatory on the table
B. PEDESTALA. WALL-HUNG (optional furniture
available on some models)
C. ABOVE COUNTER
!
USE TEFLON SEALANT TAPE ON PIPE THREADS FOR WATERTIGHT CONNECTIONS!
When replacing an original unit be sure to shut off water supply before removing the unit or disconnecting water
supply lines and drain ttings. Original supply lines and shutoff valves should be replaced and used with ttings
and adapters to match the hookups on the replacement unit.
1 Hole Round Lavatory - CWH WH or AC --- D20035.001 --- 7301531-100.0070A
Small Corner Basin - CWH WH or AC --- D20040.001 --- 7301531-100.0070A
Square Hand Basin - CWH WH or AC --- D20025.001 --- 7301531-100.0070A
24" One Hole Basin - CWH WH or AC --- D20095.001 --- 7301531-100.0070A
24" Three Hole Basin - CWH WH or AC --- D20095.008 --- 7301531-100.0070A
Rectangle Right Hand Lavatory WH or AC --- D20126.100 --- Hanger x 2: 047058-0070A
Rectangle Left Hand Lavatory WH or AC --- D20125.100 --- Hanger x 2: 047058-0070A
Installations: WH=Wallhung; AC=Above Counter;
PED=Pedestal
Installation
Options
Combo
Lav # Ped # Mounting Kit #
Hanger x 1: 047058.0070A
24" One Hole Basin & Square Pedestal PED D20095.100 D20095.001 D21025.000 7301531-100.0070A
Round Lavatory - Single Hole & Round Pedestal - KIT PED D20035.100 D20035.001 D21020.000 7301531-100.0070A
24" Three Hole Basin & Square Pedestal PED D20095.800 D20095.008 D21025.000 7301531-100.0070A
Small Square Lavatory & Square Pedestal - KIT PED D20025.100 D20025.001 D21025.000 7301531-100.0070A
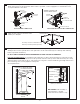
WALL PREPARATION:
Typical installation includes wall preparation, installation
of faucet and pop-up drain, supplies to house water
system.
Lavatory Mounting Provisions - Whether the lavatory is
used for replacement or new installation, the wall area
behind the lavatory basin mounting holes must be
reinforced to provide secure mounting for the new unit.
Preparing Wall for Lavatory Mounting
Optional: For non-masonry installation, crosspieces must
be installed to reinforce the lavatory mounting surface to
provide adequate support, install as described below.
1. Remove wallboard/covering from designated area.
2. Toenail 2" x 6" (51mm x 152mm) cross piece between studs (or notch studs to accept a 1" x 6" (25mm x 152mm)
crosspiece, and attach securely). Place the lavatory into desired position and check height of mounting holes for
dimensional location of horizontal crosspiece.
3. Replace wallboard/nished wall media.
NOTCH STUDS OR
TOE-NAIL
DRAIN PIPE
WATER
SUPPLY
PIPES
LAVATORY
CROSS-PIECE
SUPPORT
INSTALLING
CROSS-PIECE
INSTALLATION INSTRUCTIONS FOR A. WALL HUNG and B. PEDESTAL INSTALLATIONS:
NOTE:
OPTIONAL STEP FOR PEDESTAL
Pedestals have two additional xations
to oor (see illustration). It is optional to
secure pedestal to oor. Select hardware
depending on oor conditions.
EXTRA FIXATIONS
CAUTION: Lavatories are extremely heavy. For personal safety, always use extra person for installation.
Using level, draw a vertical line on the wall starting at the waste return hole. Use the line as reference for placing
the lavatory, and pedestal if pedestal installation, into position. Mark xation locations through mounting holes on
the back of lavatory. Remove lavatory and drill holes.
The mounting kit provided with lavatory includes two 3/8" headless wood screws, two washers and two nuts.
Important note: check and select best xation method for your wall conditions. Screw anchor for masonry walls
(not provided) or other kind of screws could be needed for installation on different walls.
Lag Bolt
Washer
Lavatory
Steel Hanger
NOTE:
EXTRA STEP FOR LAVATORIES
SUPPLIED WITH A STEEL HANGER
IMPORTANT: Final assembly of nut and washer or lag
bolt method shown for reference only.
The CORNER lavatory is supplied with a mounting kit and one steel hanger. Follow the wall hung
installation instructions to use the kit with the two large anchor holes.
Fixation method for the steel hangers must be selected depending on wall conditions (wood screws,
masonry anchors,…) and are not provided.
Mark the location of xations of the hanger on the wall when positioned as shown in illustration. Drill holes
on the wall and secure hanger as illustrated.
The extra xation next to the hanging slot could be needed depending on wall conditions. You should use
the extra xation if corner is not perfectly right. Hardware for the extra xation is not provided and must be
selected depending on wall conditions.
BOTTOM VIEW OF CORNER LAVATORY
HANGING
SLOTS
EXTRA
FIXATION
ANCHOR
HOLES
Install lavatory anchor screws on the wall leaving
1-7/8" threaded end exposed as illustrated.
1-7/8"
Anchor Screw
Washer
Lavatory
Nut
A3
Bead of Silicon
Geometry shown is for illustration only
and may not match product geometry.
Loosely attach the lavatory to the wall at the anchor locations. Optionally, place cushioned adhesive-backed or
similar product on the top and bottom of the pedestal to avoid ceramic damage, oor damage and clattering
between pedestal and lavatory.
DO NOT OVER-TIGHTEN MOUNTING HARDWARE OR LAVATORY MAY BE DAMAGED!
Pedestals Installation Note: Do not tighten nuts at this time, in order to allow the lavatory to swing up enough
to permit the insertion of the pedestal. Insert the pedestal under the lavatory. Ensure that the lavatory sits evenly
against pedestal. Level lavatory side to side and front to rear, (place cushioned adhesive [provided] under level to
protect lavatory), then securely tighten mounting nuts.
See Diagram Below.
LAVATORY TO WALL ANCHORS
LOCATION 4 PLACES
FINISHED
WALL
FINISHED
FLOOR
Lag Bolt
Washer
Lavatory
Lavatory
Steel Hanger
Use lag bolts to secure
lavatory as illustrated.
IMPORTANT: Final assembly of
nut and washer or lag bolt
method shown for reference only.
Apply a bead of silicon to the back of the
lavatory. See diagram.
Pre-assemble P-trap drain connections in accordance with manufacturer’s instructions. Check that pop-up
drain opens and closes properly when drain control is operated. Connect supply lines to shutoff valves and
loosely install drain connections.
P.TRAP
COMPRESSION
WASHER
NUT
NUT
COVER
HOUSE DRAIN
PIPE FITTING
LAVATORY
POP-UP DRAIN
TAILPIPE
TYPICAL DRAIN CONNECTIONS
TYPICAL WATER SUPPLY LINE CONNECTIONS
SPREAD LAVATORY SET
TYPICAL APPLICATION
FLEXIBLE
SUPPLY LINE
HOT SHUTOFF VALVE
COLD SHUTOFF VALVE
FLEXIBLE
SUPPLY LINE
C2
INSTALLATION INSTRUCTIONS FOR ABOVE COUNTER INSTALLATIONS:
NOTE: BACK OF LAVATORIES ARE UNGLAZED. The Lavatories must be installed with back against the wall.
INSTRUCTIONS FOR C. ABOVE COUNTER INSTALLATIONS:
Position the lavatory in place on the counter with the back unglazed surface against the wall. Mark the center of
the drain on the counter and draw a line from the mark to the wall (to the corner if installing a corner lavatory) as
a guide for the installation.
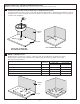
MARK COUNTER CUTOUT
Mark perimeter of opening on counter 1" away from wall. Check table below for dimensions. Place
lavatory in place and check that all perimeter is hidden under the lavatory. If visible, check again
dimensions of the perimeter.
Seagram
™
Round Lavatory D20035 12" (300mm) 14" (350mm)
Seagram
™
Small Corner Basin D20040 10" (250mm) 10" (250mm)
Seagram
™
Square Hand Basin D20025 11" (275mm) 11" (275mm)
Seagram
™
24" Basin D20095 20" (500mm) 14" (350mm)
Seagram
™
Rectangle Right Hand/Left Hand Lavatory D20125/D20126 13" (330mm) 5-3/4" (146mm)
CUTOUT DIMENSIONS
W
(front to back)
L
(side to side)Lavatory #
FINISHED
WALL
COUNTER
MARK
MARK
FOR CORNER LAVATORIES
FOR ROUND, SQUARE, AND
RECTANGULAR LAVATORIES
COUNTER
L
W
1"
1"
1"
L
W
B
C
Connect trap to drain assembly hand tight to check
alignment. It may be necessary to cut off part of the
tailpiece (area “B”) or part of the horizontal leg of
the trap (area “C”). Secure joints for watertight
assembly.
Seal gap between lavatory and wall with waterproof
sealant.
After checking fit and alignment, turn sink upside
down and apply clear silicone adhesive around the
under side of the rim near the edge. Place sink in
position. Wipe off excess adhesive. Attach the
lavatory to the wall at the anchor locations.
FINISHED
WALL
COUNTER
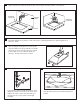
Drill a clearance hole inside the perimeter line. Cut opening around the perimeter of the template.
Mark and drill fixations of lavatory to wall. Follow steps of wall hung installation for preparing fixations of
lavatory to wall/s.
PERIMETER
OF TEMPLATE
PERIMETER
OF TEMPLATE
CAUTION: PRODUCT IS FRAGILE. TO AVOID BREAKAGE AND POSSIBLE INJURY HANDLE WITH CARE!
NOTE: Pictures may not exactly define contour of china and components.
Thank you for selecting DXV by American Standard. To ensure this product is installed properly, please read these instructions carefully
before you begin. (Certain installations may require professional help.) Also be sure your installation conforms to local codes.
!
In the United States:
DXV by American Standard
One Centennial Avenue
Piscataway, New Jersey 08855
Attention: Director of Customer Care
For residents of the United States, warranty
information may also be obtained by calling
the following toll free number: (800) 227-2734
www.DXV.com
In Canada:
DXV by American Standard
5900 Avebury Road
Mississauga, Ontario
L5R 3M3
Canada
Toll Free: 1-800-387-0369
Local: 905-306-1093
Fax: 1-800-395-1498
www.DXV.ca
In Mexico:
DXV by American Standard
Via Morelos 330
Col. Santa Clara Coatitla
Ecatepec, Estado de México 55540
Toll Free: 01-800-8391200
www.DXV.mx
Adjustable Wrench
Regular Screwdriver
Phillips Screwdriver
10'
Electric
Drill
Saber Saw
Plumbers' Putty or
Caulking
Tape Measure
Level
Channel LocksPipe Wrench
Hacksaw
Tubing Cutter
Square
FINISHED
WALL