GT90D Treadmill OWNER’S MANUAL PLEASE CAREFULLY READ THIS ENTIRE MANUAL BEFORE OPERATING YOUR NEW TREADMILL
Table Of Contents Product Registration 1 Important Safety Instructions 2 Important Electrical Instructions 3 GT90D Assembly Instructions 6 Operation of Your Console 11 Charging devices using the USB port 25 Using a Chest Strap 26 Treadmill Adjustments 29 XTERRA APP 32 Exploded View 34 Parts List 35 Manufacturer’s Limited Warranty 40 ATTENTION THIS TREADMILL IS INTENDED FOR RESIDENTIAL USE ONLY AND IS WARRANTED FOR THIS APPLICATION.
Congratulations On Your New Treadmill and Welcome to the XTERRA Fitness Family! Thank you for your purchase of this quality Treadmill from XTERRA Fitness. Your new Treadmill has been manufactured by one of the leading fitness manufacturers in the world. XTERRA Fitness will do all we can to make your ownership experience as pleasant as possible for many years to come. If you have questions, or if parts are missing or damaged, or you require customer service, call (870)336-4286.
Important Safety Instructions When using an electrical appliance, basic precautions should always be followed, including the following: Read all instructions before using this appliance. DANGER - To reduce the risk of electric shock: Always unplug this appliance from the electrical outlet immediately after using and before cleaning. WARNING - To reduce the risk of burns, fire electric shock, or injury to persons: 1. An appliance should never be left unattended when plugged in.
Important Electrical Instructions WARNING! Route the power cord away from any moving part of the treadmill including the elevation mechanism and transport wheels. NEVER remove any cover without first disconnecting AC power. If voltage varies by ten percent (10%) or more, the performance of your treadmill may be affected. Such conditions are not covered under your warranty. If you suspect the voltage is low, contact your local power company or a licensed electrician for proper testing.
NEVER operate this treadmill without reading and completely understanding the results of any operational change you request from the computer. Understand that changes in speed and incline do not occur immediately. Set your desired work level on the computer console and release the adjustment key. The computer will obey the command gradually. NEVER use your treadmill during an electrical storm. Surges may occur in your household power supply that could damage treadmill components.
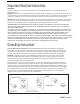
Cut the banding straps with a short box cutter (razor knife); separate the carton from the one underneath it by prying up on the staples (if applicable). Pull the carton over the treadmill parts and locate the hardware pack. Remove only the hardware for the step you are currently assembling to avoid confusion and mix ups. Pull the carton over the treadmill parts and lay it on a level surface. GT90D Assembly Pack Checklist # 74. 3.5 × 12m/m_ Sheet Metal Screw (4pcs) # 80. Ø8 × 1.
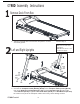
GT90D Assembly Instructions 1 Remove Deck From Box 1. Take the treadmill deck out of the box and place it on level and clean ground. 2 Hardware Step 2 #90. 13mm Wrench #99. 5/16”x1/2” Hex Head Bolts (8pcs) #100. Ø 5/16” × Ø 18 × 1.5T Flat Washers (8pcs) Left and Right Uprights 1. You may need assistance holding the Uprights (No.4/5) for this step. 2. Connect the Computer Cable (Middle) (No.54) to the Computer Cable (Lower) (No.55) then insert Right and Left Uprights (No. 4/5) into the Frame Base (No.
GT90D Assembly Instructions 3 Console Attachment Hardware Step 3 21 #102. Combination M5 Allen Wrench & Phillips Head Screw Driver #125. 5/16” × 3/4” Button Head Socket Bolts (4pcs) #80. Ø 8 × 1.5T Split Washers (4pcs) 28 54 114 53 80 29 115 102 80 125 4 125 5 1. Connect the Computer Cable (Middle) (No.54) and Computer Cable (Upper) (No.53). 2. Connect the Speed Adjustment Switch W/Cable (Upper) (No.114) and Speed/Hand Pulse Complex (No.28). 3.
GT90D Assembly Instructions 4 Crossbar Installation Hardware Step 4 #102. Combination M5 Allen Wrench & Phillips Head Screw Driver #125. 5/16” × 3/4” Button Head Socket Bolts (4pcs) 9 125 102 4 5 1. Install Handrail Support (No.9) between Left and Right Uprights (No.4/5) and use Combination M5 Allen Wrench & Phillips Head Screw Driver (No.102) to tighten 4 Button Head Socket Bolts (No.125). 5 Handlebar Covers 1. Install the Front Inner Handlebar Cover (L,R) (No.
GT90D Assembly Instructions 6 Frame Base Covers Hardware Step 6 #102. Combination M5 Allen Wrench & Phillips Head Screw Driver #126. M5 × 15mm Phillips Head Screws (6pcs) 1. Use Combination M5 Allen Wrench & Phillips Head Screw Driver (No.102) to tighten 6 Phillips Head Screws (No.126) to secure right and left Frame Base Covers (No.39, 38) on the Frame Base (No.2).
GT90D Assembly Instructions 7 Finishing Assembly Note: Once your treadmill is fully assembled, be sure to check the belt lubrication before initial use by completing the following steps: 1. Ensure that your machine is off, and that the power cord is unplugged to minimize risk of injury. 2. Use one hand to hold the treadmill belt up just enough so you can use your other hand reach between the belt and deck to verify that lubrication is present. If lubrication is present, you may continual normal use.
Operation of Your Console GT90D Console Power Up Power the treadmill on by plugging it into an appropriate wall outlet, then turn on the power switch located at the front of the treadmill below the motor hood. Ensure that the Safety Key is installed, as the treadmill will not power on without it. When the power is turned ON, the screen will show a brief loading screen and then display the WELCOME Screen which indicates that the machine is ready to operate.
Quick Start Operation 1. Attach the Safety Key to enable the display (if not already on). 2. Press any button to wake display up if not already on. 3. Press Start Workout on the Homescreen to begin belt movement at 0.5 mph, then adjust to the de- sired speed using the Speed + or - keys. 4. To slow the treadmill, press and hold the Slow - key (console or hand rail) to the desired speed. 5. To stop the tread-belt press and release Stop button.
Touch Screen Operation Set Up Once the console is powered on, connect to the available WiFi network either pressing the Signal icon on the top right corner or from the SETTINGS menu on the bottom right corner. Without WiFi, saving workout data to the cloud, using apps and casting content will not be available. If WiFi connection is skipped, please set data and time manually. If you change your mind later, you can always find WiFi settings in the bottom right corner on the screen.
Workout Programs In this section, there are 2 program categories available: Programs (programs with predefined speed and incline changing profiles) and Templates (regular programs, saved with your personal adjustments).Tap on the workout categories to switch between them. To get more info on each program, tap on the program preview. In this mode you can scroll to the side to see all the programs descriptions of the selected category. Press CHOOSE to select and adjust a program.
Preset Program Displays P1 to P30 programs have speed and incline changing profiles, which you can find on the program preview. Time and maximum speed settings are required. Once you choose your maximum speed, the program intensity will adapt accordingly. Press START to begin workout.
P17 Speed Incline P25 Speed Incline P18 Speed Incline P26 Speed Incline P19 Speed Incline P27 Speed Incline P20 Speed Incline P28 Speed Incline P21 Speed Incline P29 Speed Incline P22 Speed Incline P30 Speed Incline P23 Speed Incline P24 Speed Incline GT90D Treadmill 16
HEART RATE program will calculate your maximum heart rate based on your age. Set the target time for your workout, then adjust your speed manually while running in order to maintain the target heart rate. Incline will be controlled by the treadmill automatically. A HR monitoring device is required. The program is finished if the time is up, or if your HR is 20% higher than target. CUSTOM program allows to create customized speed and incline changing profile by sliding up and down on the profile columns.
Any program can be labeled as FAVORITE. Favorite programs appear on the Homescreen, so you can access them anytime you want.
Profile To create a new profile, press + button on the starting screen. If you already have a XTERRA APP ACCOUNT, you can scan the QR code appearing on the screen. This action will not only upload your already existing personal info to the machine, but also link two profiles together, so your workout history will be fully displayed in the XTERRA app. One XTERRA app account cannot be linked to multiple profiles on one machine.
Internet & Apps In this section there are a variety of third party apps to keep you entertained during your workout. To use them, connect to the WiFi and choose the app icon. Press to enter full screen mode. Press to exit full screen mode. Press ⌂ to choose another app. Screen Mirroring To display various content from your smartphones or tablets on the machine console, open this section and follow the instructions provided, depending on whether you use an iOS or an Android device.
Settings • • • • • Tap on WIFI for internet connection settings. Tap on DATE or TIME to change the machine time settings. The time and date settings define the time information in the workout summary. Both 12 and 24 hours formats are available. Tap on SOFTWARE to check the current software version or to update, if a new one is available. Press Update to upload and install the latest version. Be sure to be connected to the Internet. Tap on DISPLAY to adjust the brightness of the screen.
Note: This equipment has been tested and found to comply with the limits for a Class B digital device, pursuant to part 15 of the FCC Rules. These limits are designed to provide reasonable protection against harmful interference in a residential installation. This equipment generates, uses and can radiate radio frequency energy and, if not installed and used in accordance with the instructions, may cause harmful interference to radio communications.
Workout Views Once the workout has started, after the short countdown the console will appear in its workout mode. Warm-up and cool-down phases may be skipped by pressing Skip. The panel on the left is fixed and shows your current WORKOUT STATS. More related stats can be revealed by pressing on the + icon. SPEED AND INCLINE CONTROLS can be adjusted by tapping on arrows in the right panel. The icons on the top panel are the tools available during your workout: volume, fan and WiFi.
Track View: After the workout is finished, the workout summary will appear. Slide to the left to get more details or press Done to go back to the Home screen. You can also save the completed program as a template from here, if you press Save as button. The workout record will appear in History tab of the Profile section.
Charge Portable Devices with USB port USB Port Charging function: Charge your personal device during your workout using the fitness equipment’s on-console USB port. To charge your mobile electronics make sure the fitness equipment power is on. Step 1: Connect your USB charging cable (not included) to the USB Power Port and to your device. Step 2: Check to make sure your device icon indicates it is charging. NOTE: * USB charging cable is not included, make sure compatible USB charging cable is being used.
Wearing the Chest Strap 1. Attach the transmitter to the elastic strap using the locking parts. 2. Adjust the strap as tightly as possible as long as the strap is not too tight to remain comfortable. 3. Position the transmitter with the logo centered in the middle of your torso facing away from your chest (some people must position the transmitter slightly left of center).
Heart Rate The old motto, “no pain, no gain”, is a myth that has been overpowered by the benefits of exercising comfortably. A great deal of this success has been promoted by the use of heart rate monitors. With the proper use of a heart rate monitor, many people find that their usual choice of exercise intensity was either too high or too low and exercise is much more enjoyable by maintaining their heart rate in the desired benefit range.
Rate of Perceived Exertion Heart rate is important but listening to your body also has a lot of advantages. There are more variables involved in how hard you should workout than just heart rate. Your stress level, physical health, emotional health, temperature, humidity, the time of day, the last time you ate and what you ate all contribute to the intensity at which you should workout. If you listen to your body it will tell you all of these things.
Treadbelt Tracking Adjustment The treadmill is designed so that the tread-belt remains reasonably centered while in use. It is normal for some belts to drift near one side while in use, depending on a user’s gait and if they favor one leg. But if during use the belt continues to move toward one side, adjustments are necessary. 103 103 SETTING TREAD-BELT TRACKING An 6mm Allen wrench is provided for this adjustment. Make tracking adjustments on the left side bolt. Set belt speed at 3 mph.
DO NOT OVERTIGHTEN – Over tightening will cause belt damage and premature bearing failure. If you tighten the belt a lot and it still slips, the problem could actually be the drive belt - located under the motor cover - that connects the motor to the front roller. If that belt is loose it feels similar to the walking belt being loose. Tightening the motor belt should be done by a trained service person.
7. Walk on the belt at a moderate speed for 5 minutes to evenly distribute the lubricant along the treadmill belt and deck. 8. Your treadmill belt is now lubricated. Normal use can resume. To clean your treadmill belt: 1. Ensure that your machine is off, and that the power cord is unplugged to minimize risk of injury. 2. Grab one edge of the treadmill belt, and lift slightly to expose the area between the top of the treadmill base and the running belt. 3.
Using the XTERRA APP In order to help you achieve your exercise goals, your new exercise machine comes equipped with a Bluetooth® transceiver that will allow it to interact with selected phones or tablet computers via the Xterra App. Just download the free Xterra App from the Apple Store or Google Play, and then follow the instructions in the App to sync with your exercise machine. Now you can view current workout data in three different Display screens on your device.
User Notes: TRX5500 Treadmill 33
21-13 21-1 21-15 143 21-19 GT90D Treadmill 21-22 21-36 21-36 21-24 21-24 21-24 21-17 21-24 21-14 21-15 151 21-23 21-34 21-2 93 21-15 21-6 21-15 21-37 28 21-24 128 81 88 21-16 21-24 21-20 21-8 21-23 21-35 97 54 21-12 21-5 21-21 44 21-5 153 80 21-25 21-3 21-31 21-25 130 21-6 21-30 21-25 21-25 21-30 21-30 125 60 21-7 72 21-25 21-30 21-31 4 21-32 21-25 74 53 100 114 21-26 21-25 21-25 113 108 99 93 21-25 21-25 109 6 29 97 21-25 99 110 74 107 153
PARTS LIST 35 GT90D Treadmill
GT90D Treadmill 36
37 GT90D Treadmill
GT90D Treadmill 38
39 GT90D Treadmill
Manufacturer’s Limited Warranty Effective July 8, 2020- Treadmill LIMITED WARRANTY XTERRA Fitness Inc. warrants all its home use treadmill parts for a period of time listed below, from the date of retail sale, as determined by a sales receipt or in the absence of a sales receipt, eighteen (18) months from the original factory shipping date.
Supplier’s Declaration of Conformity 47 CFR §2.1077 Compliance Information Unique Identifier: GT90D Treadmill Responsible Party – U.S. Contact Information XTERRA Fitness, Inc. P.O. Box 2037 Jonesboro, AR 72402-2037 Phone:870-336-4286 - Fax:870-935-7611 FCC Compliance Statement This device complies with Part 15 of the FCC Rules.
3000 Nestle Road Jonesboro, AR 72401 - Phone:870-336-4286 - Fax:870-935-7611 www.xterrafitness.com ©2020 All Rights Reserved.