WF1H10-AC (Ribbon), WF1H10-BN (Seven), WF1H10-CHR (Whitewater), WF1H10-ORB (Nevada)
Waterfall Faucet Parts & Accessories Model Shown: Havasu (WF003-A19C) You may need the following tools/materials Valve Hoses (included) Pliers Screw Driver Silicone 2 Wrench Plumbers Tape
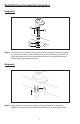
Waterfall Faucet Installation Instructions Diagram 1 1.375” (35mm) 2” (50mm) Note: Your faucet is designed for a hole with a diameter of 1 3/8” (35mm) and a deck thickness of up to 2” (50mm). Pleaseshut water valves before conducting faucet assembly. Diagram 2 Step 1: Attach the O-ring within the circular recess on the bottom of the faucet.
Waterfall Faucet Installation Instructions Diagram 3 HOT COLD Step 2: Connect both water hoses to both cold and hot water ports on the bottom of the faucet. Please note the right hose represents cold water and the left represents hot water. Diagram 4 1 Step 3: Attach the two mounting screws (1) to the faucet by screwing them into the two threaded holes on the bottom of the faucet base.
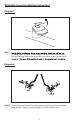
Waterfall Faucet Installation Instructions Diagram 5 4 5 1 3 2 Step 5: Install the faucet and hoses through the deck mounting hole. Attach the gasket (1), metal base clamp (2) and mounting nuts (3) onto the mounting screws (4). Align the two hoses (5) within the contoured recess of the metal base clamp before tightening the mounting nuts. Diagram 6 1 Step 6: Align the faucet to ensure its appropriately positioned.
Waterfall Faucet Installation Instructions Diagram 7 Step 7: plumbing pipes. This debris can damage the internal faucet surfaces which can cause leakage. Before turning on the water valves, make sure the faucet Diagram 8 Step 8: Connect both water hoses onto the respective water valves (we recommend using plumbers tape to prevent leakage). Turn on the water valves.
Waterfall Faucet Installation Instructions Diagram 7 Step 7: seconds. Evaluate all connections for leakage. After this process is complete, you may proceed to use your new faucet. Waterfall Filter Cleaning Instructions for A19 Series Plate Attached Plate Removed 1 2 3 Step 1: underneath the faucet. Remove the plate (2). Once the plate is removed, the process for reassembly.
Vessel Faucet Parts & Accessories Model Shown: Hudson (FL003-A8BN) You may need the following tools/materials Valve Hoses (included) Pliers Screw Driver Silicone 8 Wrench Plumbers Tape
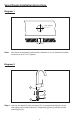
Vessel Faucet Installation Instructions Diagram 1 1.25” (30mm) 1.5” (38mm) Note: Your faucet is designed for a hole with a diameter of 1 1/4” (30mm) and a deck thickness of up to 1 1/2” (38mm). Diagram 2 2 1 3 4 5 Step 1: Unscrew the shank (1) from the faucet (if it is connected) and place it to the side, along with the faucet base (2), if applicable, gasket (3), washer (4) and mounting nut (5).
Vessel Faucet Installation Instructions Diagram 3 1 2 Step 2: Attach both water hoses to the faucet by screwing them into the two internal ports located inside the base of the faucet. The red/blue indicator on the side of the handle illustrates the hot water hose (red - 1) is attached to the left port while the cold water hose (blue -2) is attached to the right port. Diagram 4 2 1 Step 3: Attach the shank (1) and base (2) and proceed to install the faucet through the deck mounting hole.
Vessel Faucet Installation Instructions Diagram 5 1 2 3 Step 5: Install the rubber gasket (1), washer (2) and the mounting nut (3) onto the faucet shank. Tighten the screws on the mounting nut to secure the mounting nut and the faucet in place. Be sure the large side of the mounting nut is facing up and the screws are pointing upward. Diagram 6 Step 6: plumbing pipes. This debris can damage the internal faucet surfaces which can cause leakage.
Vessel Faucet Installation Instructions Diagram 7 Step 7: Connect both water hoses onto the respective water valves (we recommend using plumbers tape to prevent leakage). Turn on the water valves. Diagram 8 Step 8: seconds. Evaluate all connections for leakage. After this process is complete, you may proceed to use your new faucet.
Manufacturer Limited Warranty All Dyconn Faucet products are manufactured and tested with the highest quality standards and rigorous quality control process. This warranty is limited to the non-commercial use of Dyconn Faucet products purchased and installed in the United States and Canada.