Single Leg Free Standing Tub Filler Faucet Manual
Notes before installation: 1. Please check that all components are present. 2. Before installation ensure that all feed lines are clear of debris and on/off valve is present. 3. Ensure water pressure is between 20-125 PSI (Includes combination of hot and cold feed lines). 4. Pictures in the manual are general in content and may not represent exactly your purchased faucet. If you are having difficulties please contact a professional plumber. 5.
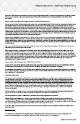
/2” 5-3/4” NP T1 3-7/8” ” 1-7/8” /10 5-9 /8” 6-5 Daily Maintenance 1. Use a soft cloth and vinegar to remove hard-water spots. 2. Check aerator (if present) regularly for calcium build up when water stream is not optimal. 3. DO NOT use corrosive cleaning products as the use will break down finish and will void the product warranty 4. Acceptable cleaners include vinegar or mild non-abrasive liquid detergents. 5.
Conceal Box Installation Steps Set the conceal box onto the subfloor (Do not install onto tile) and measure with the level provided. Check the level and make sure it is perfectly level with the ground. Then screw the conceal box on the ground. Note: N-box in-floor depth:D≤1.8” Adjust level by gradiometer. Fix by M6 expansion screw. After water pressure leakage testing, if no leakage, cement and pave tiles.
6. Connect water lines to faucet body using 8mm hex key. Attach red line to red port and blue line to blue port.
1a. 1b. Connect one end of the hose with the main body, and connect the other end with the hand shower. If necessary, use teflon tape.