User Guide Rhino ™ 4200
Copyright © 2012 Sanford, L.P. All rights reserved. No part of this document or the software may be reproduced or transmitted in any form or by any means or translated into another language without the prior written consent of Sanford, L.P. Trademarks DYMO and RHINO are registered marks in the US and other countries. All other trademarks are the property of their respective holders.
Contents About Your New Printer . . . . . . . . . . . . . . . . . . . . . . . . . . . . . . . . . . . . . . . . . . . . . . . . . . . . . . . . . . . 6 Warranty Registration . . . . . . . . . . . . . . . . . . . . . . . . . . . . . . . . . . . . . . . . . . . . . . . . . . . . . . . . . . . . . . . . . . . . . . . . . . . 6 Getting Started . . . . . . . . . . . . . . . . . . . . . . . . . . . . . . . . . . . . . . . . . . . . . . . . . . . . . . . . . . . . . . . . . . 6 Connecting the Power . . . . . . .
Deleting a Term from the Library . . . . . . . . . . . . . . . . . . . . . . . . . . . . . . . . . . . . . . . . . . . . . . . . . . . . . . . . . . . . . . . . . . 14 Using My Labels . . . . . . . . . . . . . . . . . . . . . . . . . . . . . . . . . . . . . . . . . . . . . . . . . . . . . . . . . . . . . . . . . . . . . . . . . . . . . . . . . . 14 Saving Labels . . . . . . . . . . . . . . . . . . . . . . . . . . . . . . . . . . . . . . . . . . . . . . . . . . . . . . . . . . . . . . . . . . . . . . . . . .
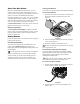
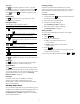
1 2 3 4 23 5 22 21 6 20 7 19 8 18 9 17 10 16 11 15 12 14 13 Figure 1 RHINO 4200 Label Printer 1 Power connector 9 Return 17 Space bar 2 Label exit slot 10 Favorites 18 Alt 3 LCD Display 11 Add/Remove 19 Hot Keys 4 Cutter button 12 Custom/Settings 20 Clear 5 Print 13 Serial/Feed 21 Escape 6 OK 14 Library/Save 22 Power 7 Navigation 15 Size/Styles 23 Backlight 8 Backspace 16 Caps 5
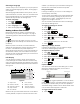
About Your New Printer Inserting the Batteries With your new RHINO 4200 label printer, you can create a wide variety of high-quality labels. You can choose to print your labels in many different sizes and styles. The printer uses RHINO Industrial label cartridges in widths of 1/4”, 3/8”, 1/2”, or 3/4”. RHINO label cartridges are also available in a wide range of materials, such as flexible nylon, permanent polyester, vinyl, non-adhesive tag, and heat shrink tubes.
To insert the label cartridge Inserting the Optional Battery Pack The printer can operate using an optional rechargeable, Lithium-ion battery pack (DYMO Li-ion Battery 7.4V 1400mAh). 1 Gently lift the label cartridge door on the back of the printer. 2 Make sure the label and ribbon are taut across the Make sure the power adapter is disconnected before handling the Lithium-ion battery pack. mouth of the cartridge and that the label passes between the label guides.
Selecting a Language shaded. If you attempt to print the label containing text that will not fit, the excess text will not be printed. The first time you turn on the power, you are prompted to select your desired language. By default, the language is set to English. Using the Backlight In low light conditions, you can turn on the backlight to see the display more easily.
ALT Key Creating a Label The key is used to select the function or symbol printed above a key. For example, when you press , the number 9 appears in the display; however, if you press and then , an asterisk (*) appears in the display. The printer remembers the last label that you were working on when the power was turned off. You need to clear that label text and formatting before you create a new label.
Removing a Label Changing the Text Style You can remove a label from the current group. You can print the text on your label in several styles: bold, italic, underlined, boxed, and narrow. The text style selected applies to all the text on all the labels in a group of labels, including most symbols. To remove a label 1 Press + . 2 Select one of the following: To set the text style • All to remove all of the labels in the group. 1 Press • Current to remove the label at the current cursor position.
Creating Multi-Line Labels Creating Wire/Cable Labels You can print a maximum of five lines on a label. A wire/cable label is placed around a wire or cable. The label text is repeated as many times as possible depending on the size of the text and the width or length of the label. The number of lines you can print on a label depends on the label width you have selected.
Creating Breaker Labels 6 Press Each module is separated by a line in the display. A breaker label is a multi-cell label used to label a row of breakers. You select the breaker height and number of breakers, enter the text for each breaker, and print. The result is a long label with a text for each breaker. 7 Enter the text for each module. Press to module. . 2 Select the breaker height and press Changing the Label Type 3 Select the number of breakers and press .
Changing Custom Defaults To add a barcode 1 Do one of the following: • To add a Code 39 barcode, press You can change the custom default settings for a label type at any time. . You can also choose to create a label using settings that are different from the custom default settings without changing the custom default settings. • To add a Code 128 barcode, press + . 2 Enter the text for the barcode within the barcode on the display and press To change custom defaults .
To add a term to the library 4 Select the amount you want to increment the character and press . 1 Enter text to save to the library. You can choose to increment in steps up to 10. If your label contains a barcode, place the cursor within the text you want to save. 5 Select the number of times to increment and press . 2 Press New labels are added in the display as needed to complete the series. + . 3 Select Term and press .
Recalling Labels Deleting Items from the Favorites list Once a label is saved to the library, you can recall the label to print or edit. Recalling a label replaces the current label in the display. When you no longer need an item in the Favorites list, you can delete the item from the Favorites list. To delete an item from the Favorites list To recall a label 1 Press 1 Press . 2 Select the symbol, term, or label to delete and 2 Select My Labels and press .
Cleaning Your Printer To print and collate multiple copies 1 Press + . Your printer is designed to give you long and trouble-free service, while requiring very little maintenance. 2 Select the number of copies of the group of labels to print and press . 3 Select All to print all of labels in the group. Clean your printer from time to time to keep it working properly. 4 Press To clean the cutter blade . 5 Select one of the following: 1 Remove the label cassette. • Yes to print collated.
Symbols The following tables show the commonly used symbols by category. Arrows and Brackets Currency $ ¢ £ ¥ € ( ) [ ] { } Electrical ΩØ ² ° μ λ Hazard and Warning Pro AV and Security Numbers .
Terms The following lists the commonly used terms by category.
Troubleshooting Review the following possible solutions if you encounter a problem while using your printer. Problem/Error Message Solution Battery Discharged Attach the power adapter. Recharge the battery pack. See Recharging the Battery Pack. Insert new AA alkaline batteries. Poor print quality Clean the print head. See Cleaning Your Printer. Adjust the print contrast. See Adjusting the Print Contrast. Check battery level; power may be low. Label Jam Motor is stalled due to label jam.
Documentation Feedback We are constantly working to produce the highest quality documentation for our products. We welcome your feedback. Send us your comments or suggestions about our user guides.
Environmental Information The equipment that you have bought requires the extraction and use of natural resources for its production. It may contain substances that are hazardous to health and the environment. In order to avoid the dissemination of those substances in our environment, and to diminish the pressure on natural resources, we encourage you to use the appropriate take-back systems.