
Owners manual


16
XTL
®
300
User Guide
To create a patch panel label manually
1 From the Home screen, select Patch Panel.
2 Follow the steps to configure your label.
3 Add text and formatting.
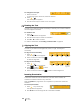
Flag Label
The flag label is one of several cable management specific labels. The flag label
consists of two matching segments that when wrapped around a cable form a flag
allowing the user to see the same data from both sides.
One text object is automatically added to the label. You can add an image and
barcode object to a flag label.
Text size and style apply to all the text on a single line. You can apply different text
sizes and styles to each line of text on the label.
Use serialization to automatically create a series of labels. See Creating a Series
of Labels on page 29.
Flag labels can be printed on any type of continuous labels. A vertical dashed line
will be printed in the center of the wrap part of the label to help you easily center
the label on the cable.
The label properties you can set are:
To create a flag label
1 From the Home screen, select Flag.
2 Do one of the following:
• Select the cable type.
• Select Custom and then select the cable diameter.
3 Follow the steps to configure your label.
4 Add text and formatting.
Laminated Cable Wrap Label
The laminated cable wrap label is one of several cable management specific
labels. This label contains two segments: a segment for the label content and an
adhesive-backed, transparent segment that wraps around the cable covering the
printed content for durability.
One text object is automatically added to the label. You can add an image and a
barcode object to a laminated cable wrap label.
Cable type and
diameter
Cable type: CAT 5/6, COAX, AWG: 4/0 - 2/0, AWG: 0 - 2, AWG: 3 - 5,
AWG: 6+, or Custom
Diameter: Available when Custom is selected for Cable type.
Minimum: 5/32” (4 mm)
Maximum: 2” (50.8 mm)
Flag length Minimum: 7/16” (11.1 mm)
Maximum: 10” (254 mm)
Label outline Yes - Show label outline.
No - Hide label outline. (Default)