
Owners manual


3
XTL
®
300
User Guide
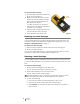
To remove the battery
1 Press and hold for approximately five
seconds to turn the power completely off.
2 Disconnect the power adapter and USB
cable.
3 Using a #1 Phillips head screwdriver,
loosen the screw holding the battery cover
in place. See Figure 4.
The screw is attached to the battery cover.
Do not remove the screw completely from
the cover.
4 Lift off the cover.
5 Remove the battery from the battery compartment using two fingers to lift the
battery from the top edge.
6 Insert the new battery.
7 Replace the cover over the battery compartment.
8 Tighten the screw only until the battery cover is secure.
Make sure to read the LiPo Safety Precautions found on page 51.
About Labels
The label maker uses DYMO XTL
™
label cartridges in label widths of 1/4”, 3/8”,
1/2”, 3/4”, or 1” (6 mm, 9 mm, 12 mm, 19 mm, or 24 mm). Labels are available as
continuous tape or pre-sized labels for specific applications.
The label cartridge that is inserted in the label maker determines the type of labels
you can create and print. For example, if you have a 1” continuous label cartridge
inserted, you will not be able to create a heat-shrink tube or laminated cable wrap
label.
See Using the Label Applications on page 13 for information about the types of
labels you can use with each label application.
Visit www.dymo.com for information on obtaining labels for your label maker.
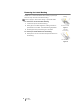
Inserting the Label Cartridge
A sensitive electronic chip is embedded in the
side of each label cartridge. This chip contains
information that is read by the label maker and
DYMO ID
™
software. This chip must be kept
clean to function properly.
Do not touch the electronic chip in the side of
the label cartridge; oils from your hand may
prevent the chip from working properly. See
Figure 5.
Figure 4
Figure 5
Do not
touch!
Ribbon
rewind
Label
guides